
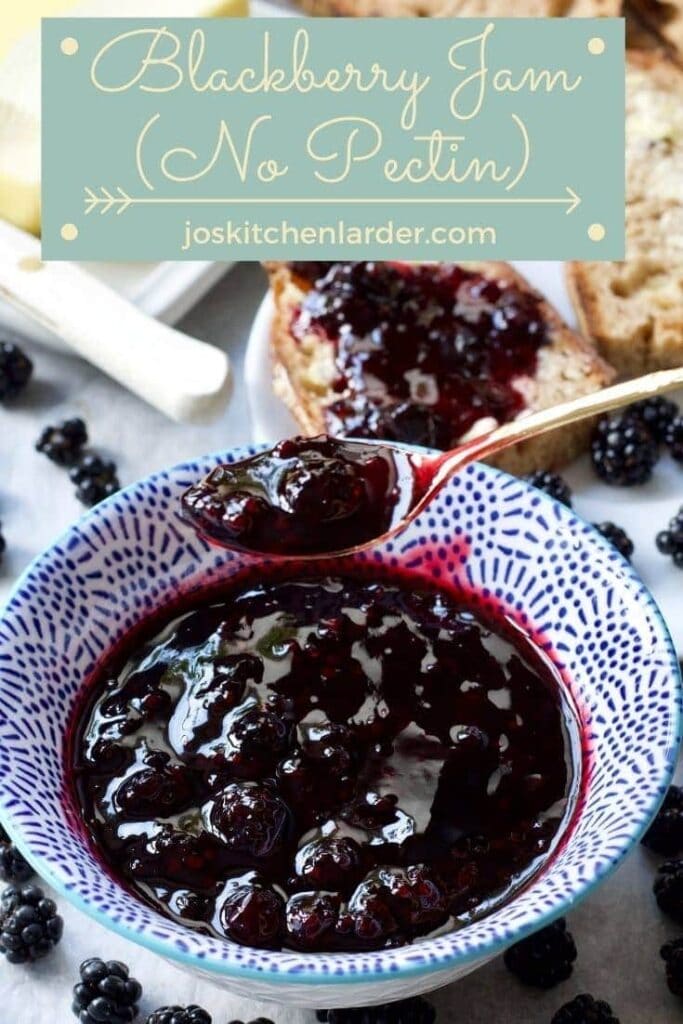
Preserve the Summer in the form of delicious blackberry jam to enjoy on toast, pancakes, in porridge & more. Quick and easy, small batch & no pectin recipe that is perfect for using up those foraged berries!
How to use foraged blackberries?
This is the question I had to ask myself the other day when hubby and the kids arrived home from their bike ride with two containers full of these delicious berries.
With hedgerows bursting full of blackberries, It would be such a waste not to put these to a good use. You could make cakes, crumbles, muffins or even my delicious blackberry vinegar but I decided on this really quick and easy, blackberry jam recipe. You can of course use shop bought blackberries here instead.
Standard recipe for any fruit jam includes same amount of fruit and sugar. On this occasion I decided to follow this ratio exactly.
If you're into foraging, check out my recipes for delicious Homemade Elderflower Cordial (early summer) and Elderberry Syrup (late summer/early autumn). One tree, two different recipes to be enjoyed at different times of year.
Homemade preserves
I don't know about you but I love having a little stash of homemade preserves, spreads and sauces that I can turn to when the need strikes.
Orange marmalade I've made earlier this year was one of my proudest preserving moments. It gave me that extra boost of confidence in my jamming abilities. And trust me, this blackberry jam is a real doddle in comparison (as is my Easy Plum Jam in case you'd like to give it a go.)
Equipment you might find useful for jam making
Large pan or preserving pan – I must say I still do not own a preserving pan* and have used my old trusty stock pot* for making my blackberry jam. Make sure the pot you use is nice and big (at least 5 litres).
Jam Thermometer* – Super simple gadget for jam makers who don't want a fuss that comes with freezing saucers and the "wrinkle test". Try this digital option* if old fashioned thermometer is not your thing.
Jam Funnel* - Something I still don't own that is highly recommend by seasoned preserve makers as it allows for much cleaner transfer of your jam from pan to jars.
Wooden Spoon* - Long, wooden spoon is perfect for stirring.
Small saucers/plates - Invaluable litter helpers (if you don't own jam thermometer). Needed for "wrinkle test" (checking whether your jam has reached its setting point).
Jam Jars* - Before you buy, I would wholeheartedly encourage you to reuse what you've already got at home. You will be surprised how many jars waiting to be repurposed are already lurking in your cupboards.
Helpful tips for Blackberry Jam making
Don't fear jam making. There really isn't much that can go wrong. Follow this simple recipe, trust your gut & common sense and enjoy the process. You will be hooked!
Sterilise your jars. If your intention is to keep your blackberry jam for some time then your jars need to be sterilised.
To do this, simply wash them (together with lids) in hot soapy water and dry stood up on a clean baking tray in the oven preheated to 150°C/300F for 10-15 min. The jars should be straight from the oven when you pour in your hot jam.
Alternatively, pop them on a hot dishwasher cycle. Make sure you time it right so that they’re ready at the same time as your jam.
Sort your blackberries - You want to discard the mushy ones that are past their best. Do it as you wash them to get rid of dust and little bugs. Make sure to drain and gently dry them afterwards.
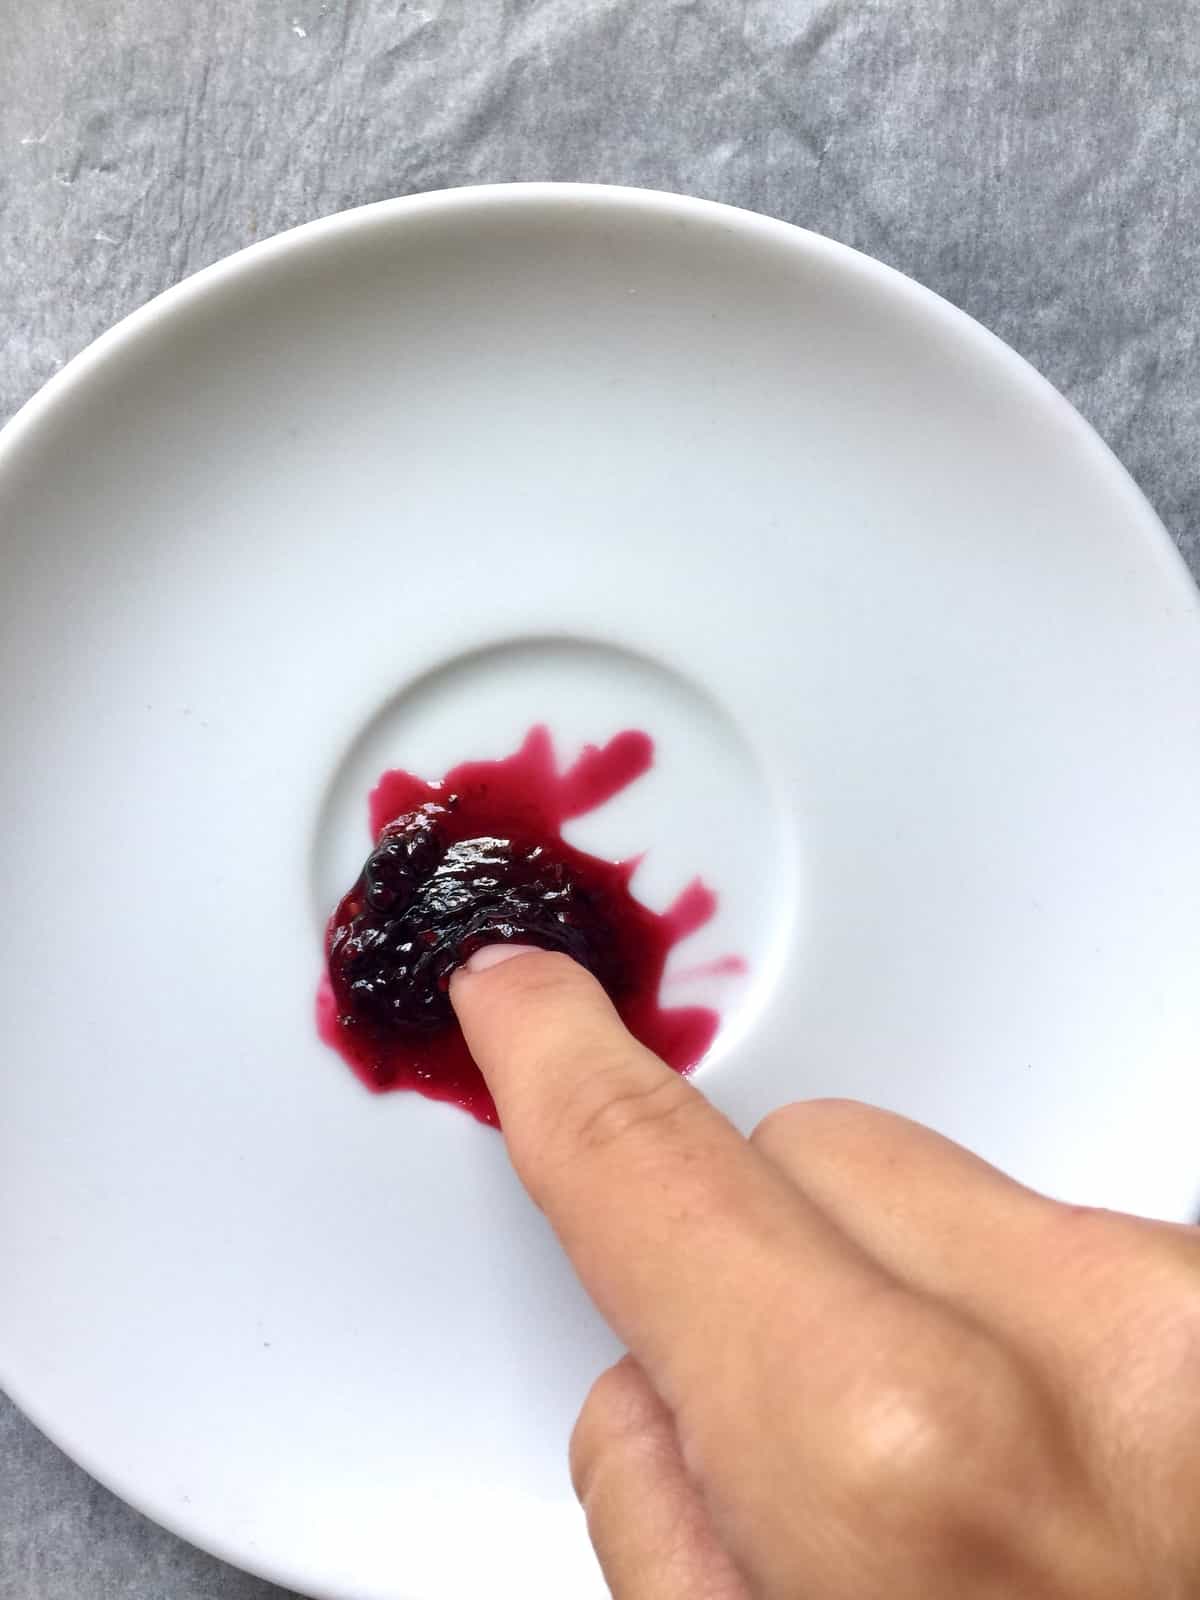
"Wrinkle Test" or "Cold Plate Test" - Wrinkle test is done using well chilled (out of the freezer) saucer/plate you spoon a dollop of jam on after it’s been on rolling boil for 15 minutes. Pop that plate in the fridge for a minute or two, take it out and push jam with your finger. If it “wrinkles”, it's ready. If it appears runny, continue boiling your jam for another 5 minutes and check again. Keep repeating until you get the set.
Jam setting point is 105C/221F so if you’ve got jam thermometer definitely use it. I would still do the “wrinkle test” just to double check.
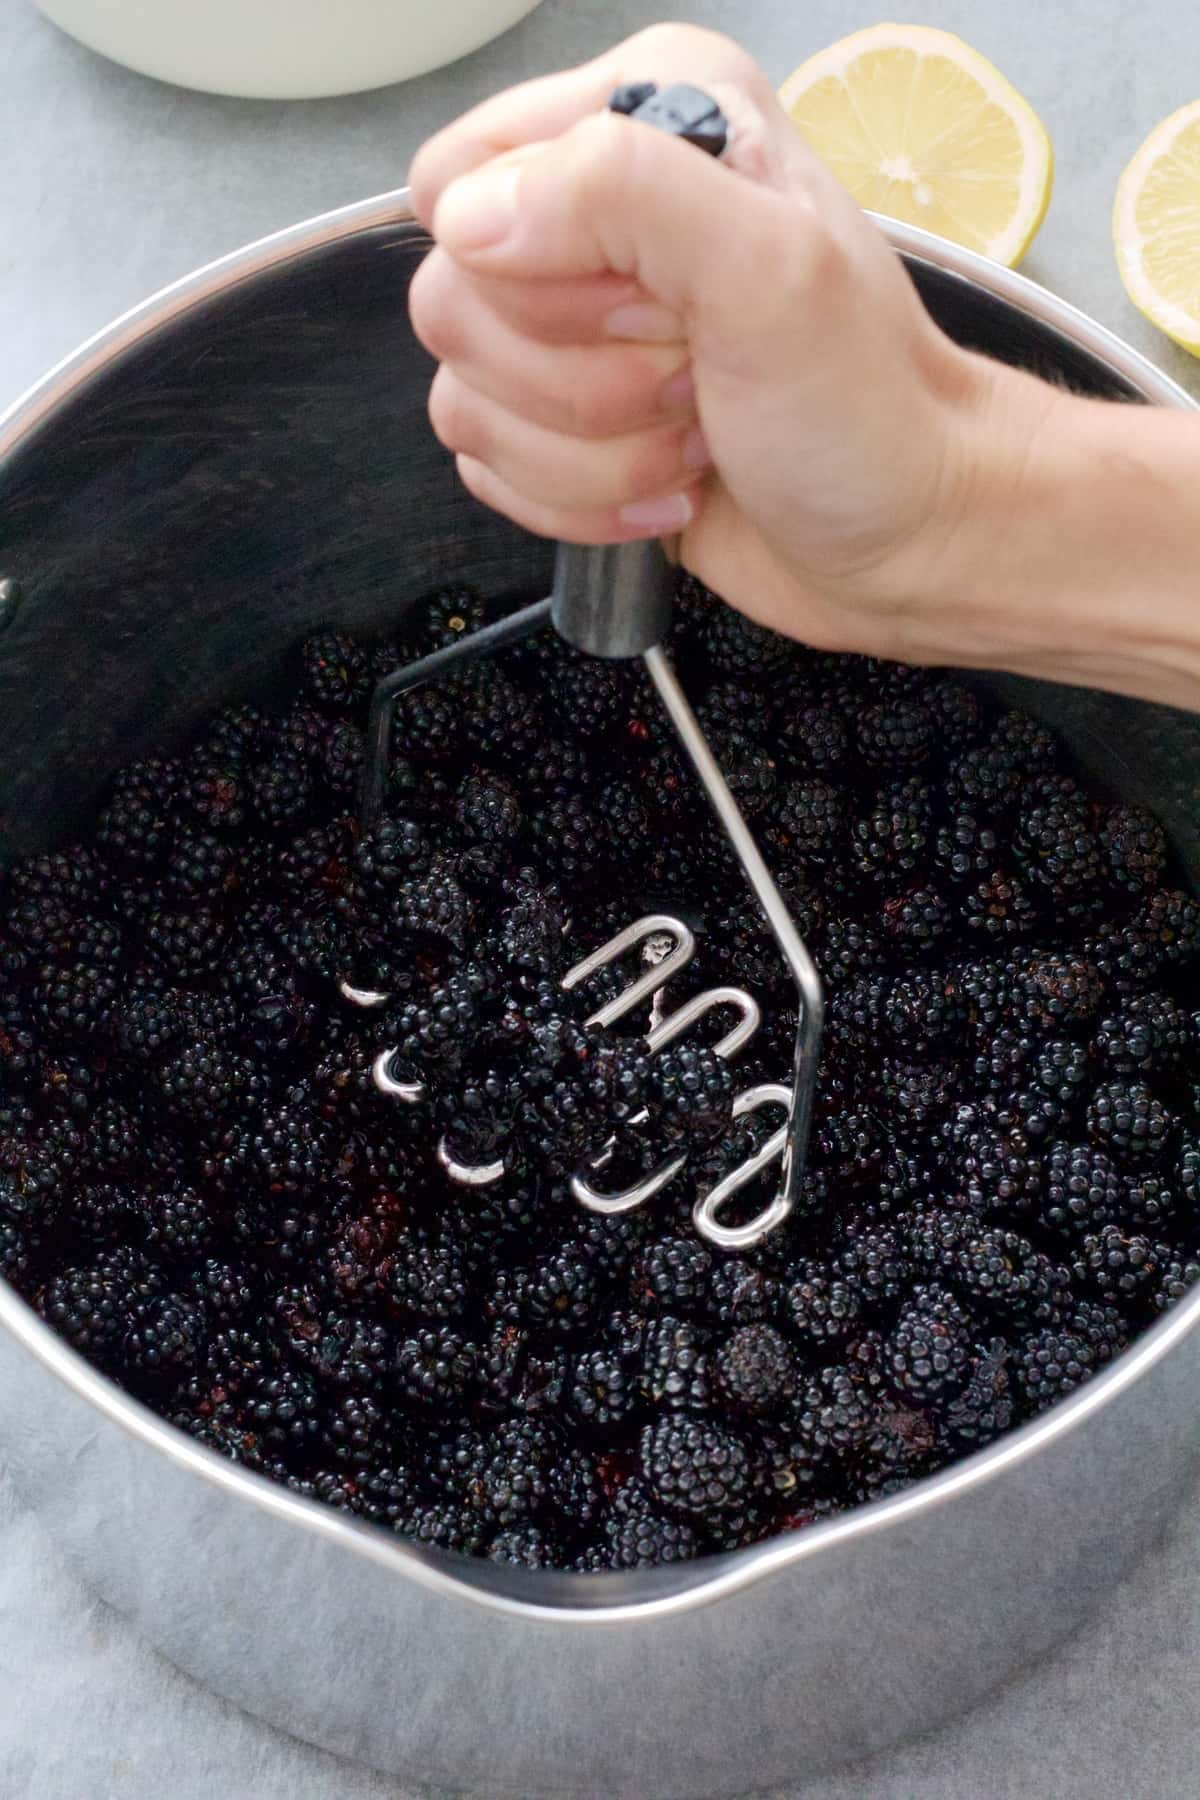
Mashing blackberries - This will only take you a minute or two but will help releasing juices from the fruit and make it cook quicker during the initial stage when you're dissolving your sugar.
Make sure your sugar is fully dissolved - This will prevent it from crystallising later as your jam cools down. Fine caster sugar or golden caster sugar will dissolve quicker although you can use granulated sugar here too.
If you've got any of your own tips you'd like to share here feel free to let me know and I shall add them to the list!
Jam with No Added Pectin
Blackberries are funny ones when it comes to pectin. Generally speaking, they don't have tons of it although wild blackberries and the ones that are unripe are richer in pectin than fully ripe or farmed ones.
To give blackberries helping hand and get your jam to set without using preserving sugar (the one with added pectin) we are using some lemon juice that will help our jam to set.
I have used the juice of one whole lemon which in this case equated to 4 tablespoons. As I had 800g blackberries I've used 1 tablespoon per 200g of fruit. That simple math might come handy in case you've got different amount of blackberries to process.
For some extra help, you could throw in few unripe blackberries which are full of natural pectin but that's not something I've tried yet.
Storing Blackberry Jam
As long as you keep your blackberry jam in well sterilised jars that created that vacuum effect (you hear a little click noise few moments after tightening your lid on a jar), it should last good few months, even up to a year.
Make sure to store it away from direct sunlight and in a cooler and (if possible) darker place. I keep mine at the back of one of my kitchen cupboards.
Once opened, make sure you keep your jam in the fridge and use within a month or so.
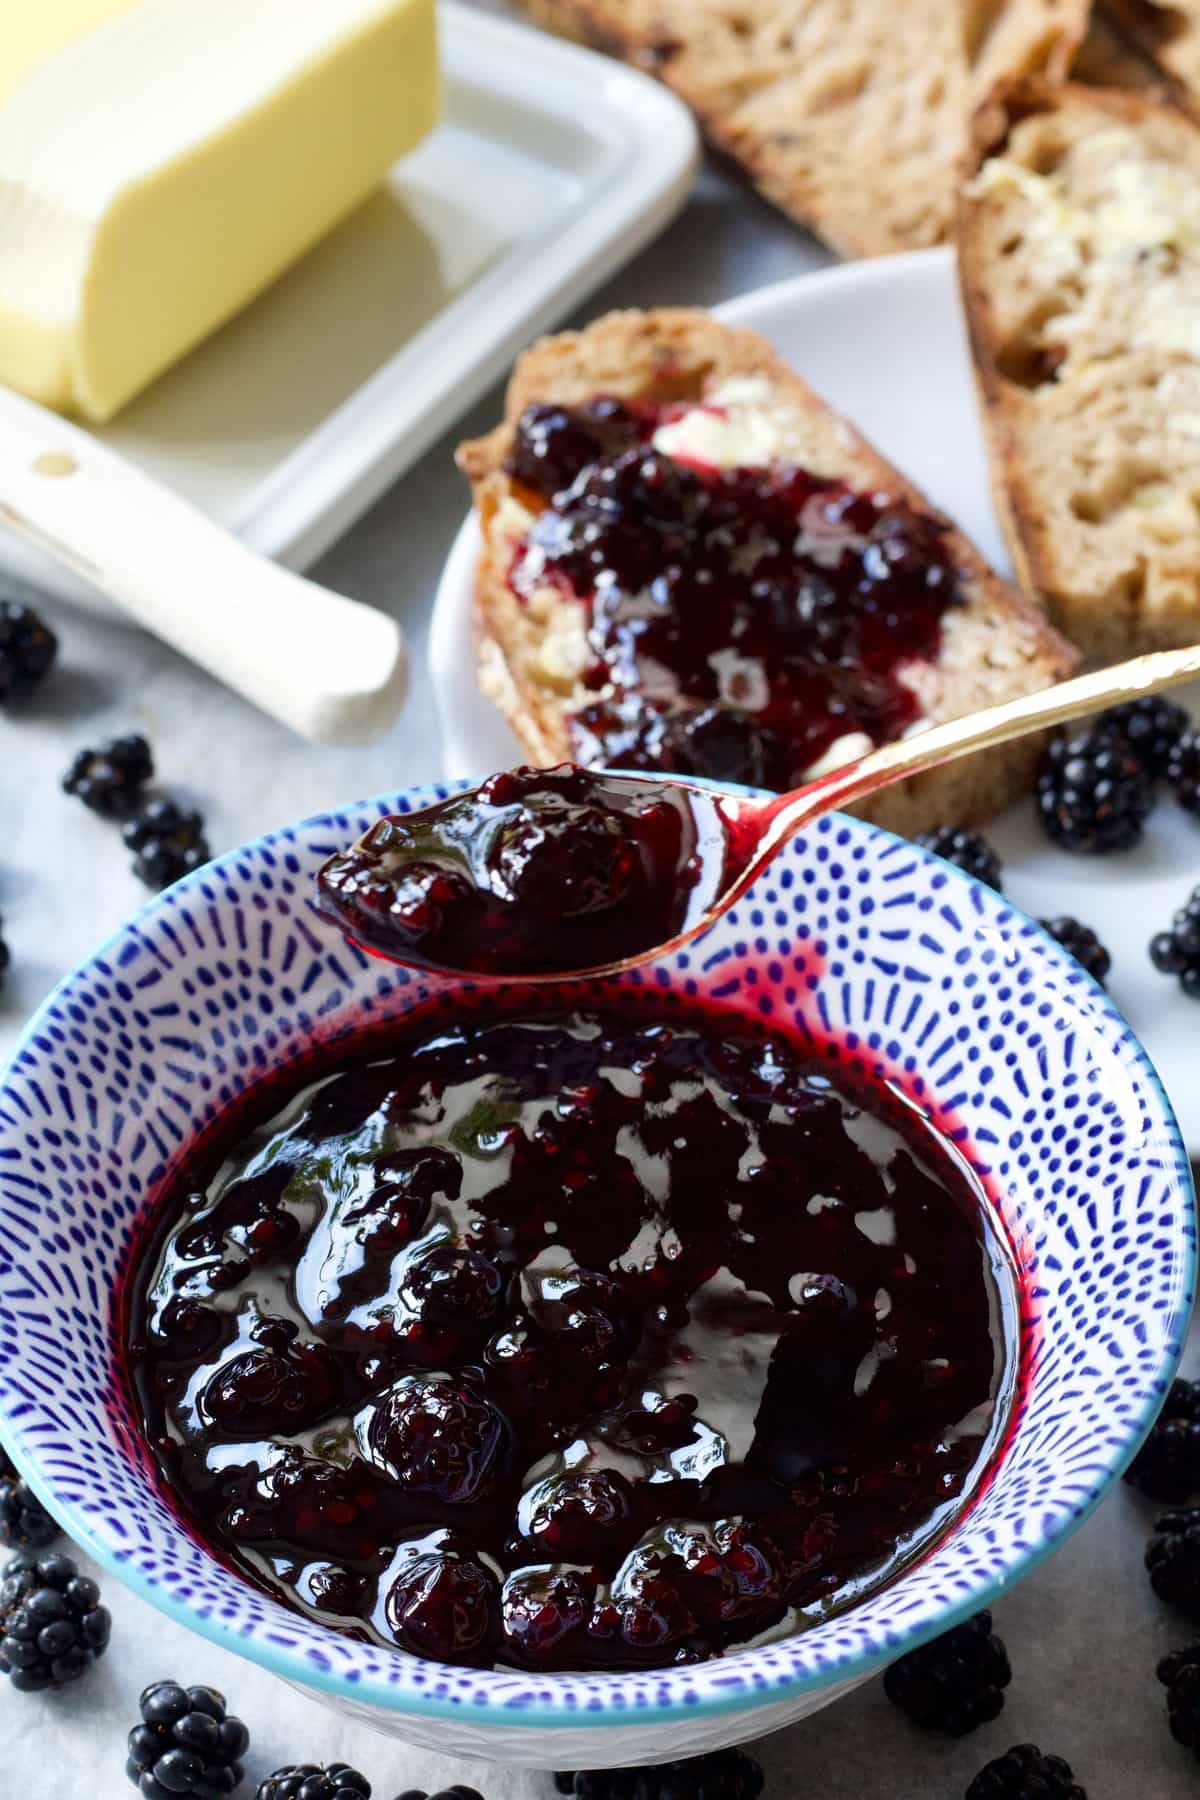
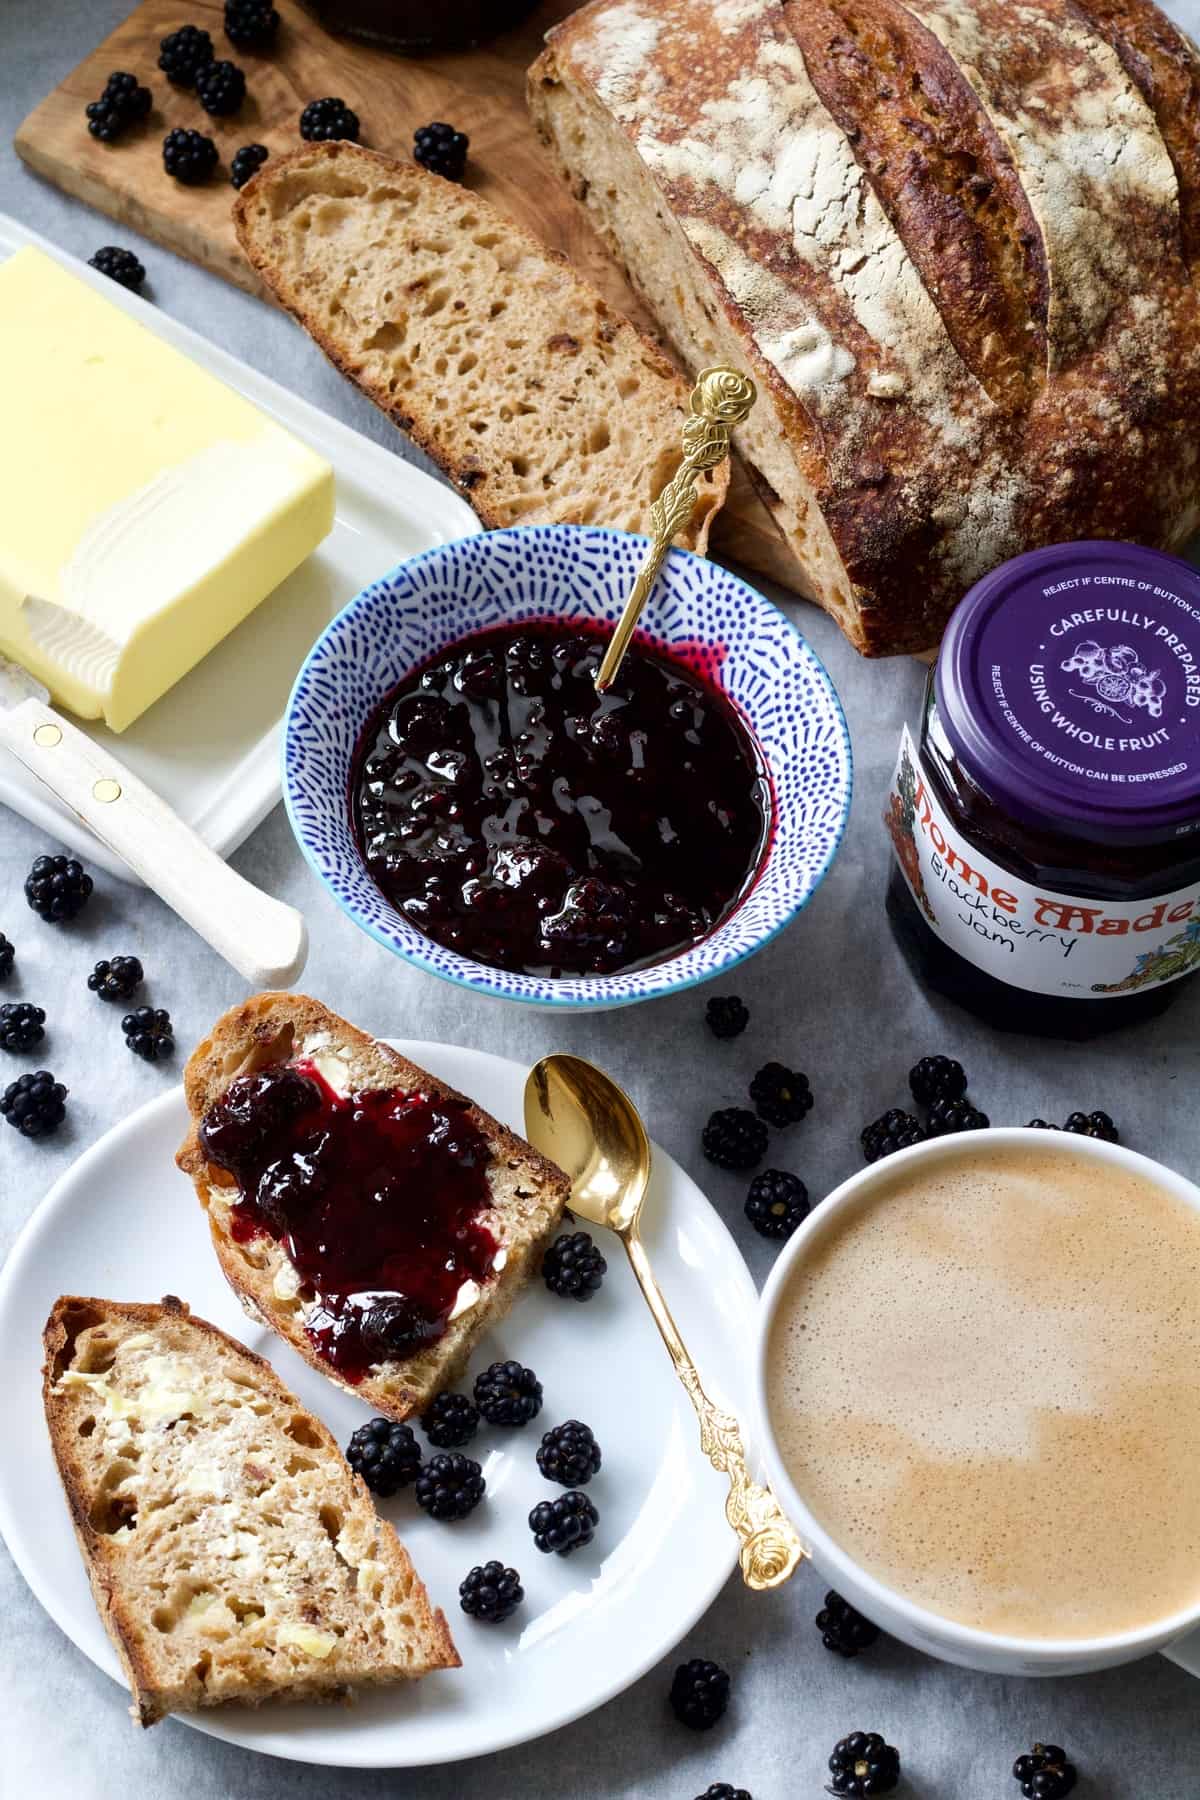
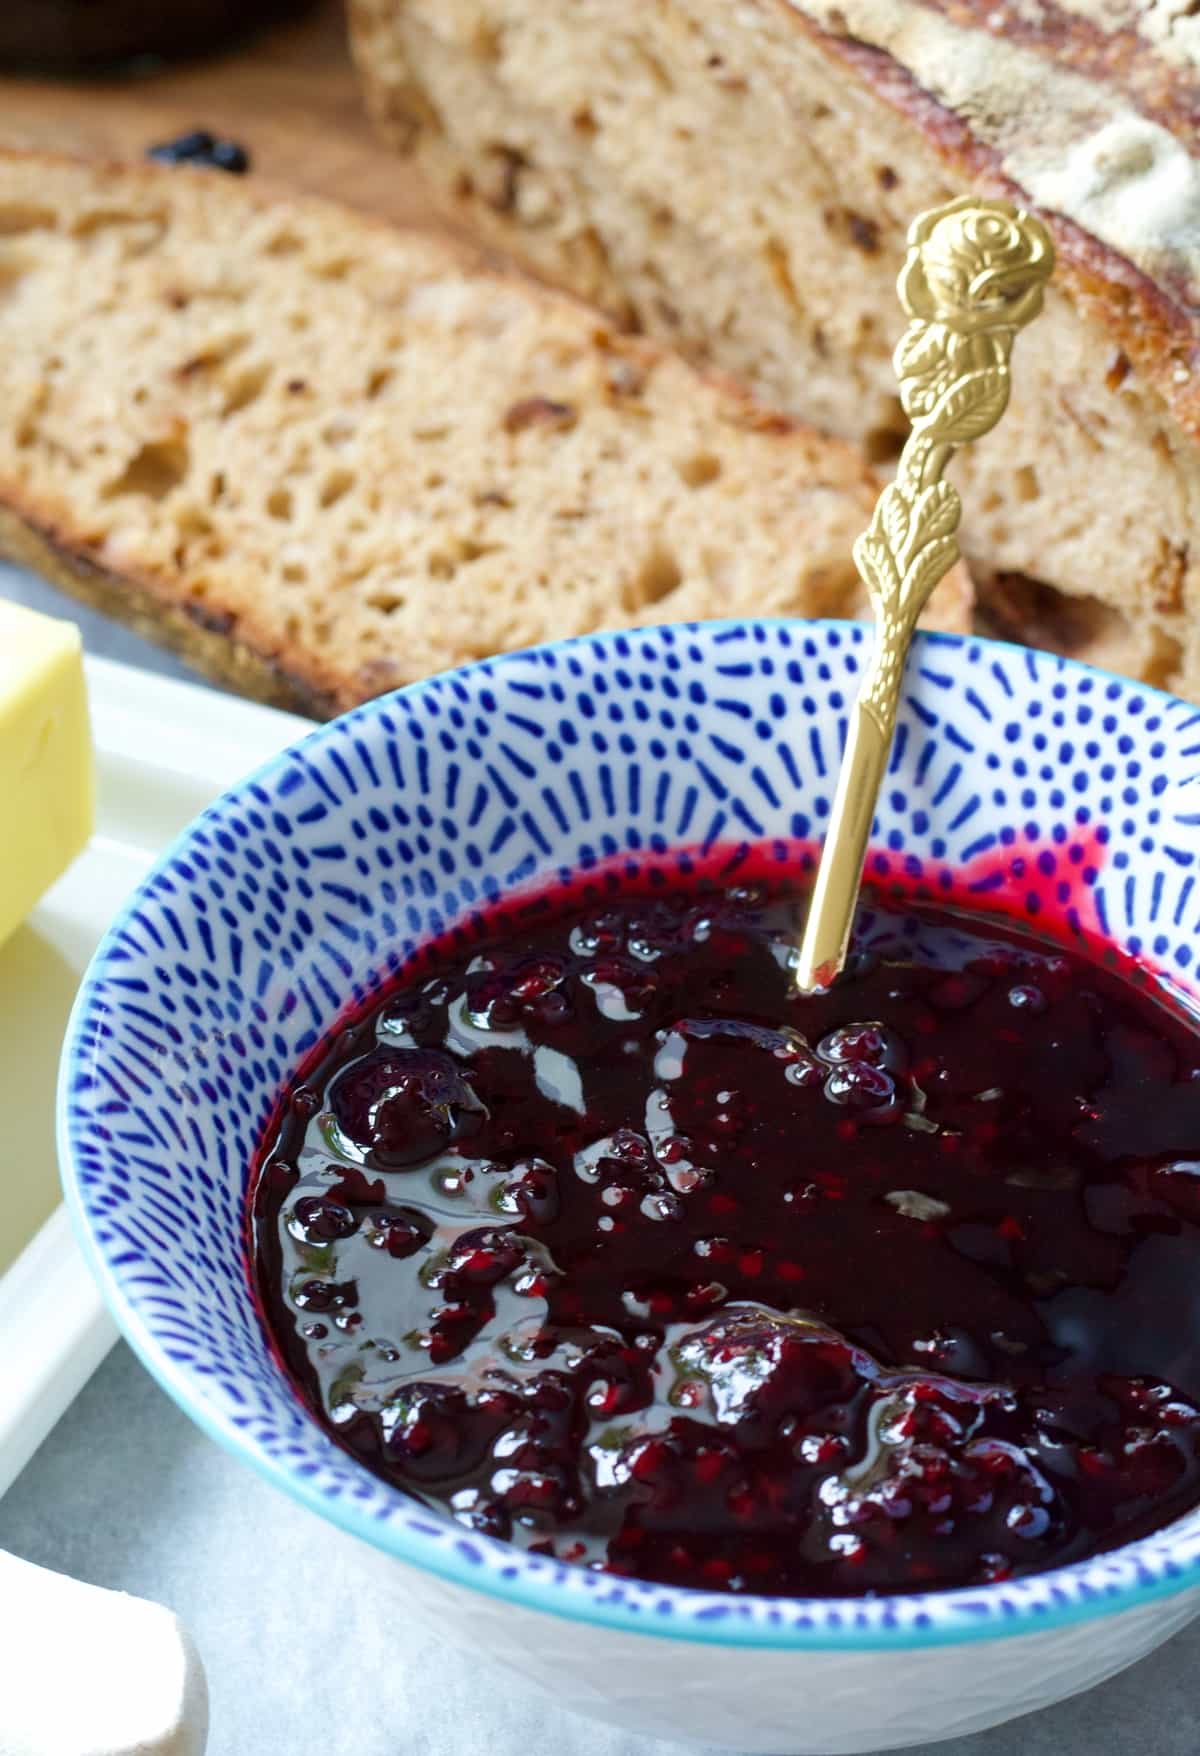
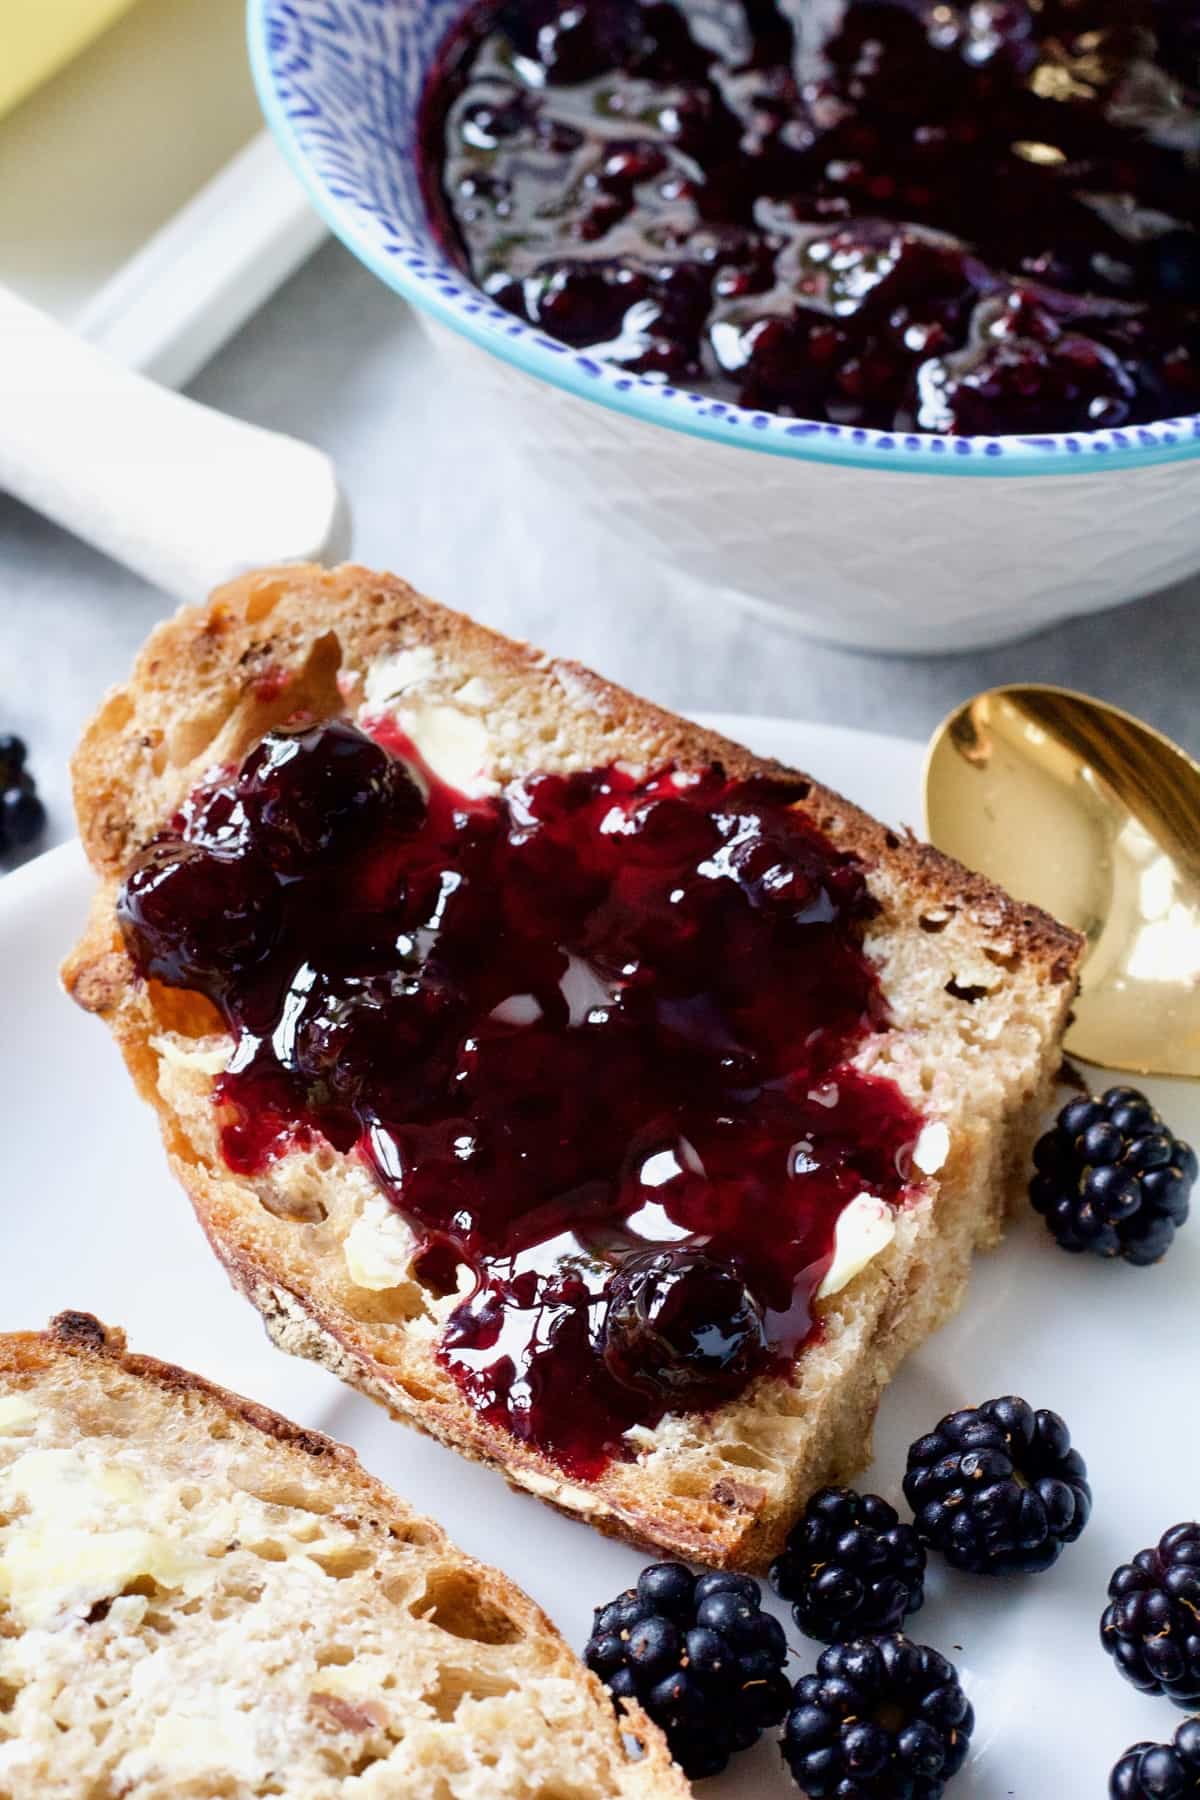
Blackberry Jam - Serving Suggestions
I'm sure you don't need me to tell you what to serve your jam with but I thought it could be useful to point you in a directions of few recipes on here that would be a perfect match for this lovely, homemade preserve.
- First this that spring to mind is of course is jam on toast! If you haven't tried my Easy Wholemeal Bread Recipe (No Knead) then you haven't lived, no really! It's delicious fresh but also makes a cracking toast and is simply made for this jam.
- In case you are more into no-yeast breads, then try spreading your blackberry preserve on my Irish Soda Bread with Yogurt or Vegan Soda Bread. Both are soo good!
- Who doesn't like fresh bread rolls? Try my Easy Bread Rolls recipe (vegan) or perhaps these enriched Yogurt Bread Rolls which are a dream. Both recipes are really simple to make too!
- Cinnamon and Raisin Bagels with peanut butter and blackberry jam. Do I need so say more?
- And how about crumpets?
- Moving on from bread and rolls and onto another breakfast favourite - pancakes! Try your blackberry jam with my vegan crepes or non-vegan classic pancakes recipe or as a topping for these delicious Vegan Buckwheat Pancakes, Fluffy Vegan Buttermilk Pancakes or Pumpkin Pancakes.
- No recipe for this suggestion but try swirling your blackberry jam through your morning porridge with some peanut or almond butter added for good measure too. Heaven!
How to make blackberry jam - step-by-step instructions
- Put 2 or 3 small plates/saucers in a freezer for "wrinkle (cold plate) test" (checking whether your jam has reached setting point).
- Wash and sort your blackberries, getting rid of any mushy ones or those that have seen better days.
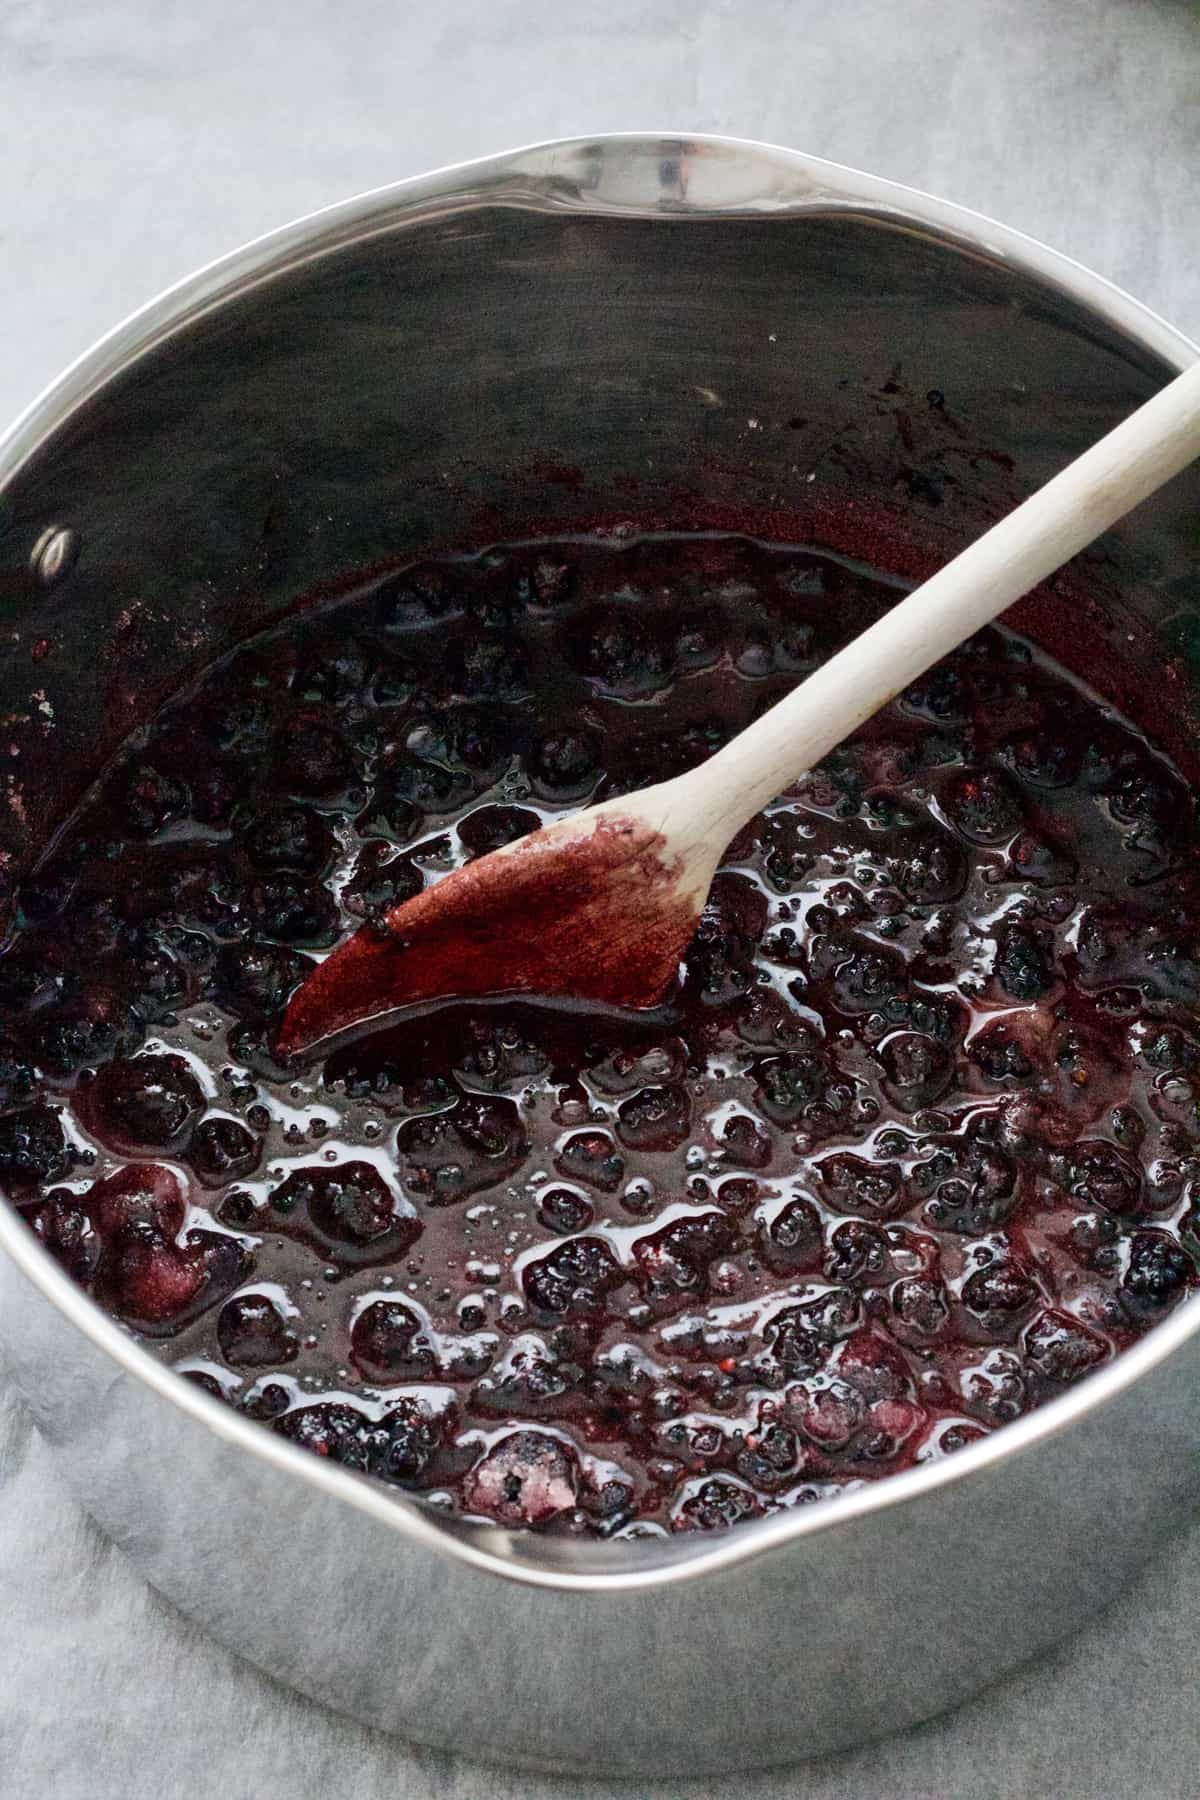
- Put blackberries in a large pan or preserving pan if you own one and mash them up a bit using simple potato masher. This will release the juices and make them cook quicker too.
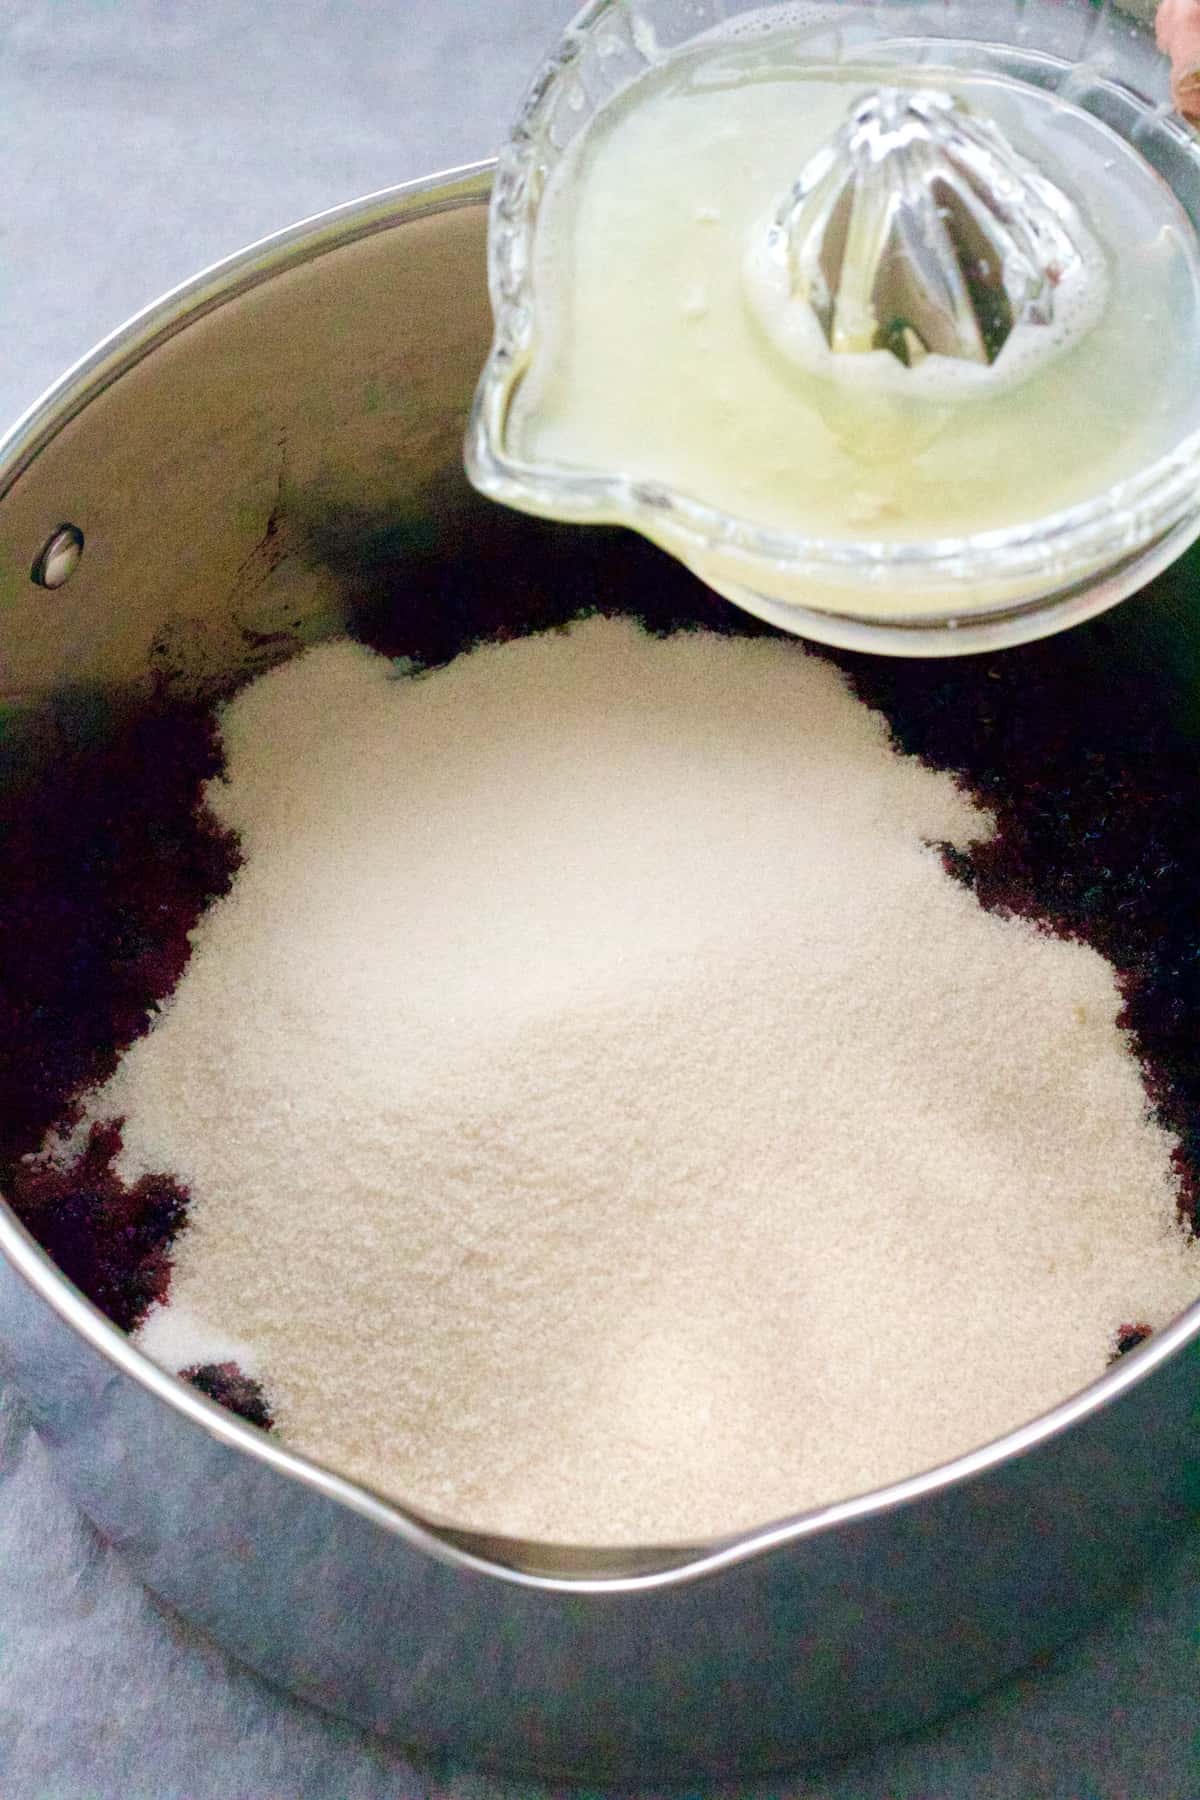
- Add sugar and lemon juice and give everything a good stir.
- Simmer blackberry jam mixture over low-medium heat stirring from time to time until all the sugar has dissolved. It took me approximately 10 minutes.
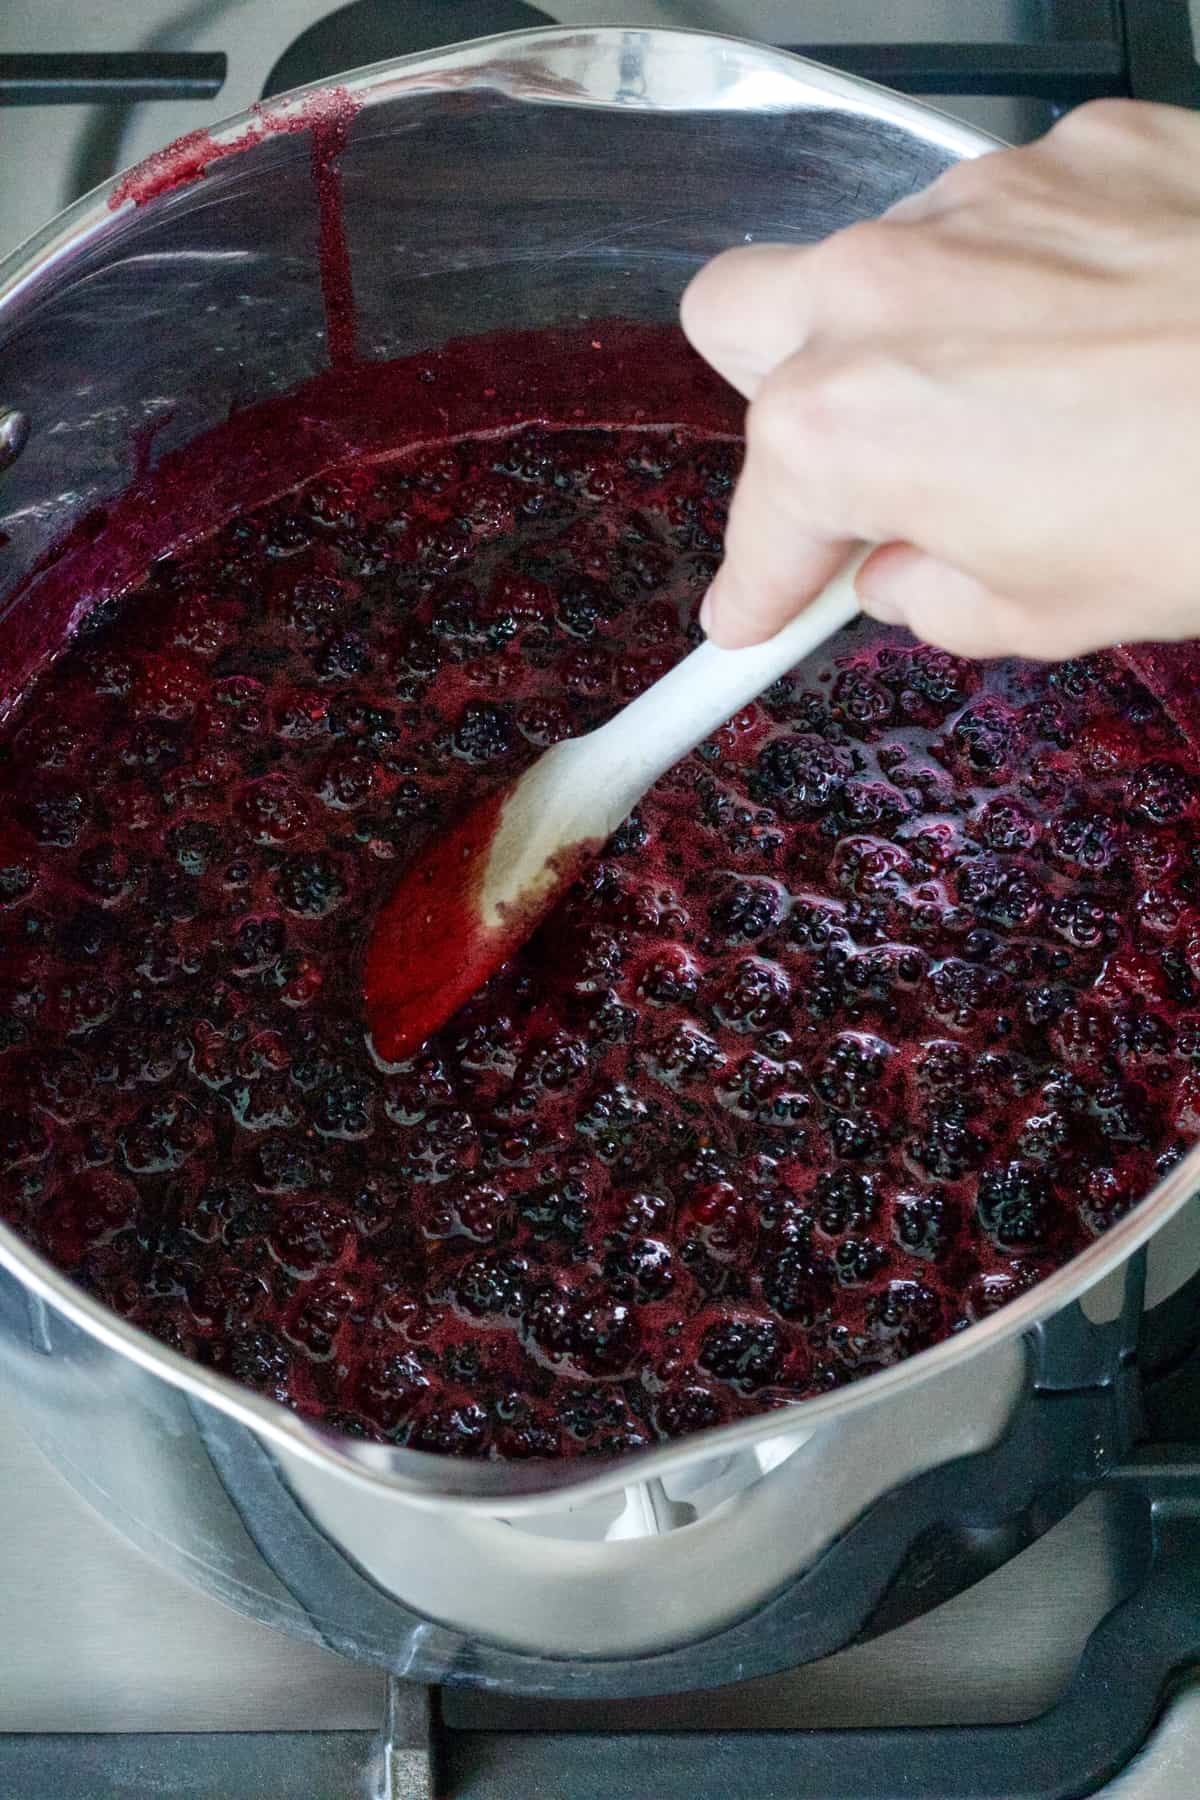
- Slowly bring your jam mixture to rolling boil for approx. 15 minutes.
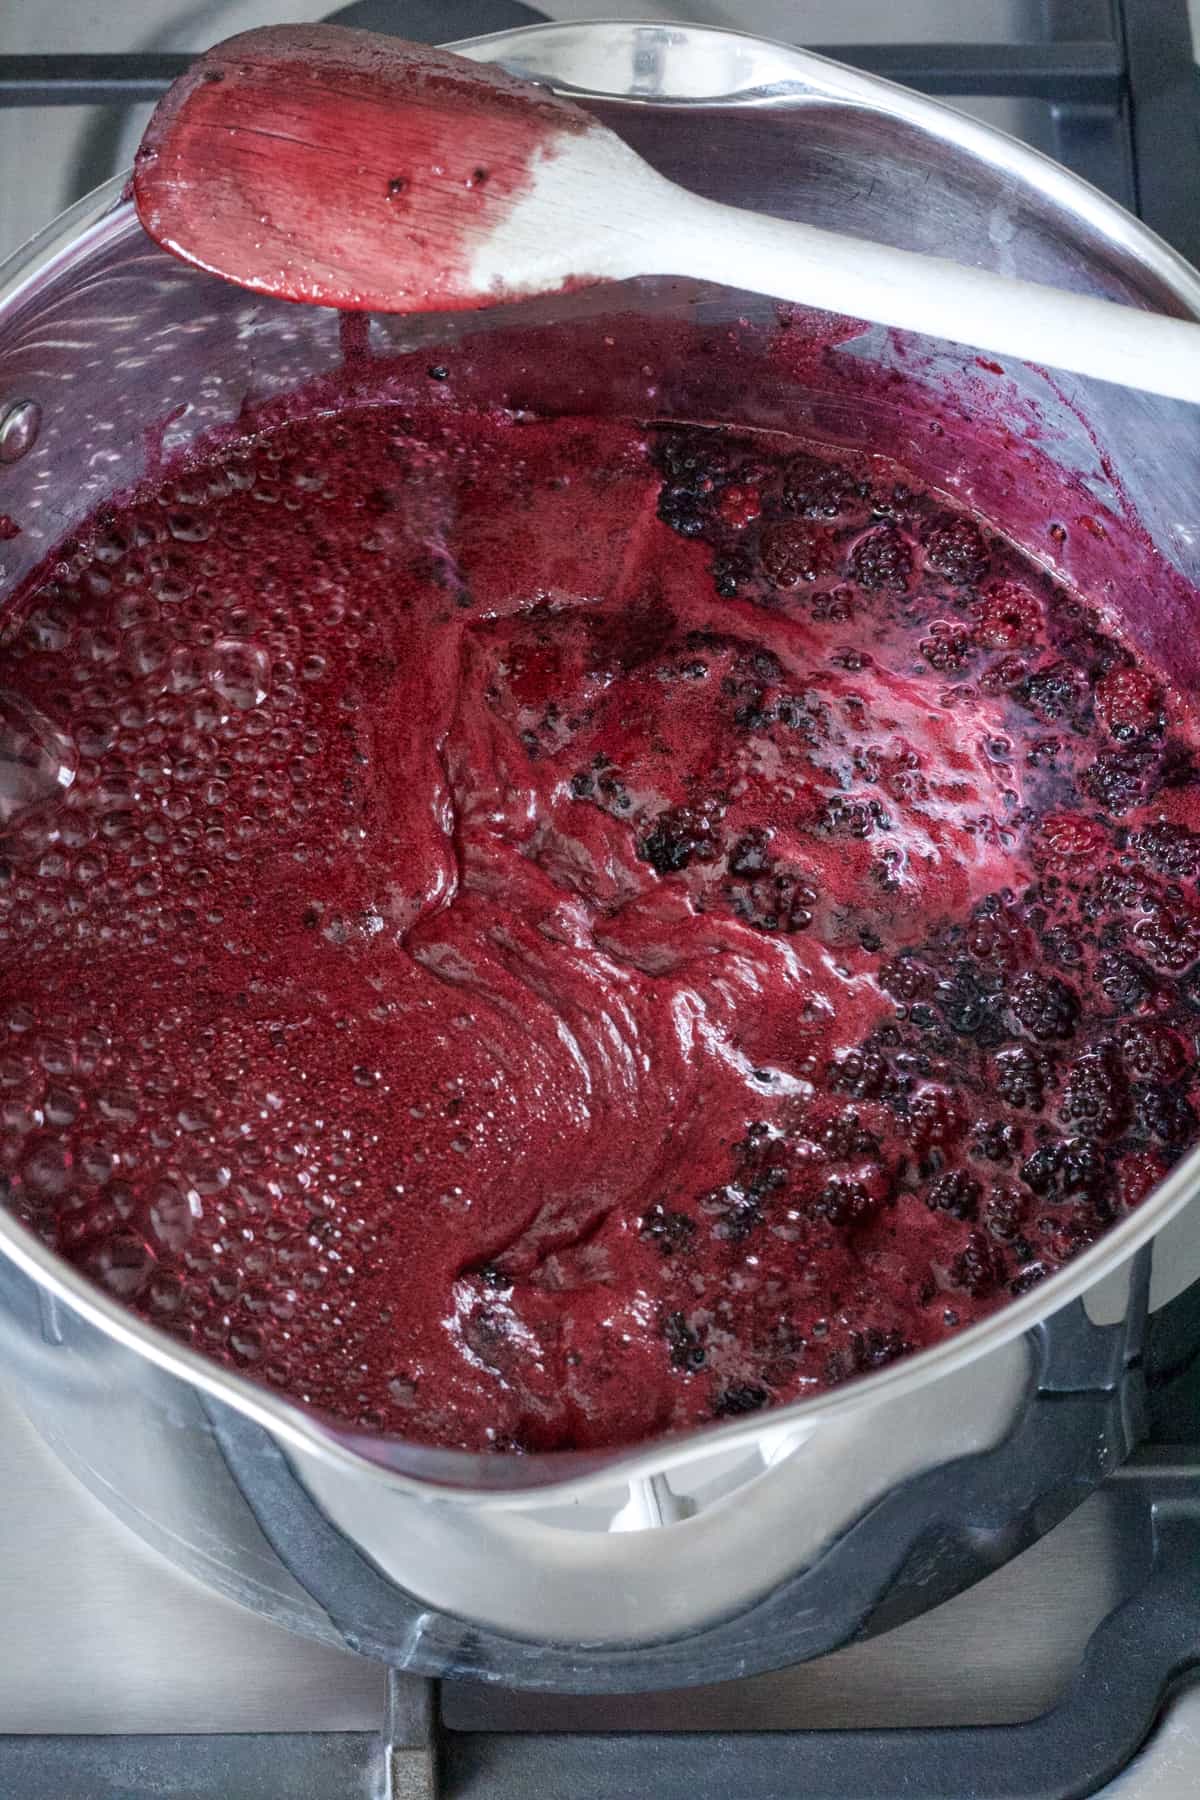
- When 15 minutes is up, take the pan off the heat and test if your jam has reached its setting point by placing a small amount of jam on the saucer straight out of the freezer. Put that plate to the fridge for 1-2 minutes, take it out and push the jam gently with your finger. If it wrinkles and stays in place it’s ready. If it doesn’t then continue boiling your mixture and checking it every 5 minutes until you get the set. It took me approximately 25 minutes.
- If you are using jam thermometer continue boiling your jam until temperature reaches 105C/221F at which point your jam is ready.
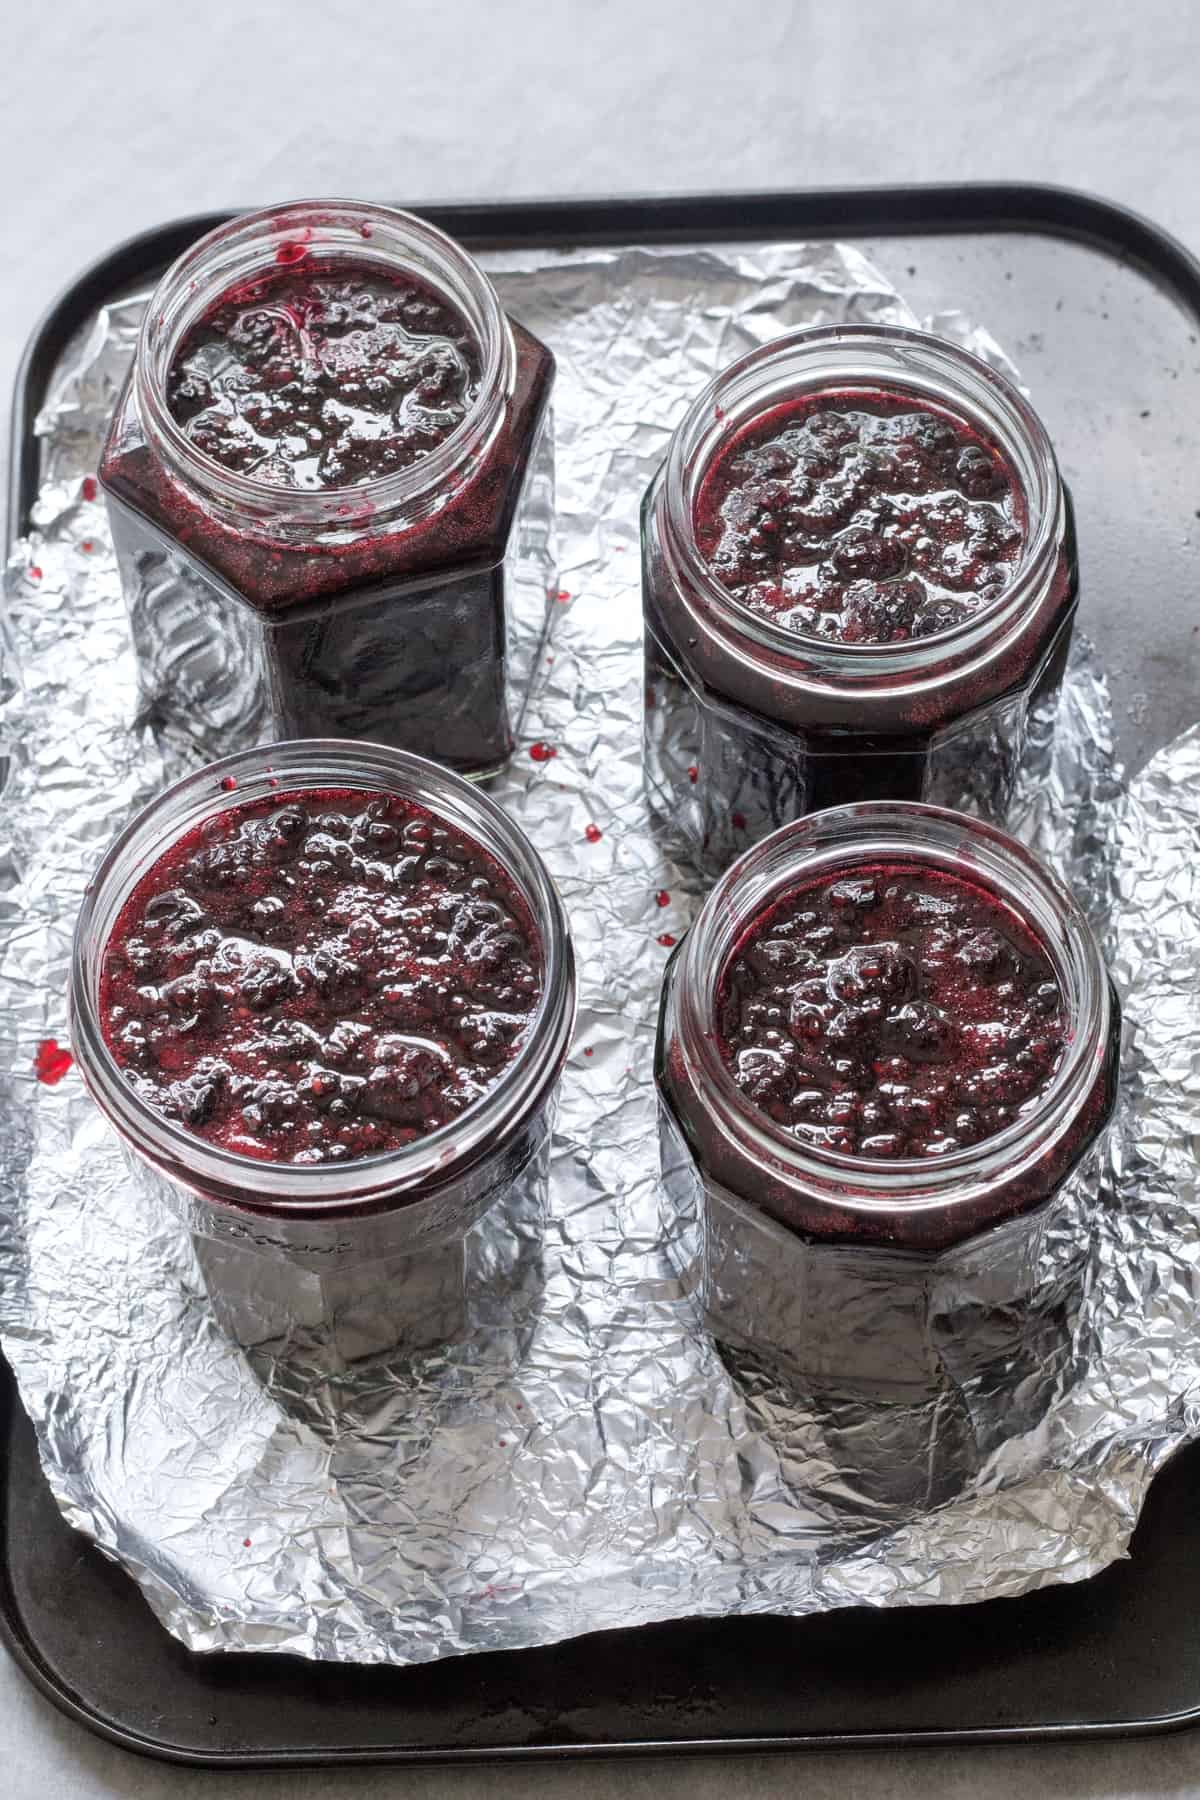
- Skim off any scum that might have formed on top of the jam and transfer it into hot, sterilised jars, cover with the lids and leave to cool. You will hear the clicking noise as your jars seal and there will be no bubble in the lid as you press it which is as it should be. It may take some time for it to happen from the moment you put the lids on so don't worry if it doesn't happen straight away.
- Let the jars cool completely at which point you can apply your labels.
- You've made homemade Blackberry Jam!
Have you tried my Easy Blackberry Jam?
Please consider giving it ⭐️⭐️⭐️⭐️⭐️ rating in recipe card below and share your views or tips in the comments.
More homemade preserves you might want to try
Plum Jam with Chocolate
Orange Marmalade
Lemon Curd
Easy Cranberry Compote (Sauce) with Rosemary
Wild Garlic & Walnut Pesto
Stewed Rhubarb (Rhubarb Compote)
📋 Recipe
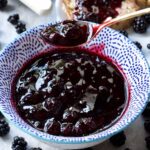
Easy Blackberry Jam (No Pectin)
Ingredients
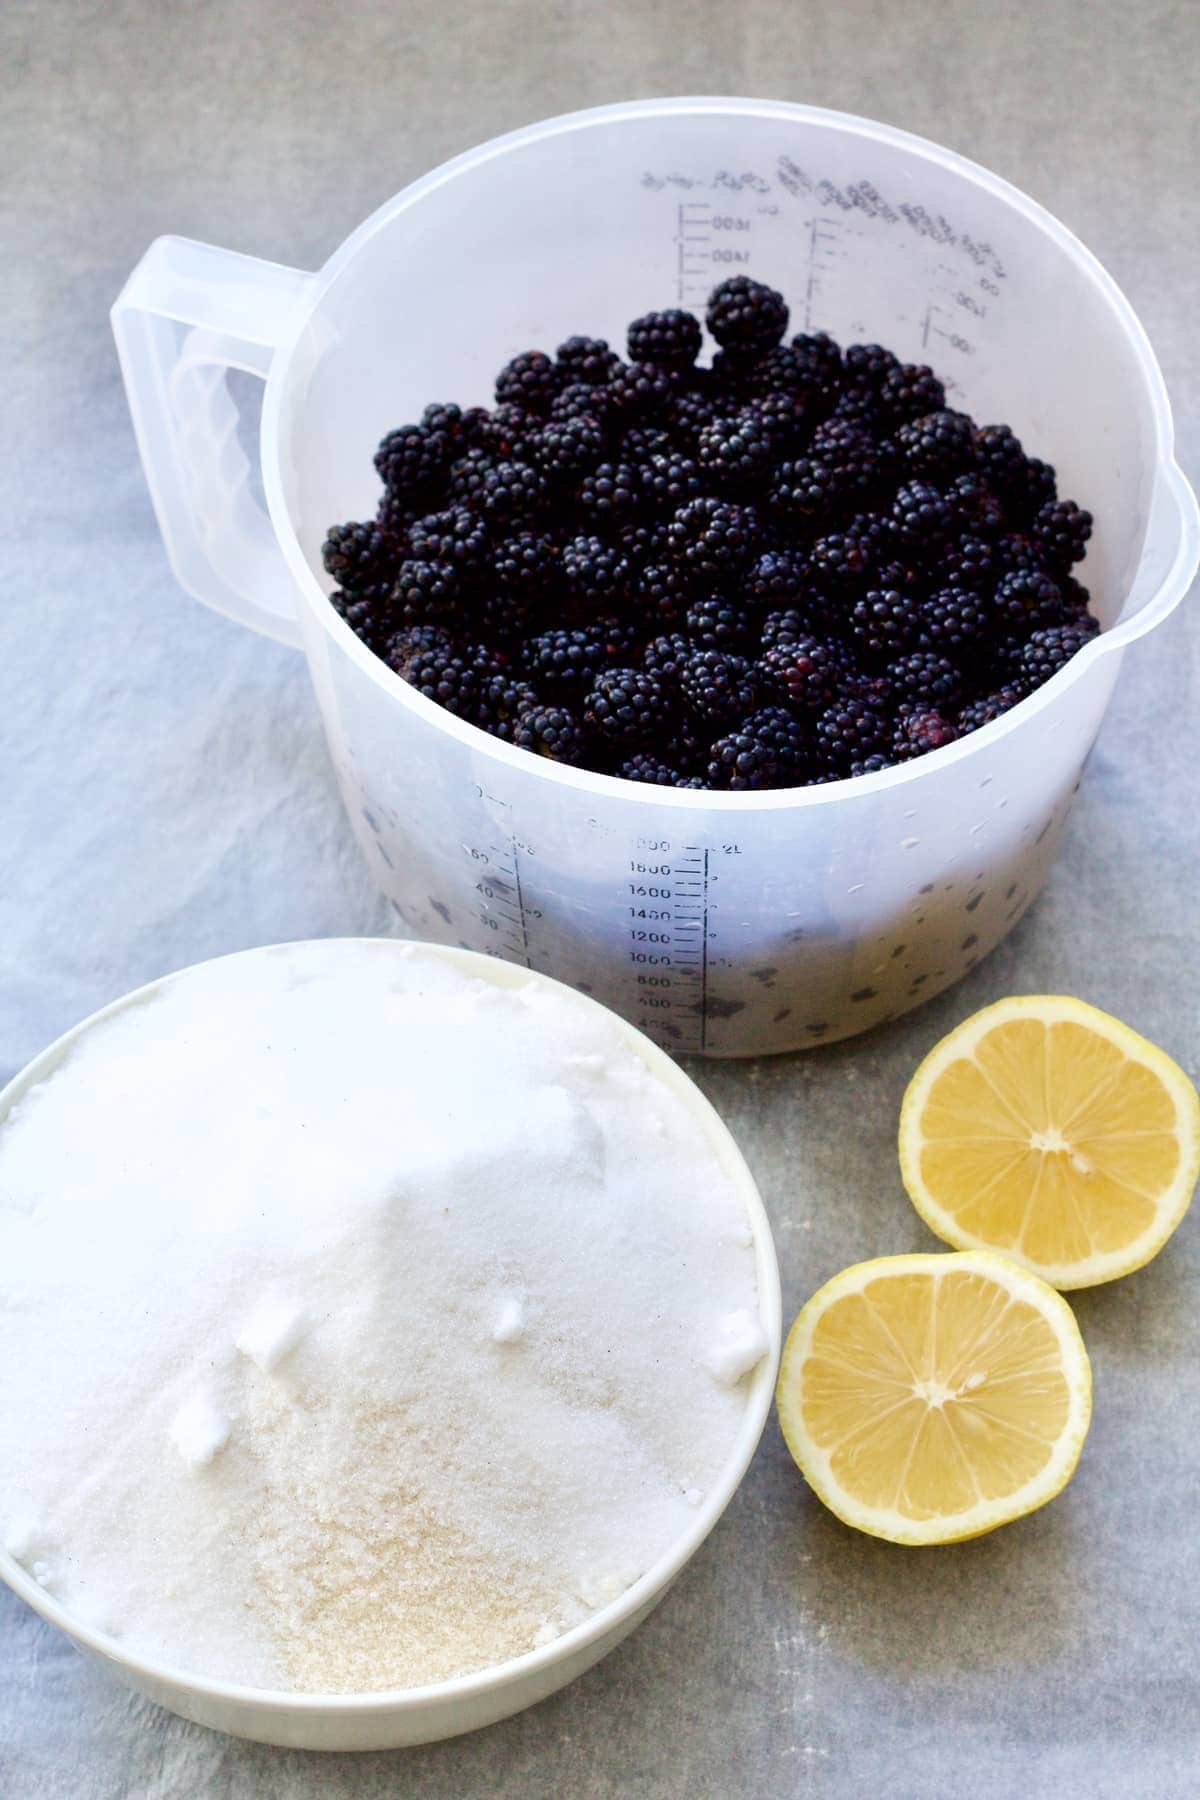
- 800 g blackberries
- 800 g caster or golden caster sugar (fine sugar) see notes
- 4 tablespoon lemon juice for me it was juice of exactly one lemon
Instructions
- Put 2 or 3 small plates/saucers in a freezer for "wrinkle test" (checking whether your jam has reached setting point).
- Wash and sort your blackberries, getting rid of any mushy ones or those that have seen better days.
- Put blackberries in a large pan or preserving pan if you own one and mash them up a bit using simple potato masher. This will release the juices and make them cook quicker too.
- Add sugar and lemon juice and stir well.
- Simmer blackberry jam over low-medium heat stirring from time to time until all the sugar has dissolved. It took me approximately 10 minutes.
- Slowly bring your jam mixture to rolling boil for approx. 15 minutes.
- When 15 minutes is up, take the pan off the heat and test if your jam has reached its setting point by placing a small amount of jam on the saucer straight out of the freezer. Put that plate to the fridge for 1-2 minutes, take it out and push the jam gently with your finger. If it wrinkles and stays in place it’s ready, if it doesn’t then continue boiling your mixture and checking it every 5 minutes until you get the set. It took me approximately 25 minutes.
- If you are using jam thermometer continue boiling your jam until temperature reaches 105C/221F at which point your jam is ready.
- Skim off any scum that might have formed on top of the jam and transfer it into hot, sterilised jars, cover with the lids and leave to cool. You will hear the clicking noise as your jars seal and there will be no bubble in the lid as you press it which is as it should be. It may take some time for it to happen from the moment you put the lids on so don’t worry if it doesn’t happen straight away.
- Let the jars cool completely at which point you can apply your labels.
Video
Notes
- Nutritional information is approximate, per 1 tablespoon serving and should be treated as a guideline only.
- I like using caster or golden caster sugar here as it dissolves quicker but you could use regular granulated sugar too.
- This recipe is easy to scale up or down just remember to use equal amount (in weight) of blackberries and sugar and add 1 tablespoon of lemon juice per each 200g of fruit.
- Store in sterilised jars in cool and (if possible) dark place, away from direct sunlight for up to a year. Once opened, refrigerate for up to a month.
- Sterilise your jars. If your intention is to keep your blackberry jam for some time then your jars need to be sterilised. To do this, simply wash them (together with lids) in hot soapy water and dry stood up on a clean baking tray in the oven preheated to 150°C/300F for 10-15 min. The jars should be straight from the oven when you pour in your hot jam. Alternatively, pop them on a hot dishwasher cycle. Make sure you time it right so that they’re ready at the same time as your jam.
- Sort your blackberries – You want to discard the mushy ones that are past their best. Do it as you wash them to get rid of dust and little bugs. Make sure to drain and gently dry them afterwards.
- Mashing blackberries – This will only take you a minute or two but will help releasing juices from the fruit and make it cook quicker during the initial stage when you’re dissolving your sugar.
- Make sure your sugar is fully dissolved – This will prevent it from crystallising later as your jam cools down.
Sasanna Samarin says
Best Blackberry Jam I've made so far! My family loved it! Perfect ratio of blackberries, sugar and lemon juice. Directions very easy to understand. Thank you.
joskitchenlarder says
Thank you so much Sasanna for such lovely feedback!😊
Laura says
Thanks for the great recipe! I made this today and I made so much 🤭 It's been maybe 3h since I've put it in jars, so it's still warm, but there's no signs of setting. I did the cold plate test and it was fairly good (a little runny but mostly jammy, I like when the Jam is slightly loose). Any tips on how to fix/prevent that next time, or maybe I should just be patient and see what it looks like tomorrow 😅
All best!
joskitchenlarder says
Hi Laura, Any improvement on set? I hope it worked in the end as it definitely does take some time as jam is cooling down 😊. If it hasn't set, however, you can always try reboiling it again although it would be a bit of a pain as you will need to wash and sterilise all the jars again. I would definitely wait until the following day until the jars are completely cold and then open one of them to check for consistency and whether it's to your liking. Personally, I also prefer jam that is slightly loose and hopefully the final consistency of your jam is just that! Fingers crossed.🤞😊 Do let me know how you got on.
Em says
Thank you for a seemingly simple and easy recipe.
Would the jam be the same if made with some frozen berries? I am continuously harvesting and worry that some that I have picked will go bad while I wait for others to ripen. I may like to freeze small batches until I have enough for a good size recipe.
joskitchenlarder says
Hi Em, Using frozen berries will be just fine. You can use them straight from frozen as well, no need to defrost. Hope that helps. 😊
Nicky50 says
First time I have made jam and I couldn’t believe how easy it was. I followed your recipe and found the tips particularly helpful. Thankyou for sharing your expertise and for such a tasty jam recipe.
joskitchenlarder says
Thank you so much Nicky for such a lovely comment.😊
Colleen Nelson says
I didn’t actually use the amounts suggested, as I live in British Columbia, Canada. We use cups here. But I followed your method and watched your helpful video. It was very helpful and my jam has set perfectly. Thank you.
joskitchenlarder says
So pleased to hear Colleen.😊 Thank you so much for your lovely feedback!
Sue says
Thank you for the easy recipe. I have just made 4 Jars of blackberry jam. They are just cooling. I used old jars so I used jam pot covers with wax disks as didn’t have the lids. I will make fabric circles to cover the tops to give to my family.
joskitchenlarder says
Hi Sue, That's brilliant! There is no better gift to receive in my opinion than something homemade. Thank you for your lovely comment. 😊
Christine says
Followed your recipe easily while making jam with my kids for the first time! Made 4x 250ml jars and 1x 125ml jar (plus a good tablespoon to taste at the end!)
Thank you, we will definitely be making this all summer!
joskitchenlarder says
I'm so pleased to hear Christine. Thank you. 😊
Janet says
So successful . Made 9 kilos .
joskitchenlarder says
That's amazing! 😊
Janet says
Fabulous quick recipe . I grow heaps of both blackberries also raspberries. I freeze them till winter then make my jam . I live in northern Tasmania . Island state of Australia.
joskitchenlarder says
Hi Janet, So jealous of your homegrown blackberries and raspberries. I'm trying raspberries this year for the first time, one of each summer and autumn varietes (only got a small garden), we shall see how it goes. So pleased you like the recipe and thank you so much for taking the time to comment, really appreciate it! 😊
Polly Baynes says
Blackberry jam recipe perfect
joskitchenlarder says
Thank you Polly 😊
Kim says
Followed the instructions, which worked perfectly. The jam is now cooling - and the dents in the lids have pulled in! Thanks
joskitchenlarder says
Great to hear Kim, thanks! 🙂
Robert Northcutt says
Blackberry Jam. Turned out perfect. Made a second batch. Same great results. Easy to follow. Thank you.
joskitchenlarder says
So pleased to hear Robert, thank you!
Melanie Holley says
I just finished making the recipe with 1290 grams of blackberries and ended up with 7 (8 ounce) jars plus a bit extra. After reading other comments and your replies, I realized I was supposed to fill the jars up. Since I have lately been canning pickles and tomatoes, I was used to leaving headspace. I don’t imagine it will cause a problem. The hot jars are under a towel on the counter and if they don’t seal, I can water bath them or just put them straight into the refrigerator. This was only my second batch of jam but it was much easier than my first try at scuppernong jelly 2 years ago.
joskitchenlarder says
Hi Melanie,
I'm so pleased you found my recipe easy to make. Hope your jars sealed nicely in the end. Hope you enjoy it.
The reason why I recommend filling the jars to the top without much headspace is to avoid trapped air and condensation forming which might prevent jars from sealing.
We are on our last jar from the batch I made last year. It lasted well in a dark cupboard and the last jar is my signal that it's the time for more preserving especially as blackberries are getting nice and ripe in the hedgerows near where we live.
Christine says
Can l use a sugar substitute in this jam recipe its for a diabetic ? Kind regards
joskitchenlarder says
Hi Christine, I'm afraid I've never tried it myself so cannot advise, sorry.
Catherine says
Hi there Jo,
Do you think I could use monk fruit instead of regular sugar?
joskitchenlarder says
Hi Catherine,
I'm afraid I'm not familiar with monk fruit sweetener so can't really advise, sorry.
benita says
Super easy and although the jars are just cooling they are delicious! I am just curious about the lids, as it wasn't that clear to me. I actually used old sterilized regular honey and jam jars I had. For the cooling, I understood 'cover with the lids and let cool'. So I put the lids on WITHOUT screwing them tight... Then I realised you must've have meant to tighten them, or they won't pop in. At the end I tightened them and they are still cooling and I believe they will be fine! Thank you!
joskitchenlarder says
Hi Benita, Yes I meant cover and tighten the lids straight away to create a seal. Sorry for not being clear. I'm pleased you found the recipe easy and hope you will enjoy the jam 🙂
Margaretwwl says
Hi, I’m new to jam making. I made red currant jam last month, & poured the hot jam into hot sterilised jars & closed the lids tightly. Left them standing on my kitchen top for 6hrs to cool (while I was at work), but when I got home , I noticed some jars (the ones that weren’t filled right to the top) had condensation. When I pressed on the lids, they all “popped”, so am I right in thinking they hadn’t sealed properly? Anyway, I opened all the jars with condensation & dried the glass & lids with kitchen paper as I was worried they’d go mouldy, screwed the lids back on & stuck them all in my fridge.
I want to make blackberry/ bramble jam as there’s an abundance in my area. Can you please advise if I did the right thing with my red currant jam?
Also, if I was to make seedless blackberry jam, do I add the sugar after I’ve pulped the mixture & removed the seeds? Would it still be the same amount of sugar? My red currant jam was made this way (only 3/4 amount of sugar to liquid ie 300g sugar to 400ml liquid).
joskitchenlarder says
Hi there,
If it was just a single pop when you pressed the lid it would indicate that the seal has been created in your jar as your jam cooled. However, if the lid keeps popping up and down when pressed that means that the jars didn't seal properly. Hope it makes sense.
Ideally, you should fill the jars right to the top as your jam will "shrink" a bit anyway as it cools. The more you fill it the less condensation, although if you notice the condensation in your jar it's not the end of the world as long as the jar sealed properly.
I haven't made seedless blackberry jam before but from the recipes I've seen you would add sugar once you've measured out the amount of seedless pulp or strained juice (depending on what you're using to make your seedless jam) and then add the sugar accordingly. You can use the amount of sugar as per your liking but make to add lemon juice as well to help your jam set.
I hope that helps and good luck with your jam making. 🙂
Kassi says
This came out really really thick for me.
It's tasty, but not an easy spread.
joskitchenlarder says
Hi Kassi, It sounds like it was cooked for too long or perhaps the sugar hasn't fully dissolved and crystallised upon cooling which would have caused it to come out thick. I assume you followed the recipe and haven't used sugar with added pectin as too much pectin can also cause your jam to go from runny to too thick before you know it. I find that cooking your jam on steady medium low heat, dissolving sugar properly and then not stirring it during the rolling boil stage helps a lot. I'm pleased you like the flavour though and as jam making is such a learning curve I hope the next batch will come out as it should. 🙂