
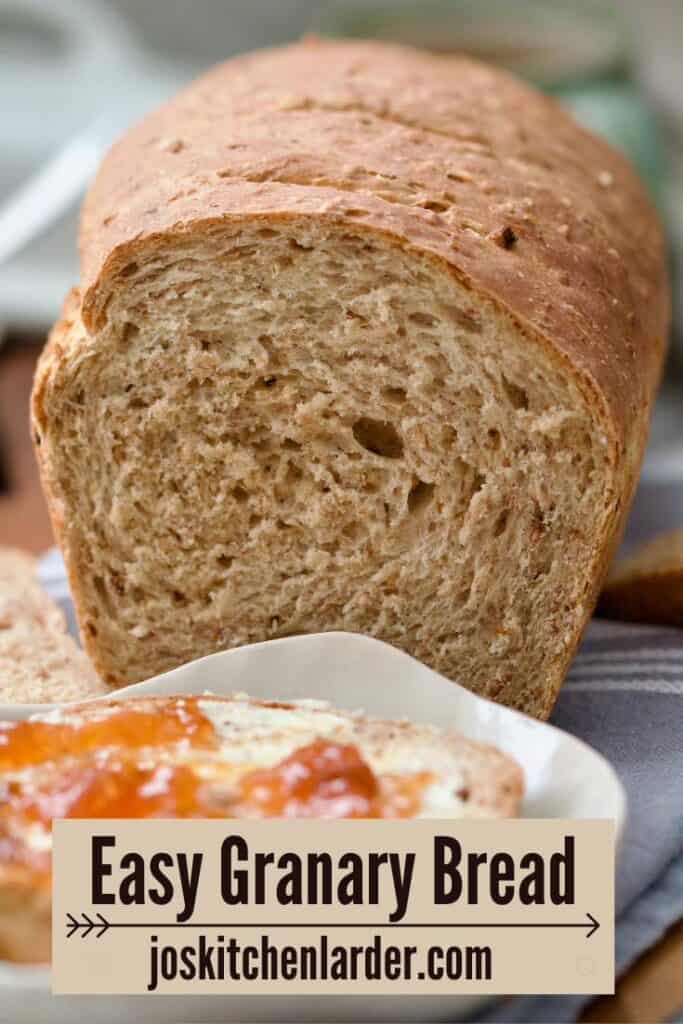
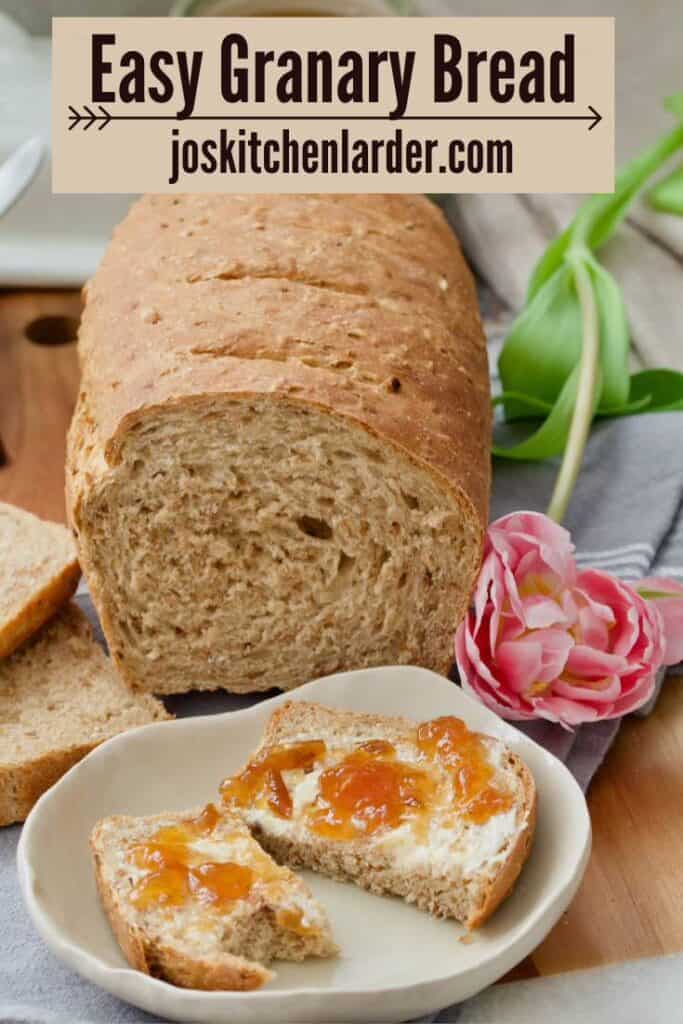
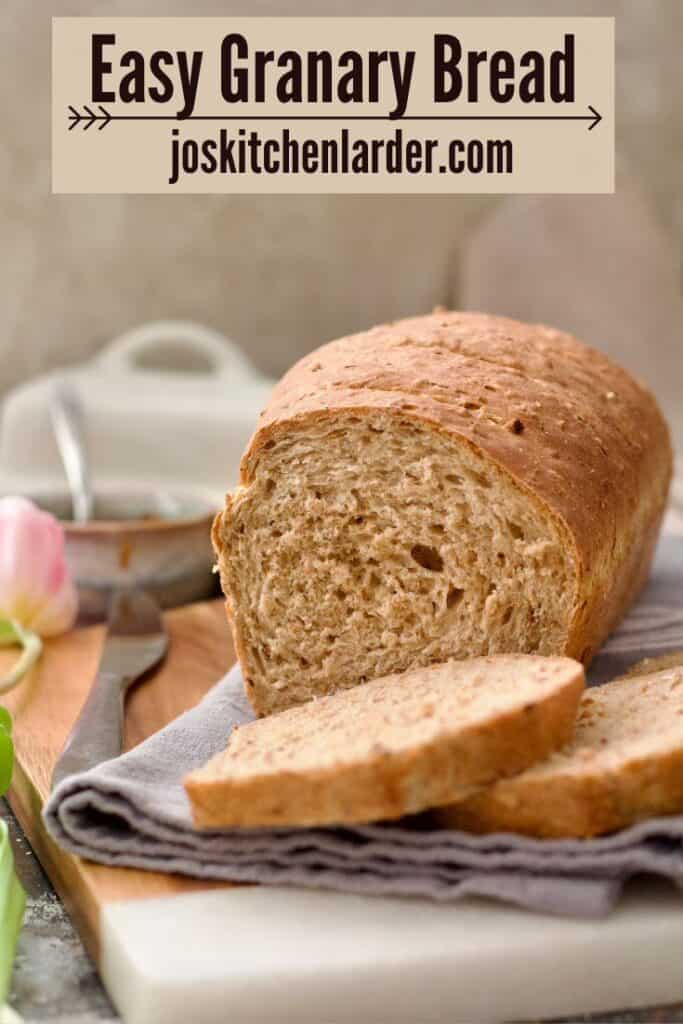
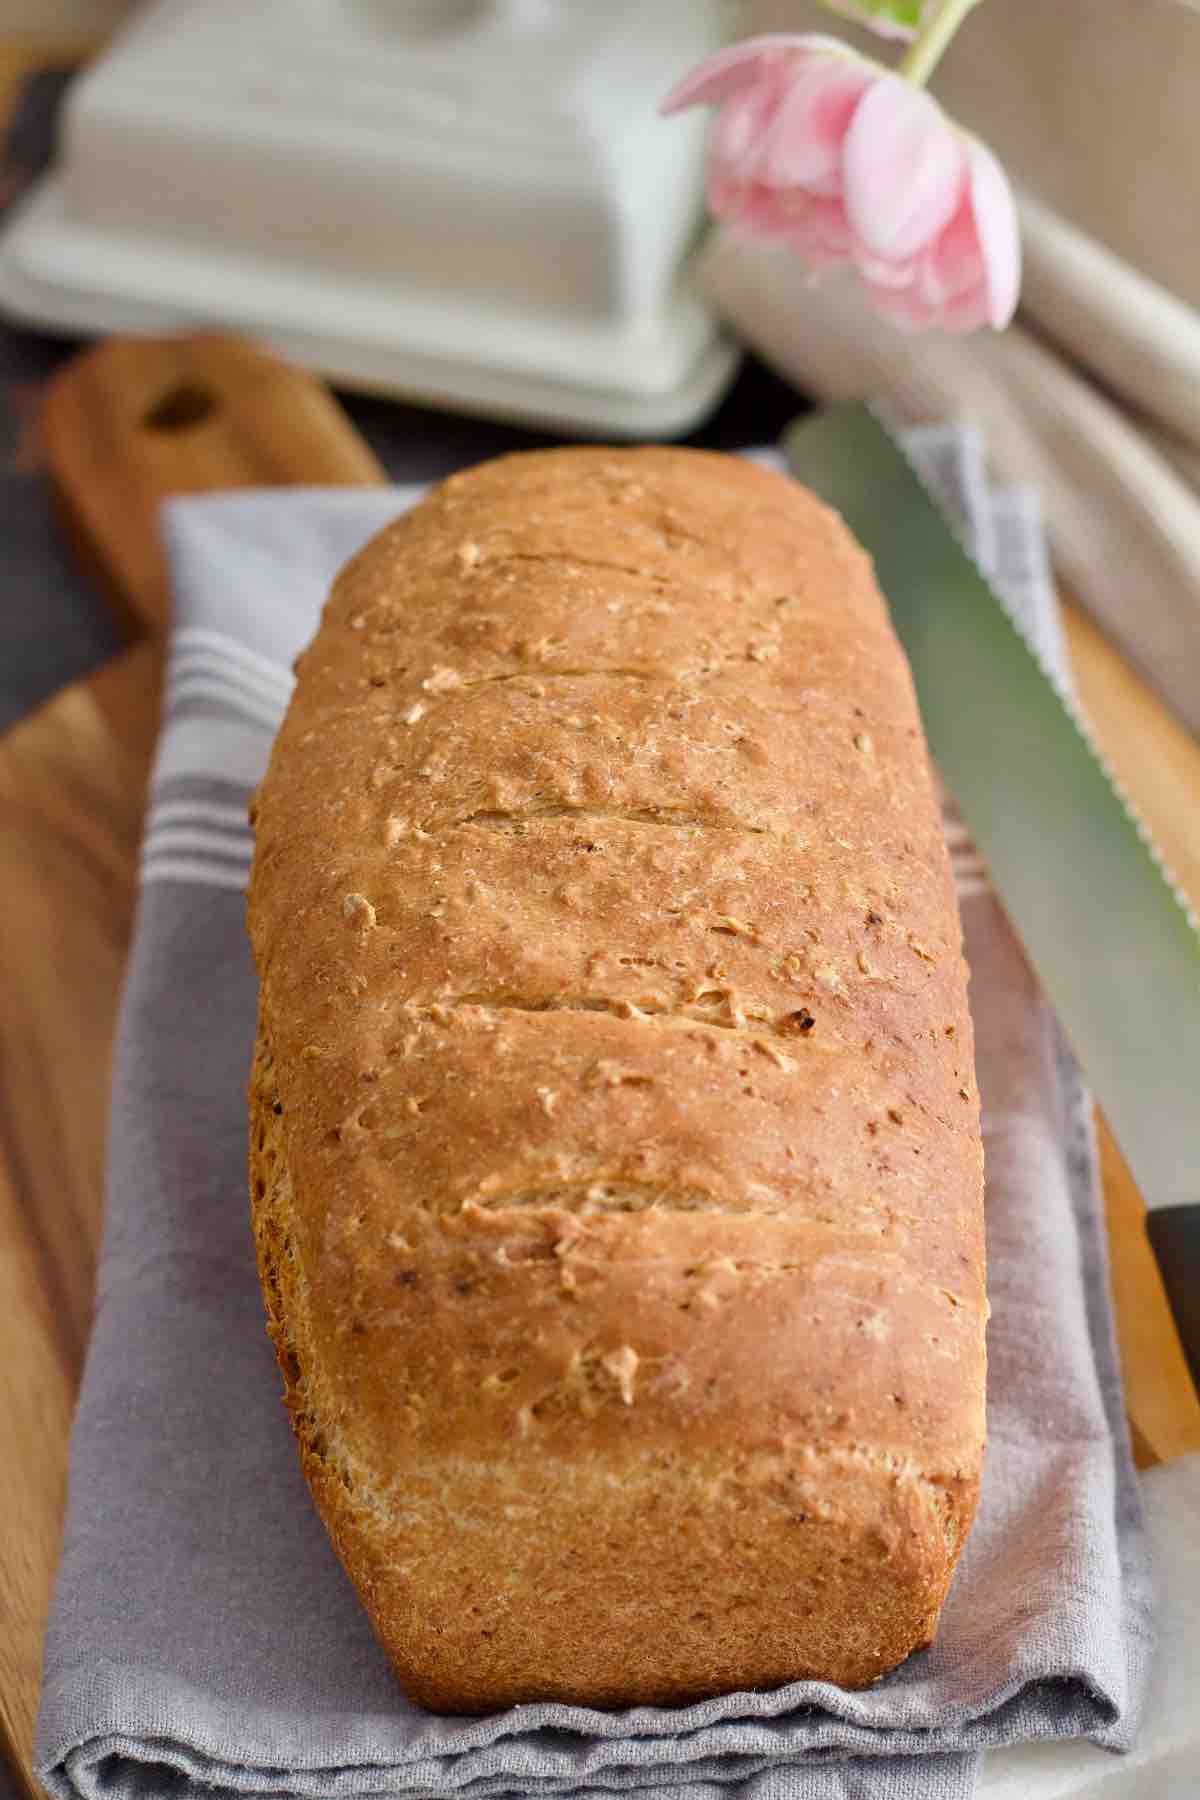
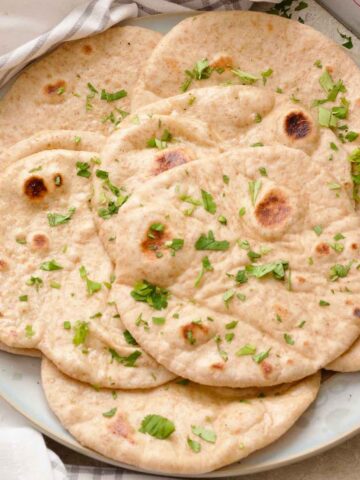
This quick, easy and very forgiving recipe for quintessentially British granary bread will become your family staple. Easily made by hand or with the help of a mixer and with only 5 simple ingredients, it's home bakers' favourite.
If you've been following my blog for a while you know my love for simple bread recipes.
The one that has become your all time favourite is my Easy Wholemeal No-Knead Bread which is the easiest bread to make EVER as far as myself and many of you are concerned.
This recipe for easy granary bread might not be no-knead but it is also super easy to make and doesn't take much time at all.
For those of you who love sarnies on shop bought granary, why not skip the shop bought bit and start making your own. You will soon be hooked.
Jump to:
🍞 Few words about granary flour
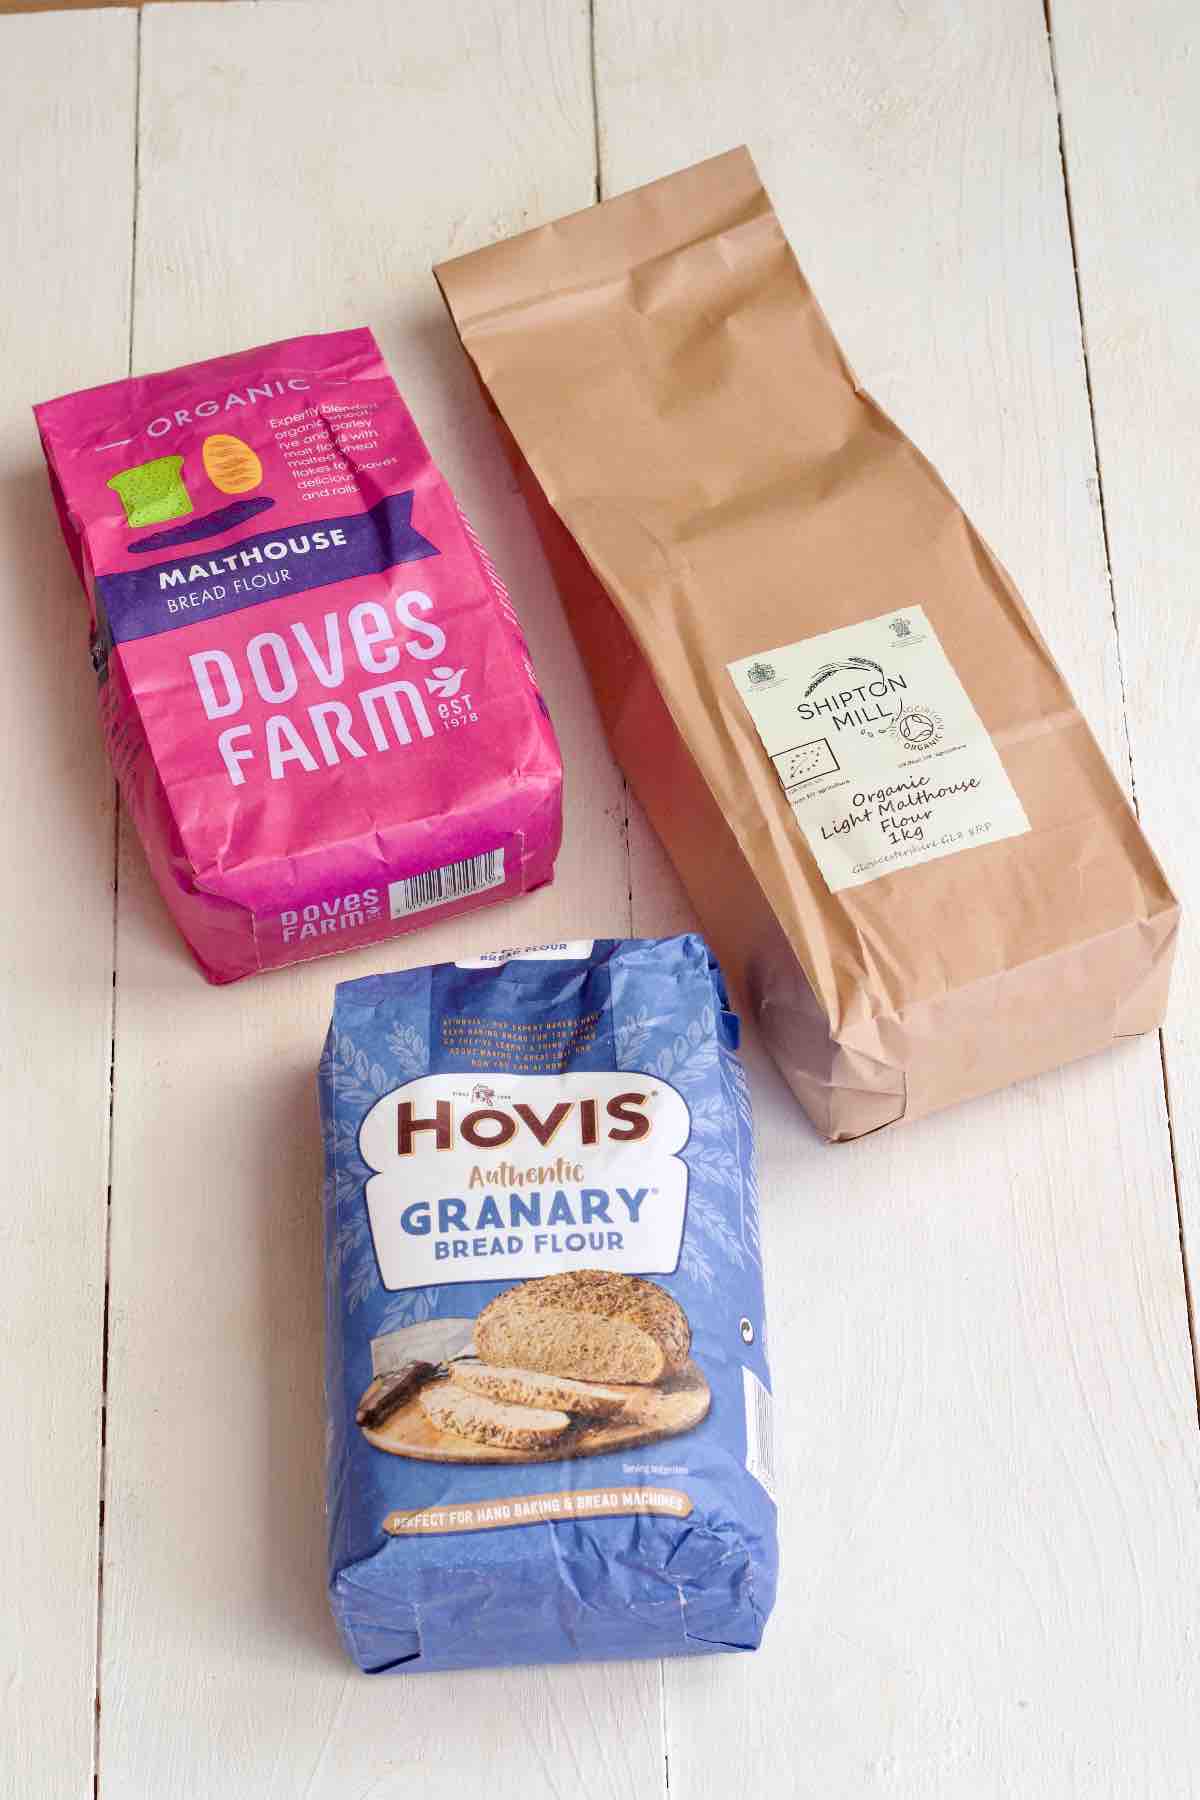
You might not know this but granary flour is a registered trademark of Hovis brand (a large British bread company) and is used to describe their wheat flour with added malted wheat flakes and malted barley flour.
Other companies have since come up with their own versions of malt flours with various ratios of white and wholemeal flours, added malted wheat flakes, barley and some even rye flour.
The ones I tend to use are pictured below but there are many more alternatives on the market so feel free to use whichever one you like. The best way to find suitable flour would be to look at the ingredients list. If you see malted wheat flour and malted wheat flakes on the list you are on the right track.
Some flours might have other ingredients like rye flour for extra nutty flavour and more different seeds for extra crunch. You might even find you prefer them to the original granary.
All in all, they all make lovely bread and have no added nasties often found in the shop bought breads. Most are also full of fibre and high in protein too.
✔️ Why you will love this recipe
- 5 simple ingredients + water.
- Dough which is super easy to work with.
- Super simple to make by hand and even easier in a stand mixer.
- Perfect sandwich loaf.
- Freezer friendly.
- Really delicious.
- Makes the best toast!
- All the flavour of your favourite granary bread without added nasties (UPF - Ultra Processed Food free).
📝 Ingredients and substitutes
Here's what you will need to make my Easy Granary Bread:
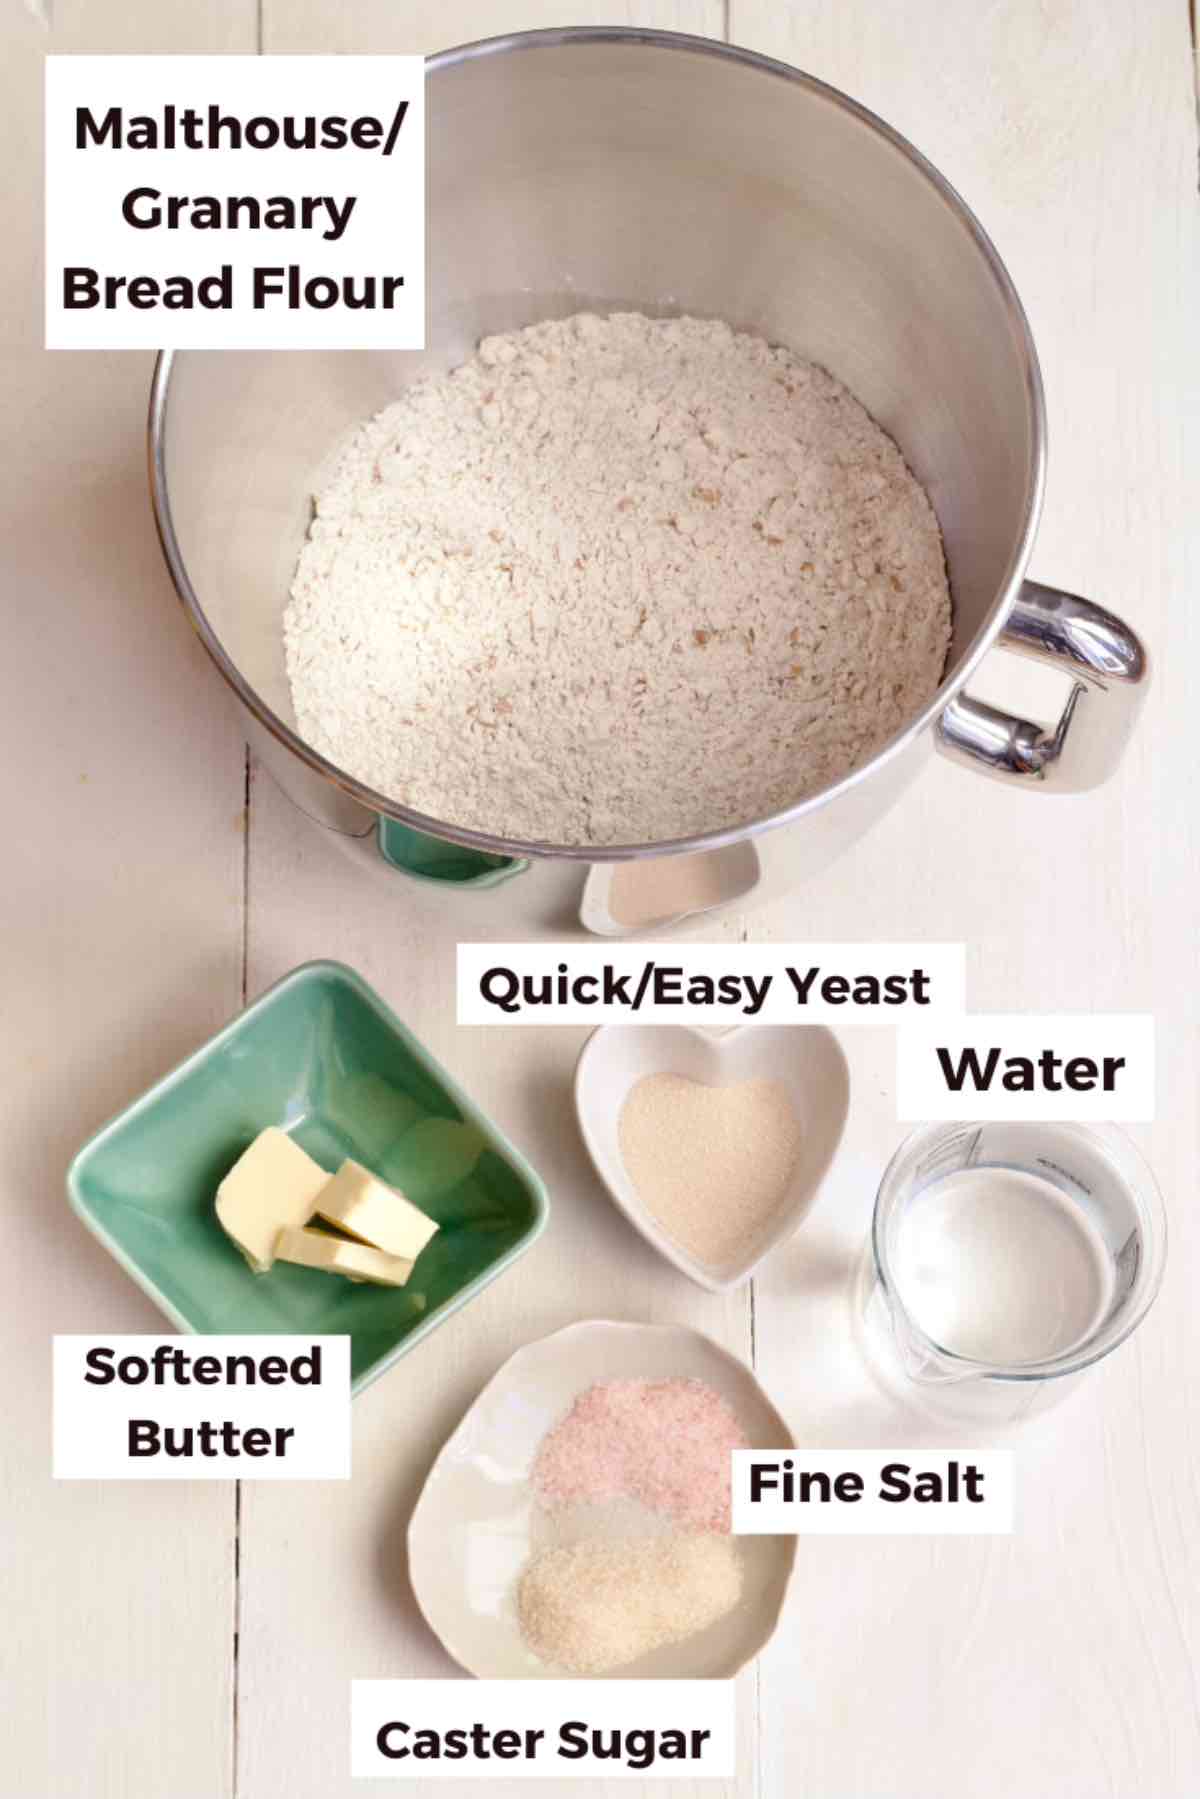
Flour - You will need either Hovis granary flour or malthouse type flour equivalent (see Few words about granary flour above for details).
Softened Butter - It helps in achieving soft texture, adds flavour and also keeps bread fresher for longer. Both dairy and vegan butter work well here but can also be substituted with light (not extra virgin) olive oil.
Caster Sugar - I've used sugar here mainly to give yeast a little initial boost although it also helps with crust development, soft texture and flavour. Having said that I've baked this loaf many times both with and without added sugar and would not be able to tell the difference so feel free to leave it out completely.
Quick/Easy/Instant Yeast - This is my yeast of choice as it's super simple to use and you can add it directly to the flour without the need for activating in liquid.
You can of course use dried active yeast instead but it will need to be reactivated in lukewarm water before adding to the flour.
Salt - Any fine salt will be fine. I tend to use pink Himalayan salt in my kitchen.
Lukewarm Water - You want your water at around 37°C/100°F which is perfect to get the yeast going but not too hot to kill it.
***Quick Tip*** Your dough will also rise if you use cold water, it will simply take much longer than when you use lukewarm water.
🔪 Instructions
Ingredient quantities & detailed instructions to be found in recipe card at the bottom of the post.
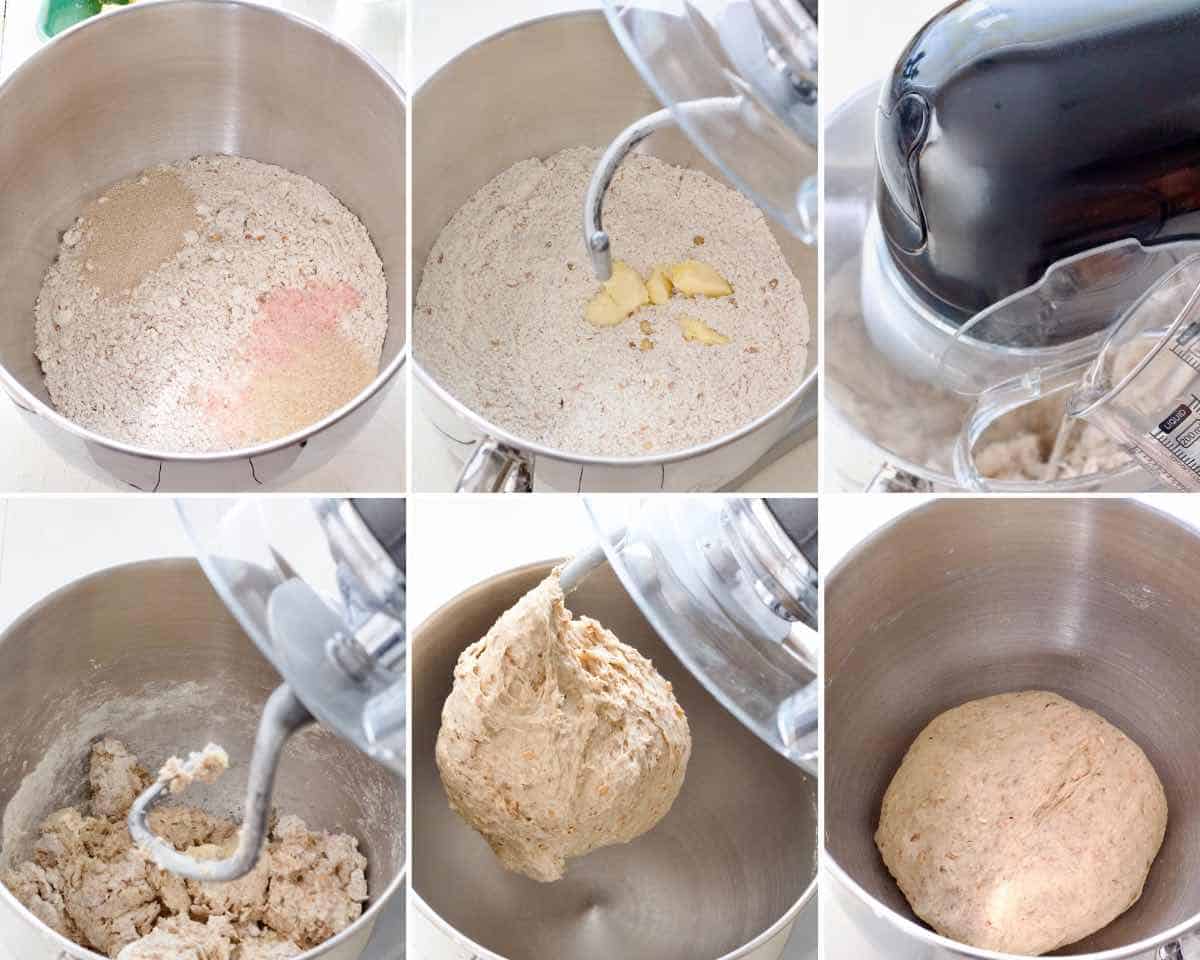
Put flour, sugar (if using), salt and yeast in a large mixing bowl or a bowl of your stand mixer. Ensure that when you add both salt and yeast into the bowl you initially keep them on separate sides.
Give all your dry ingredients a gentle mix without butter and water first using your hand or dough hook attachment.
Next, add softened butter (or olive oil) and slowly start adding water as you mix and then knead the dough either by hand or with the dough hook attachment in your mixer.
Knead the dough until it's smooth and elastic (about 10 minutes by hand and 5 minutes on a medium speed in a mixer). It should be really nice to work with and not at all sticky. If yours is sticky, add a little bit more flour, if it feels dry a tiny bit more water, only teaspoon at a time.
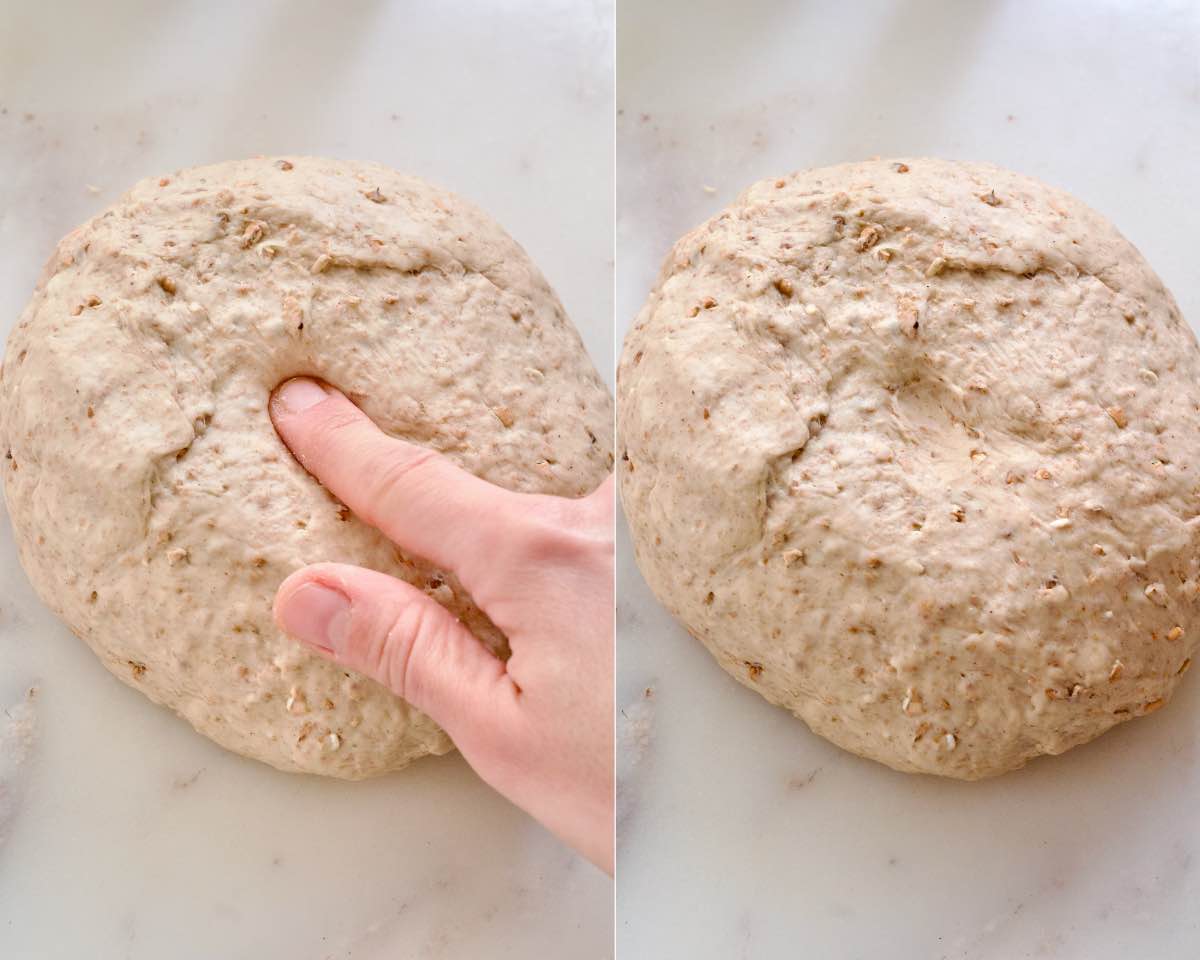
To check whether dough has been kneaded enough and is ready for proving press it gently with your finger. If it springs back slightly leaving only small indentation in your dough it's ready. If it doesn't knead for a bit longer.
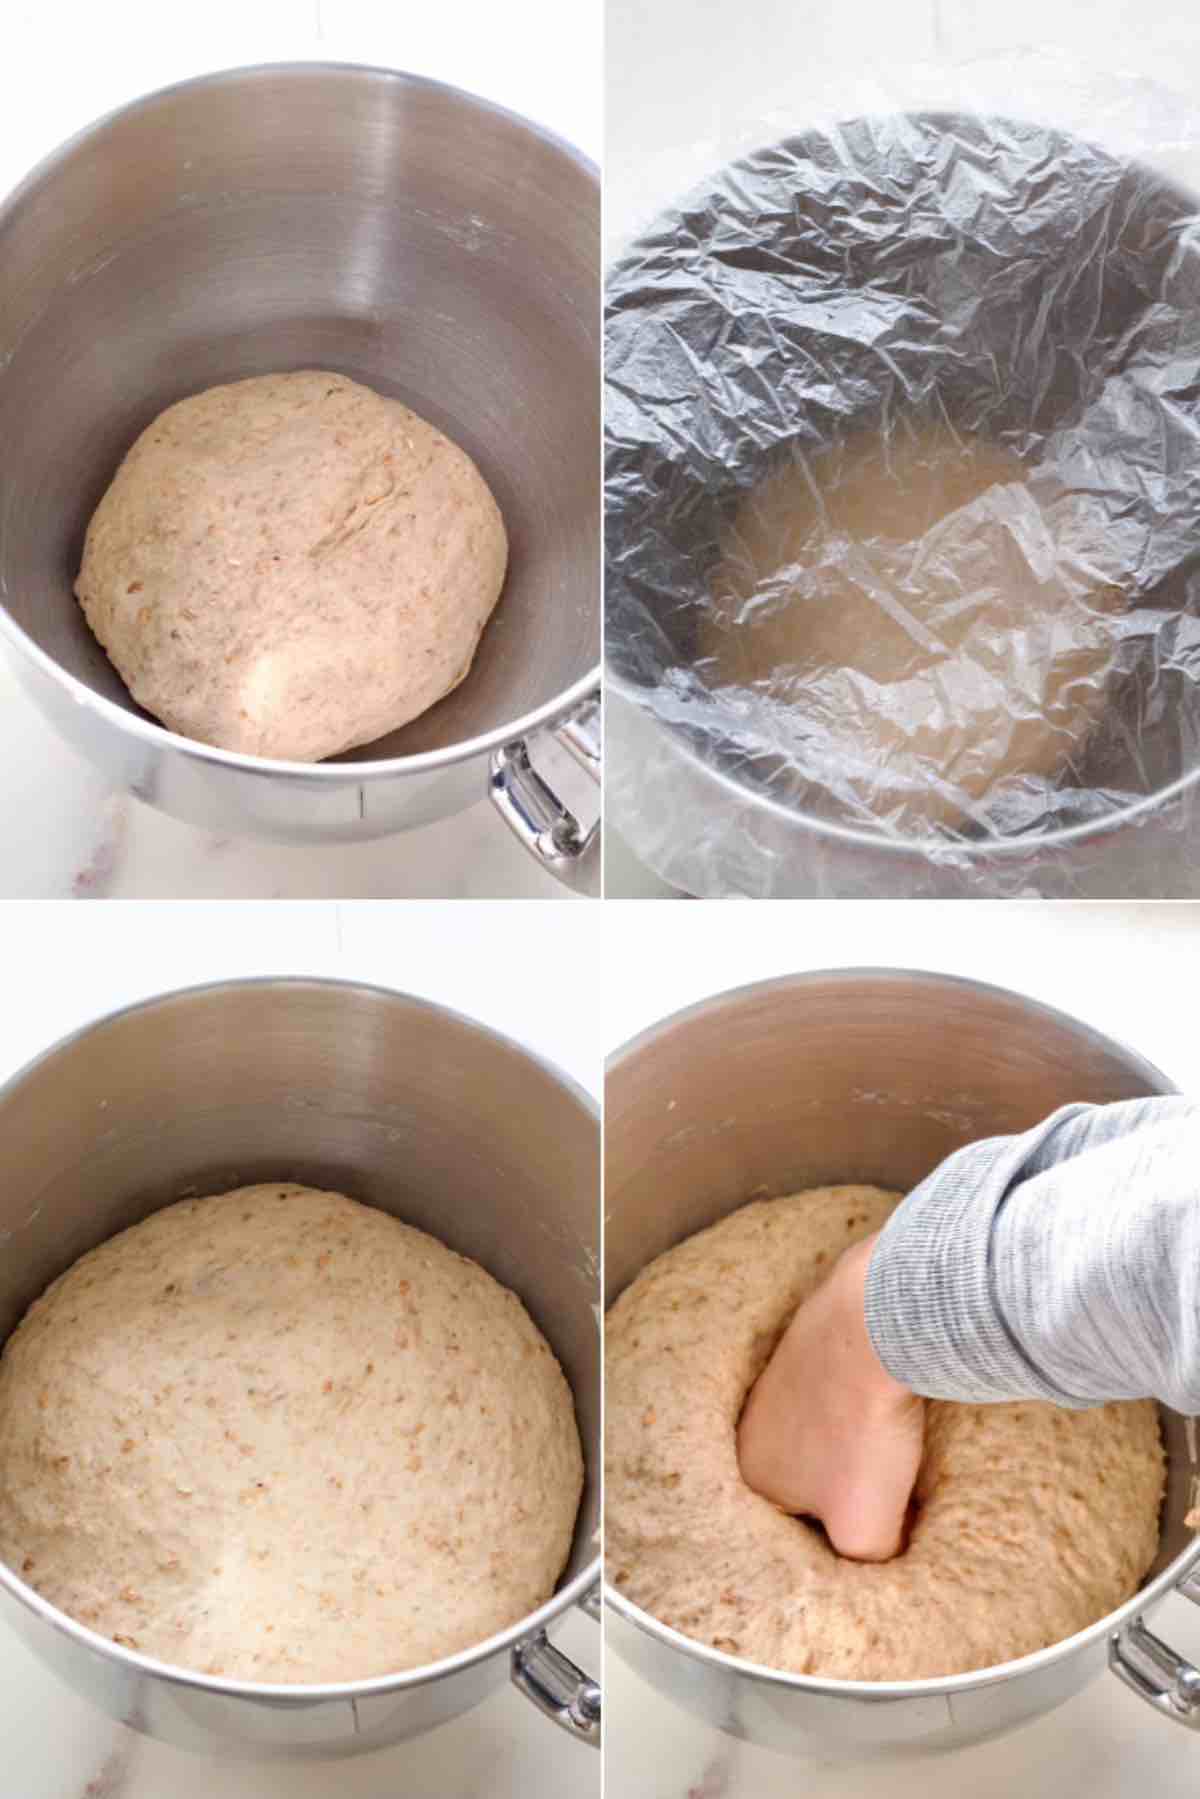
Once your dough is ready, put it back in lightly oiled bowl, cover (I use a shower cap) and place in a warm and draught free place until roughly doubled in size (about 1-2 hrs).
***Quick Tip*** If you leave your dough in your kitchen at a normal room temperature of about 20°C/68°F it will prove just as well. It might take a bit longer but it will happen.
Once double in size, knock back the dough with your fist to deflate it and turn it out onto kitchen surface.
Prepare 2 lb loaf tin by greasing it very lightly with some oil or butter, set aside.
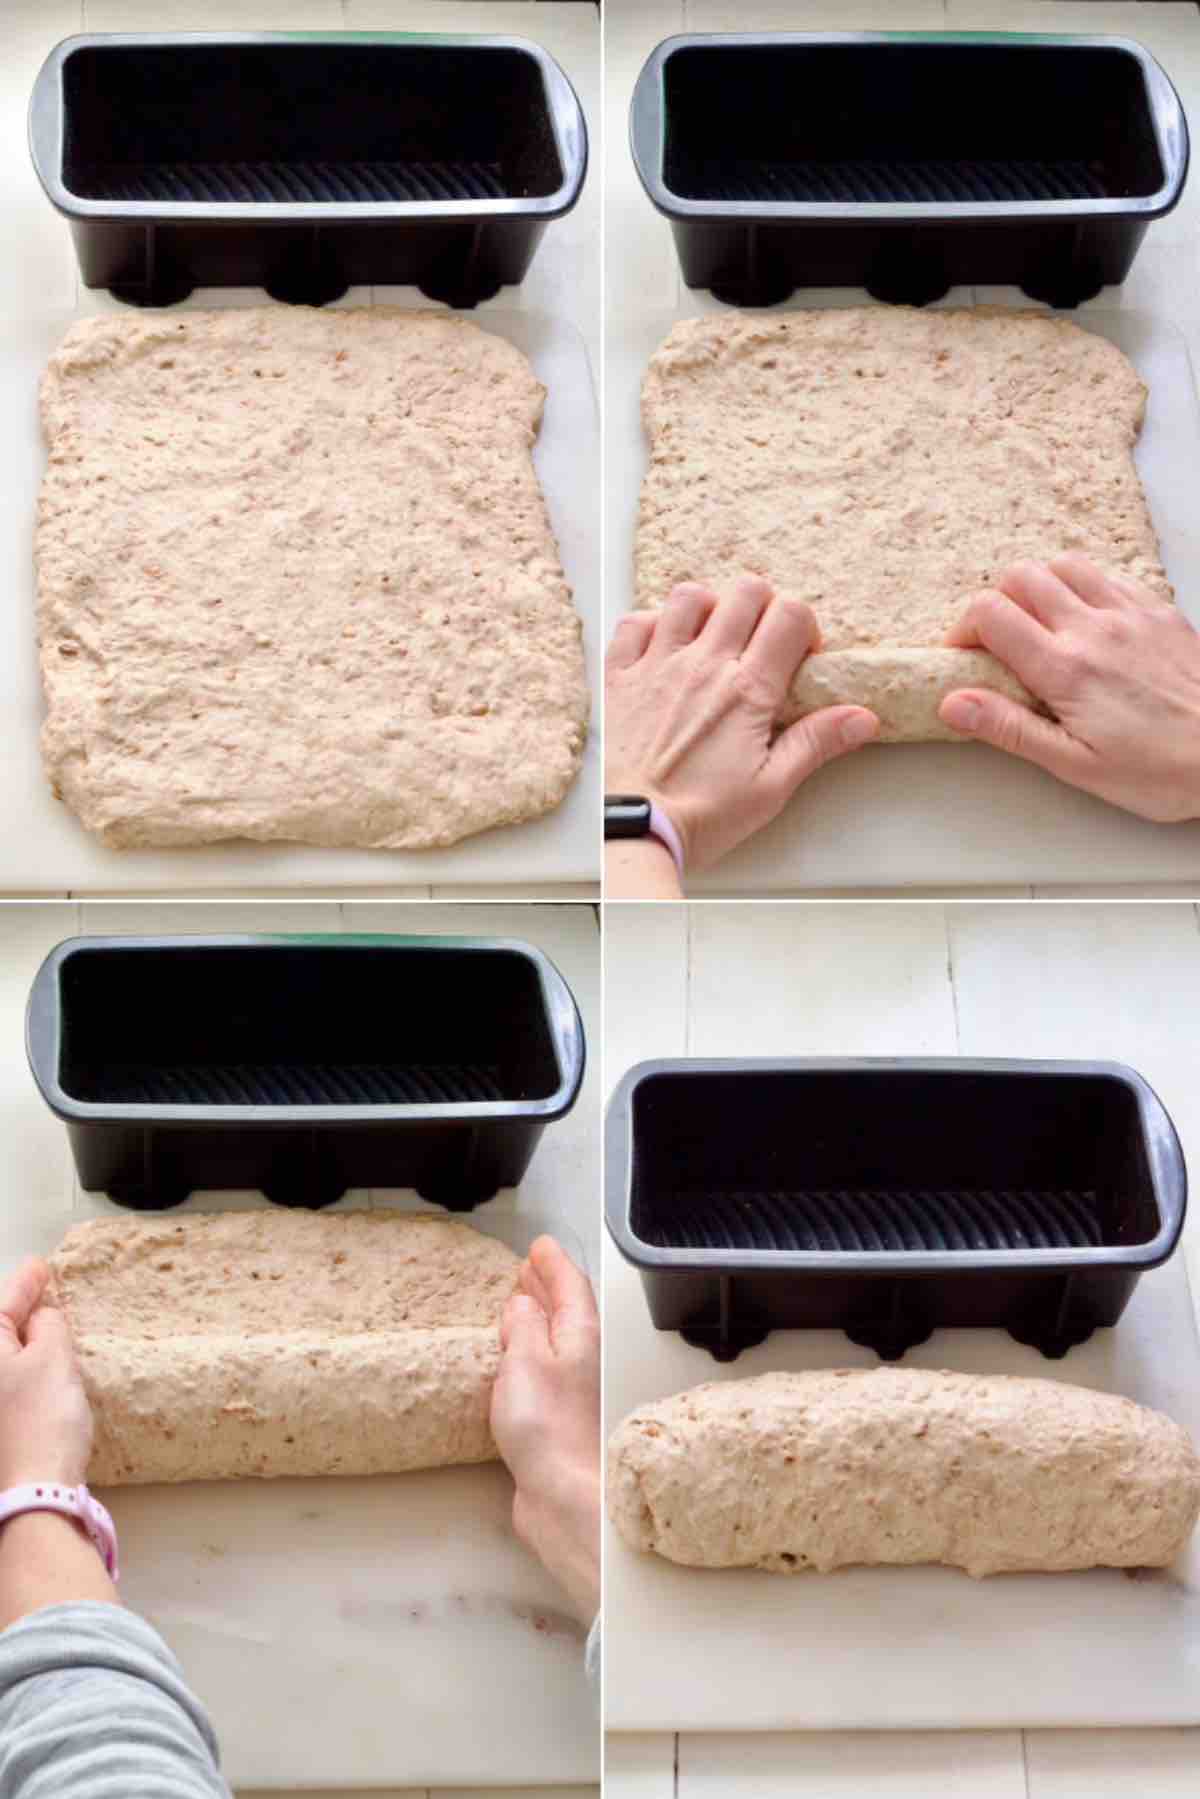
Next, roll the dough out into a rectangle (roughly 20x28cm/ 8x11in). The short side should be roughly the length of your loaf tin.
Start rolling up the dough from the short side ensuring it is pretty tight.
Once the dough is rolled, gently fold the ends underneath (where the seam is) and put into prepared loaf tin.
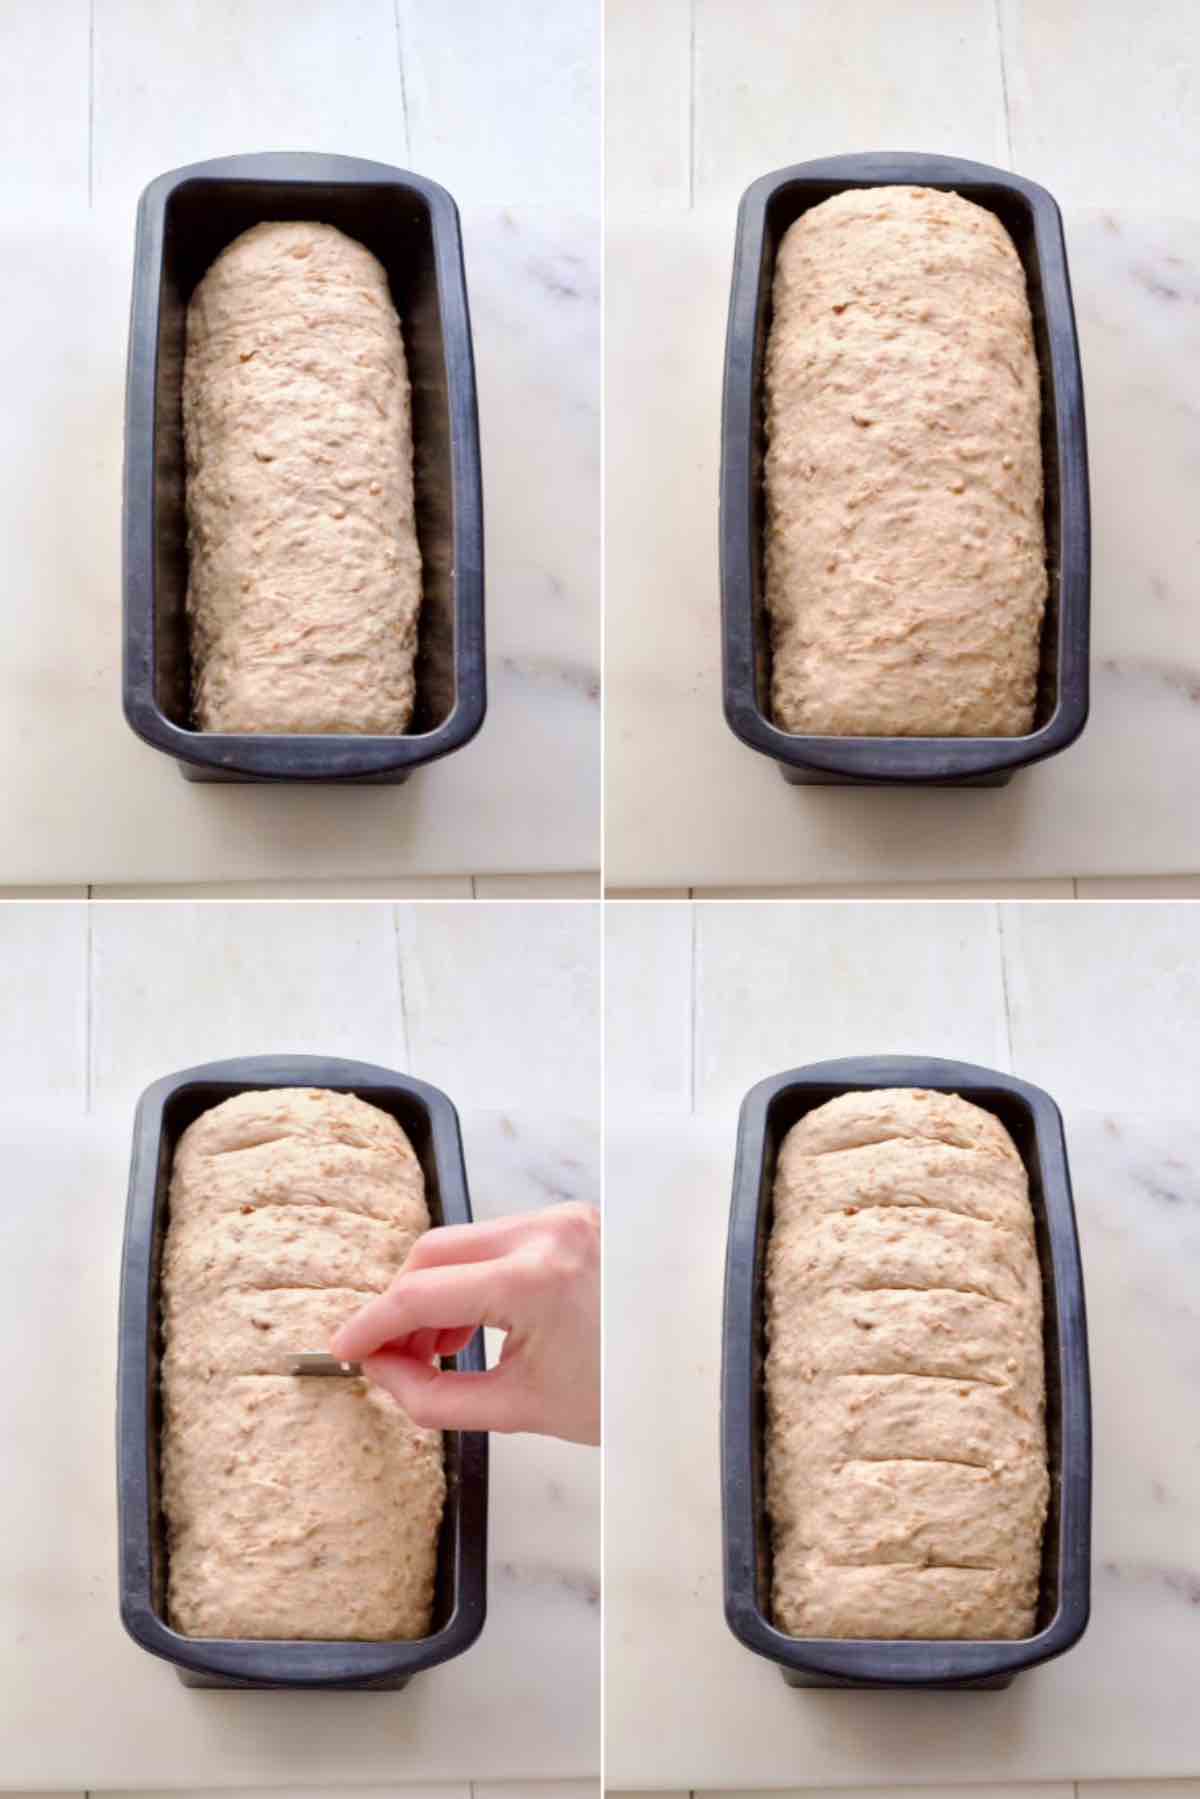
Once in the tin, cover the loaf with a shower cap and put somewhere warm (or leave it on the counter) for its second prove and to double in size (30min-1hr).
Towards the end of second prove, preheat your oven to 200°C/400°F/Gas Mark 6.
***Quick Tip*** My kitchen is usually pretty warm and the second proof takes roughly the amount of time it takes for my oven to heat up to 200°C/400°F/Gas Mark 6. Once you've baked this loaf few times you will establish your own timing routine. It all comes with practice.
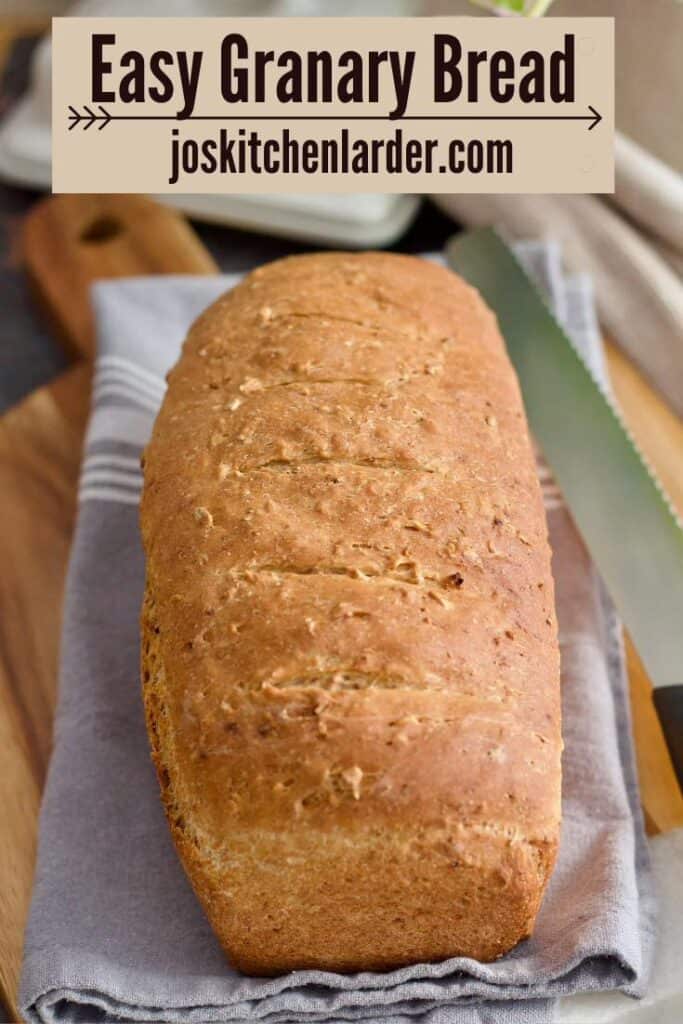
When your loaf doubled in size, score it gently across (lengthwise) with a blade or a sharp knife making sure you don't press too hard.
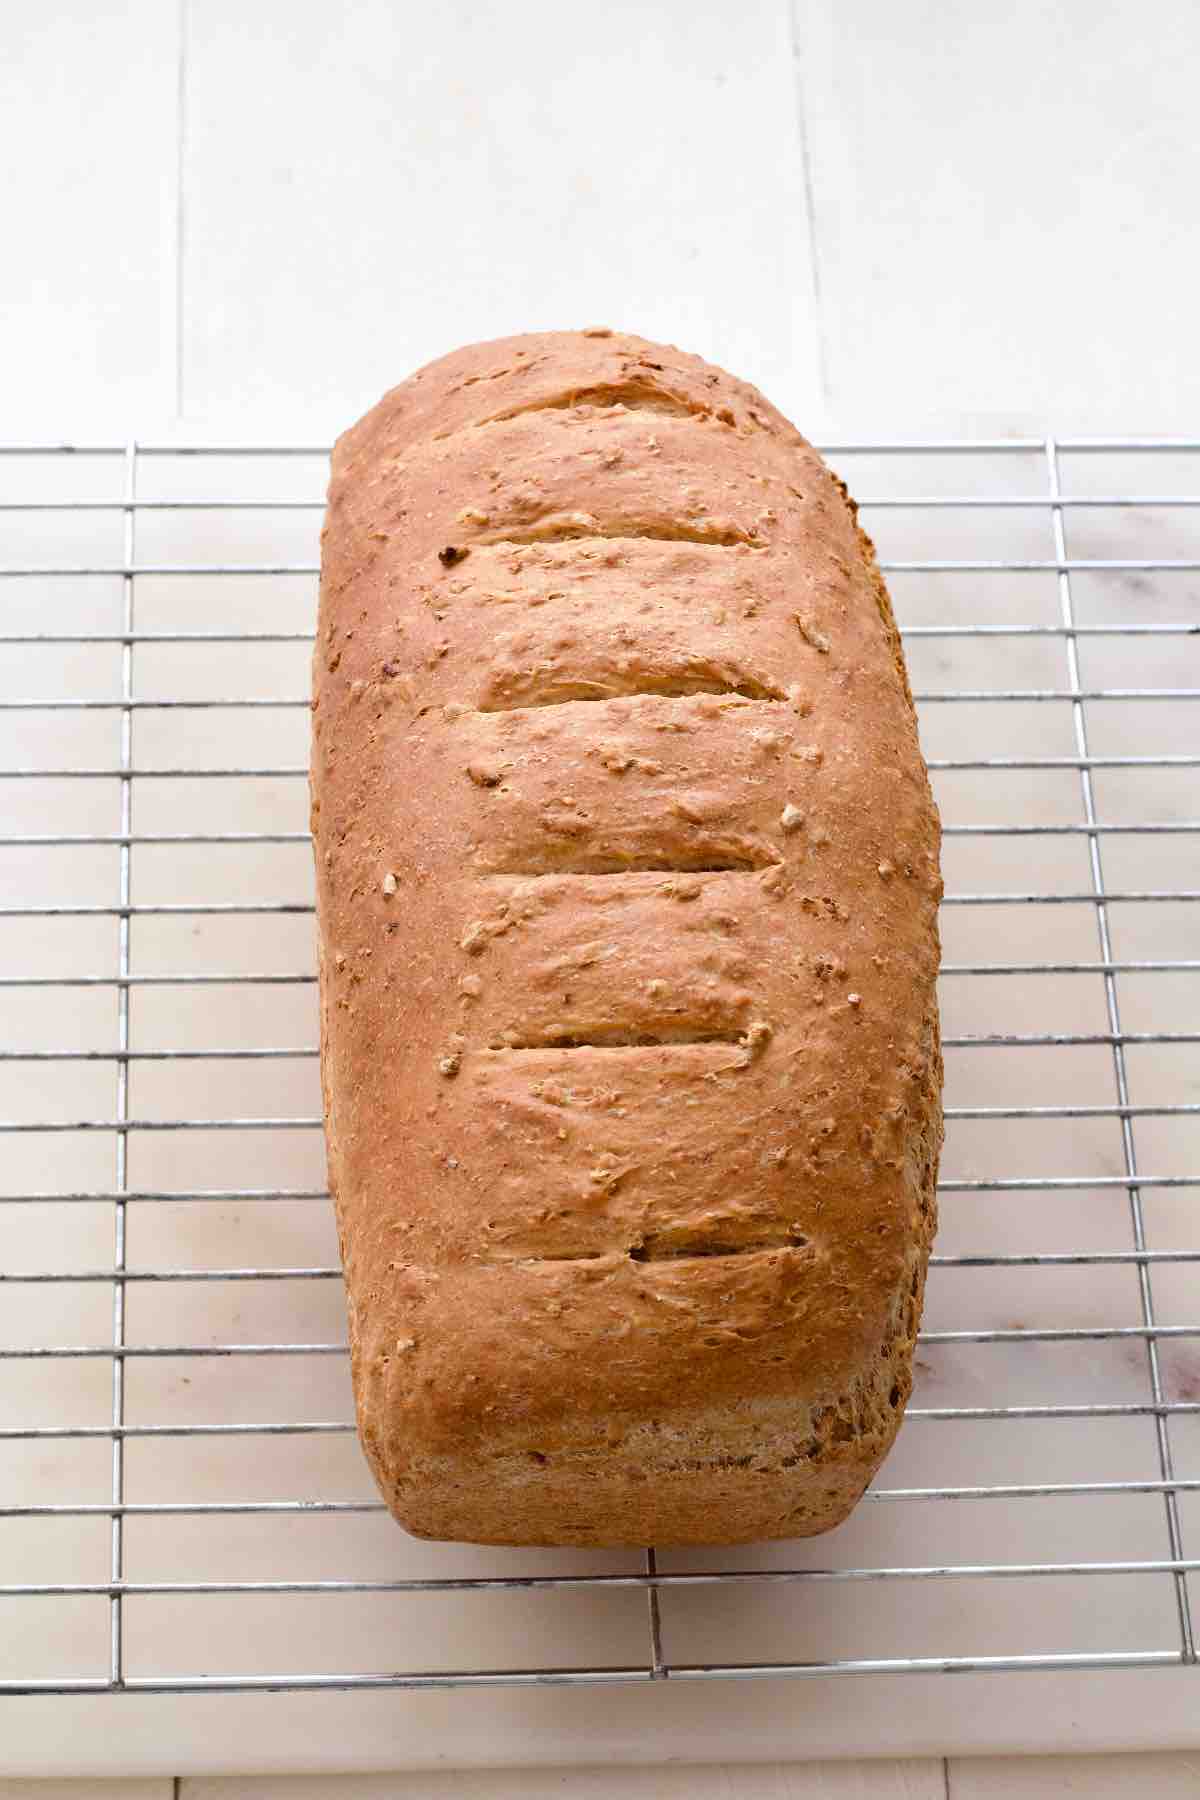
Bake your loaf in preheated oven for about 25-35 minutes.
To check it for doneness, take it out of the tin and tap at the bottom. If it sounds hollow, it means it's done. If it's more like a dull thud sound that means it will need few more minutes.
***Quick Tip*** Having baked this loaf more times than I can count now, I usually take it out of the oven and its tin exactly after 25 minutes. It never sounds hollow and you can tell that there is still a bit of moisture at the bottom. I put it back in the oven without the tin, directly onto a rack and bake for further 8-10 minutes. Works every time.
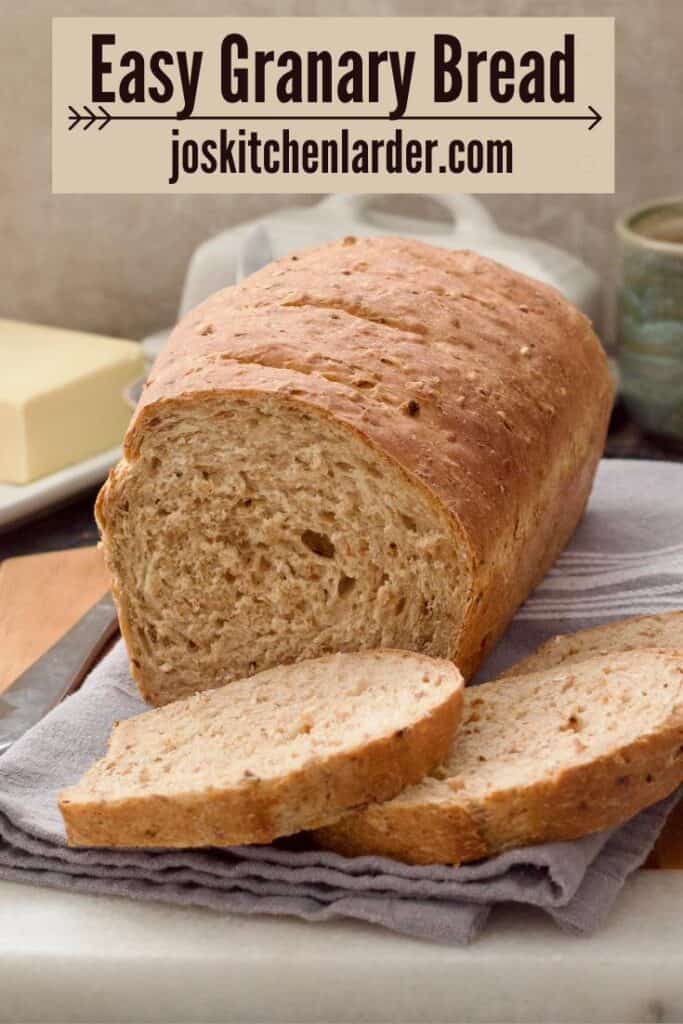
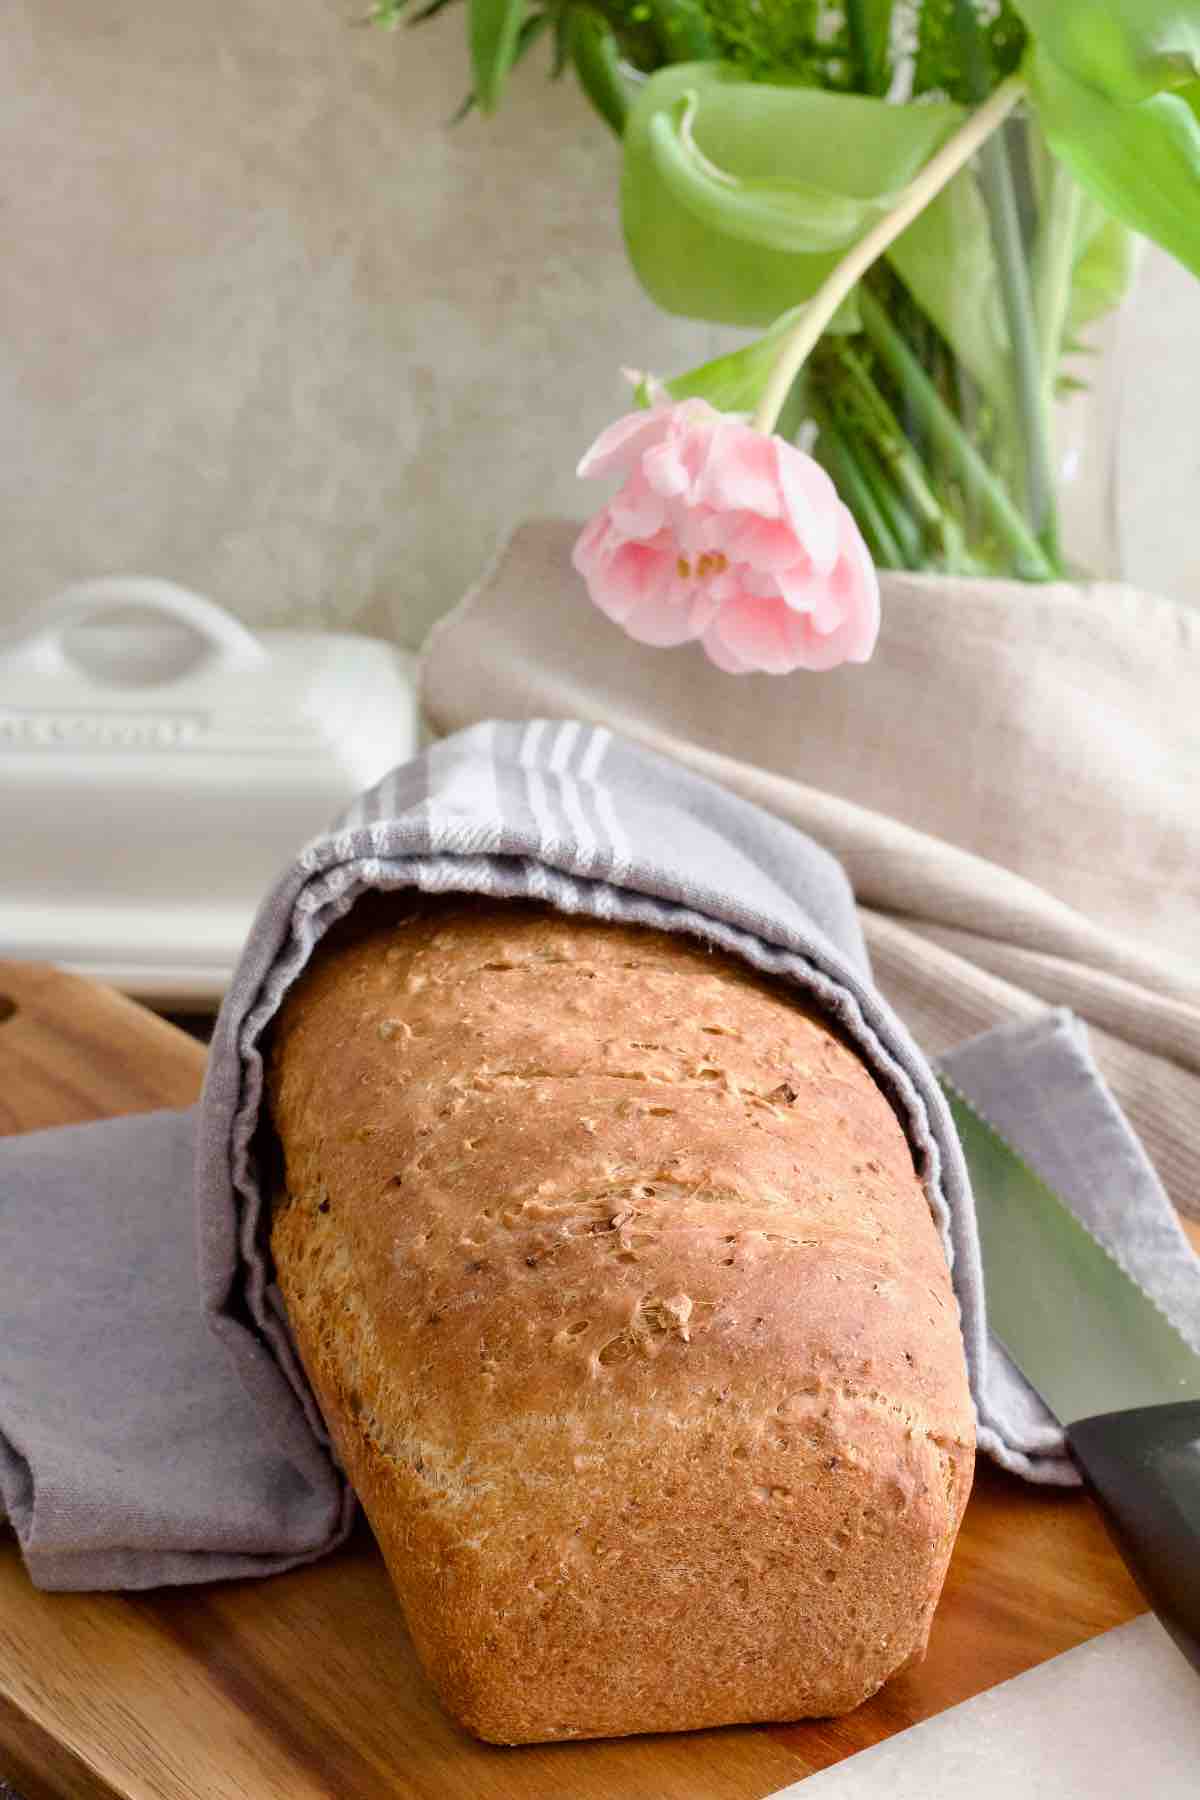
Once ready, take it out of the oven and onto cooling rack.
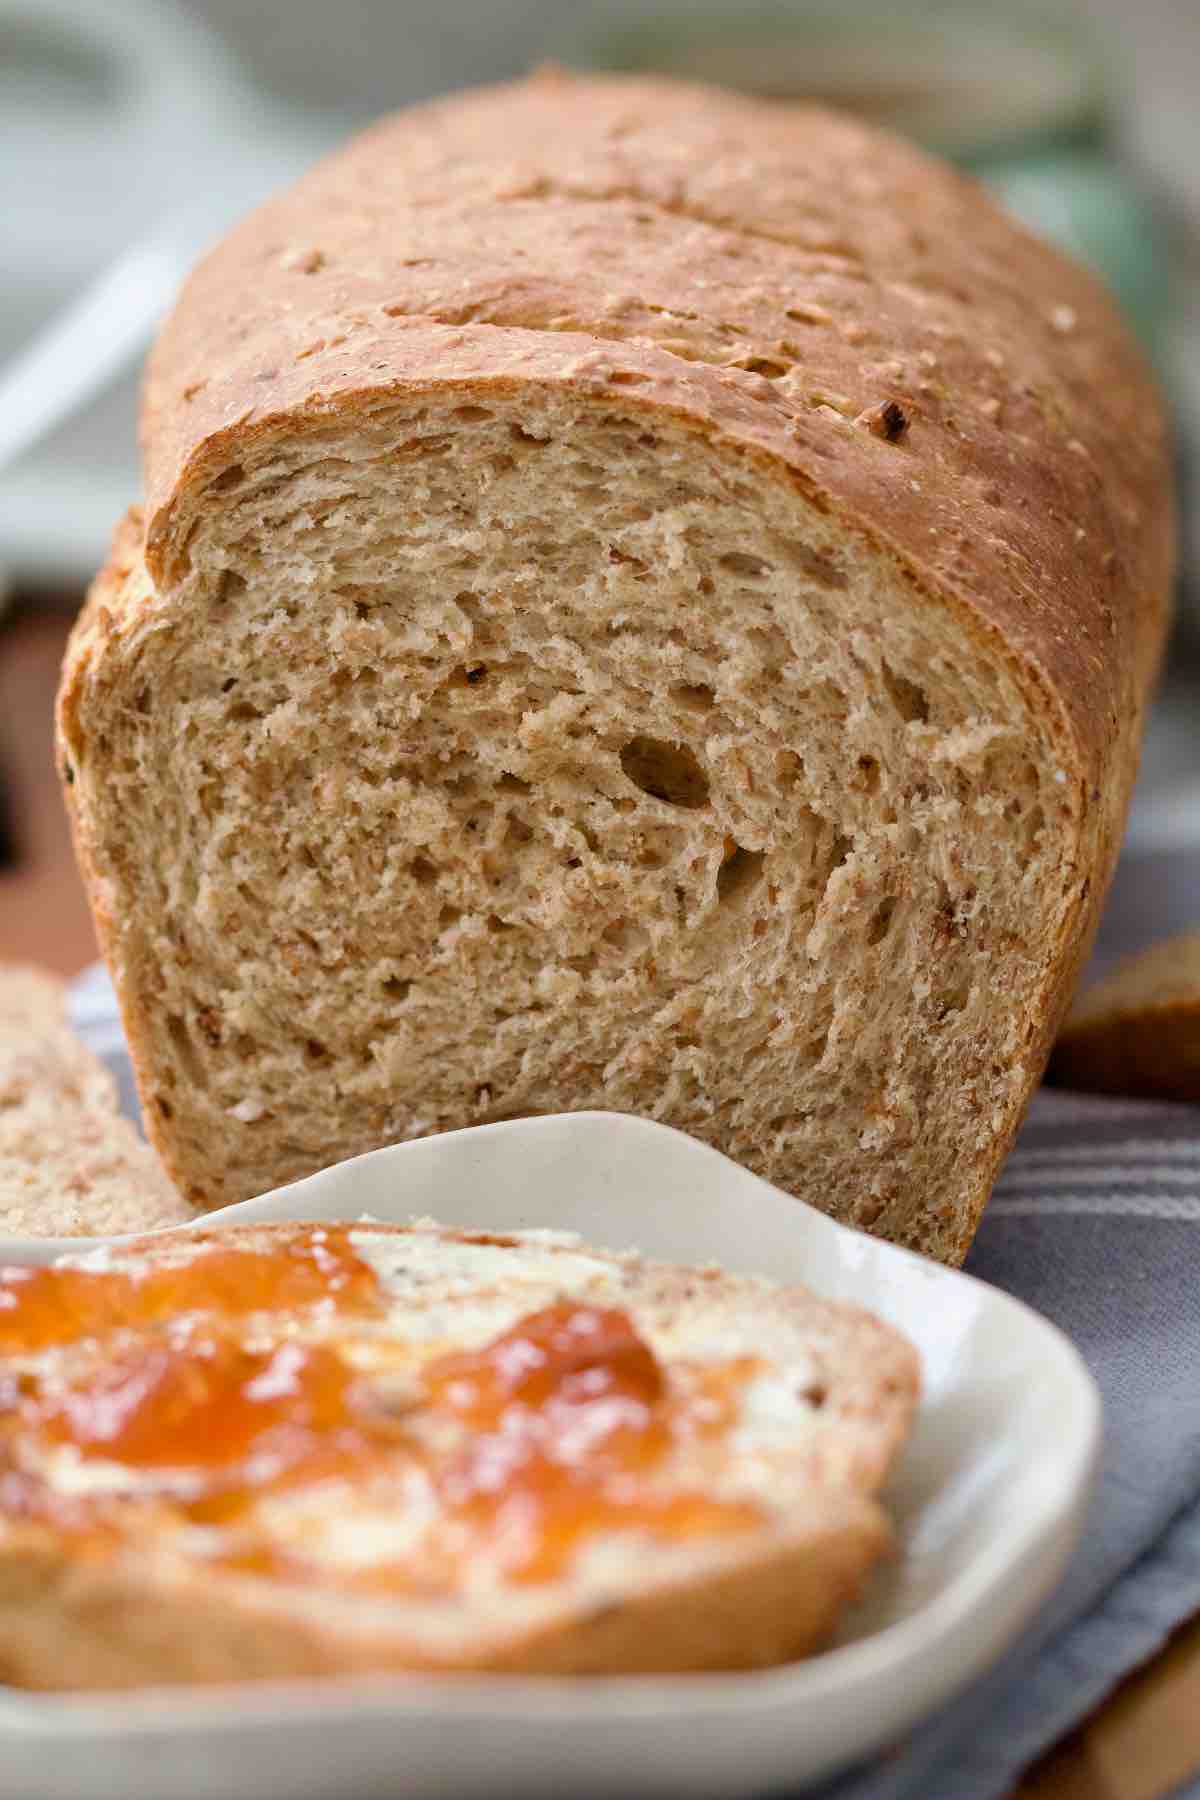
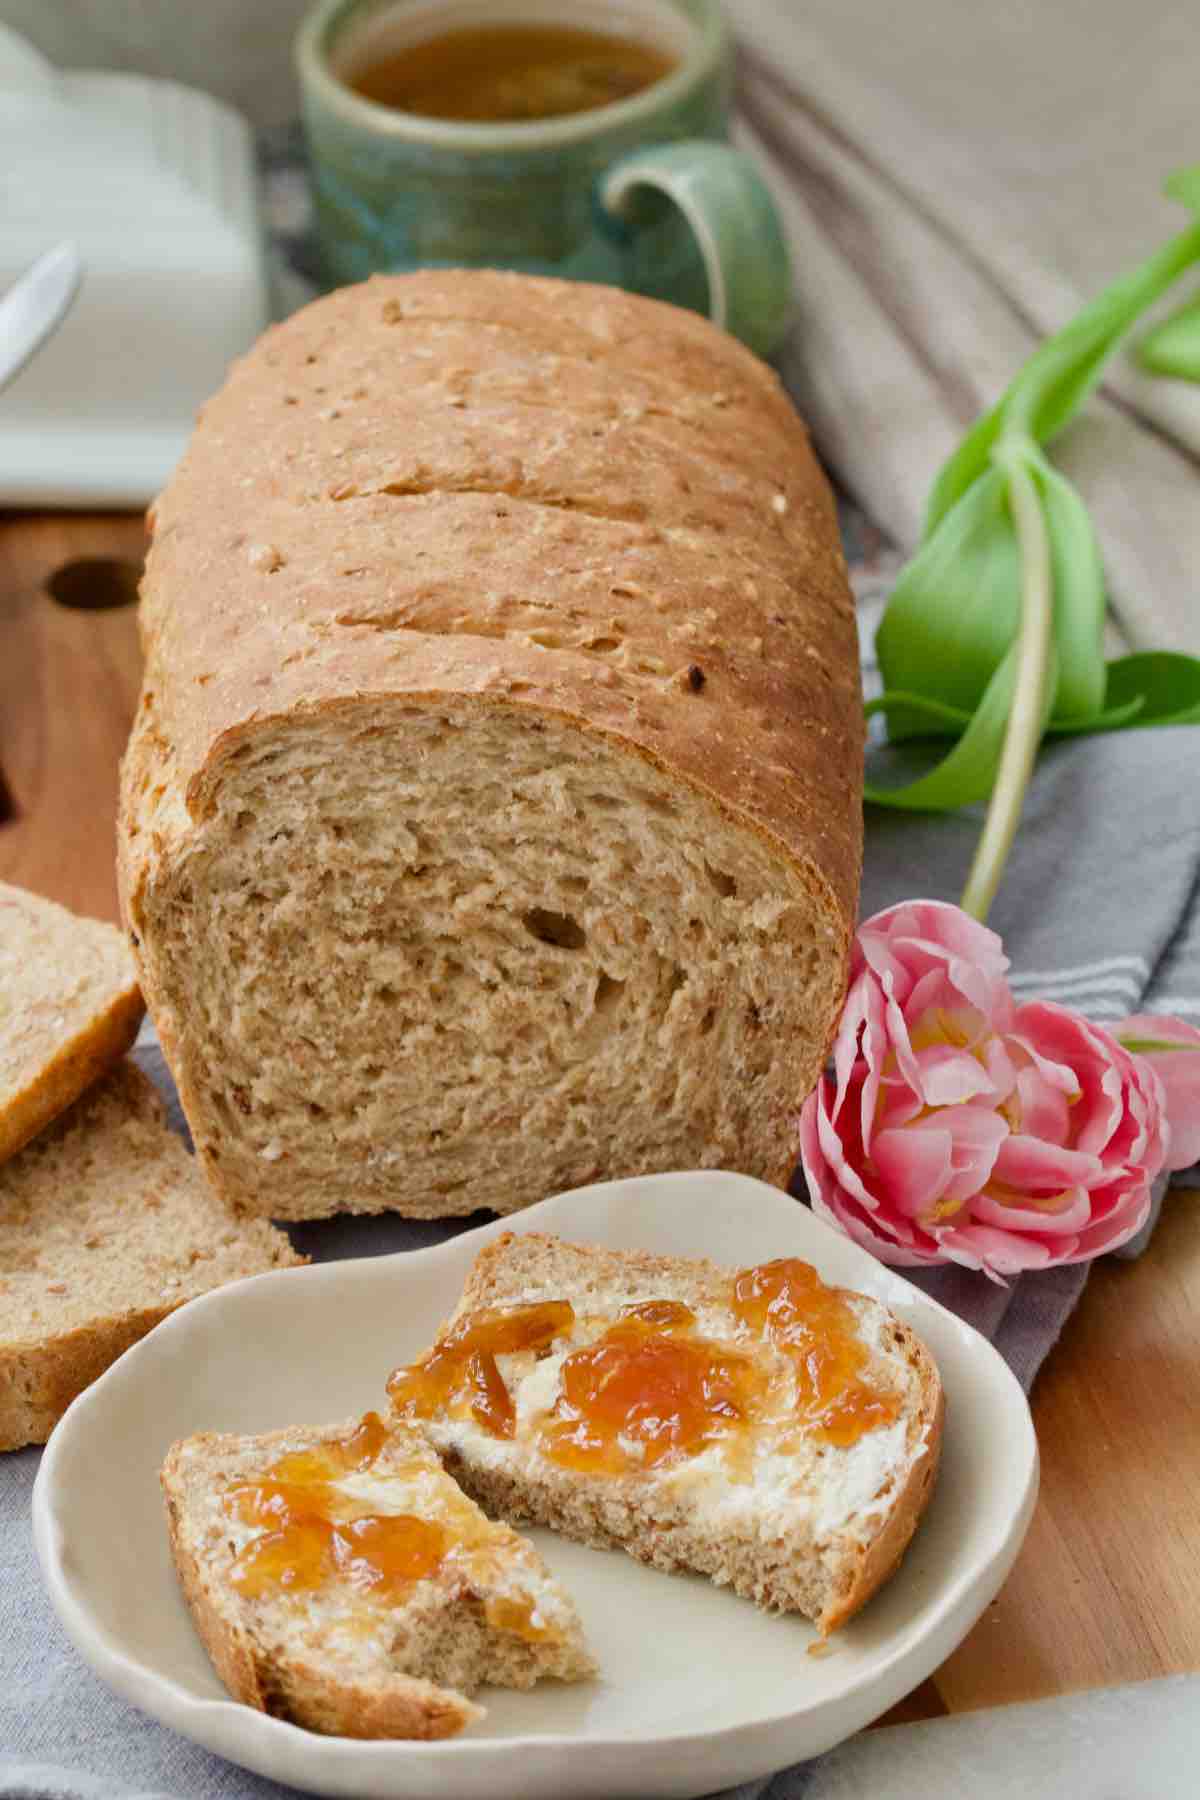
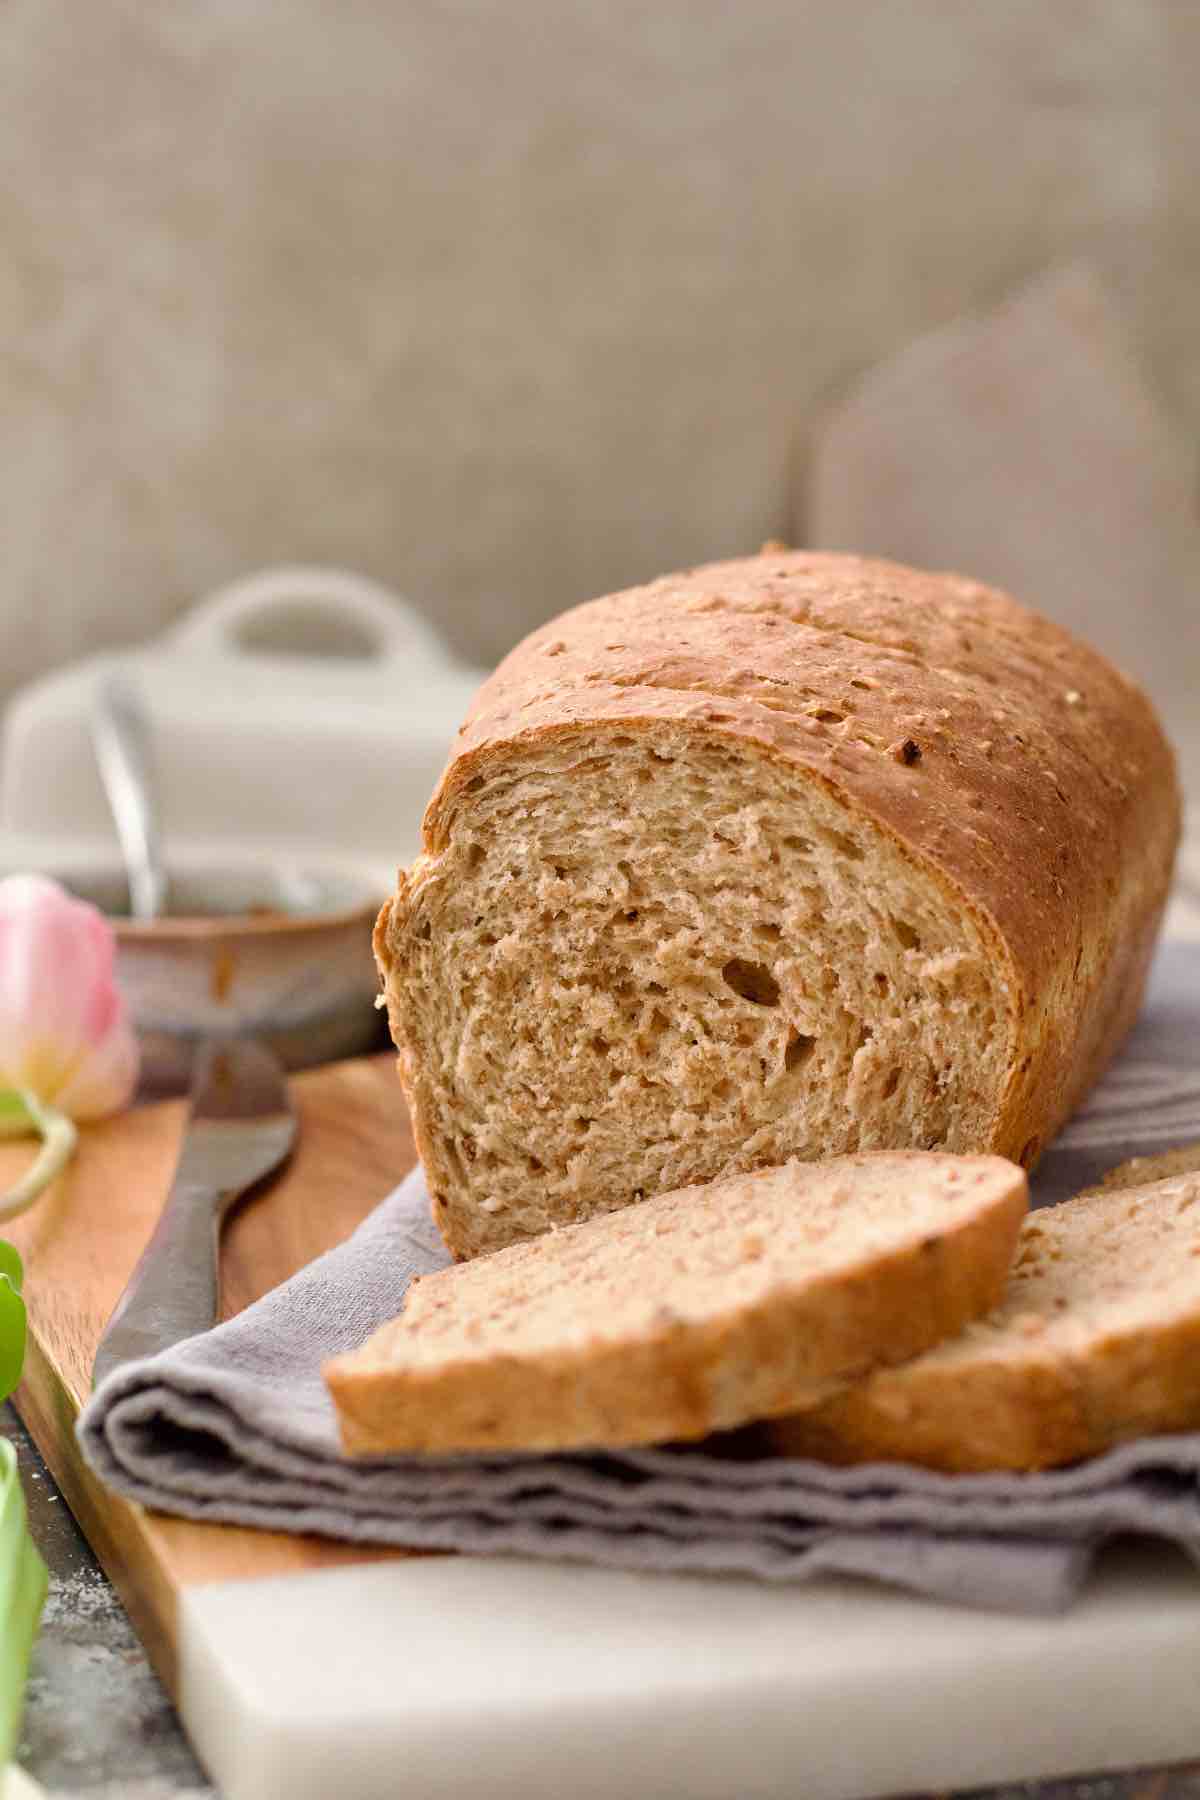
I like to wrap mine (still hot) in a clean tea towel which softens the crust.
Let it cool for as long as you can (ideally almost completely) before you slice into it.
Enjoy!
🥡 Storing
Store: This easy granary bread is best eaten super fresh, ideally within two days of being baked. Having said that, it will still be fine after that and it makes fantastic toast.
Store it somewhere dry, ideally inside the bread bin (if you have one) in a linen/cotton bread bag or even ziplock style, reusable plastic bag for 3-4 days.
Freeze: It freezes really well both as a whole loaf or in slices.
I like to freeze mine in slices and defrost as and when needed.
Defrost: You can defrost the loaf or individual slices on the kitchen counter in couple of hours or overnight and toast or warm up in the oven.
You can also toast slices directly from frozen for speedy breakfast.
💭 Pro Tips
Lukewarm water has temperature of roughly 37°C/100°F (digital food thermometer comes handy here). You should be able to dip your little finger in the liquid and just feel warmth. Warm liquid will help to activate the yeast. If you get it too hot, wait until it cools down as hot water will have an opposite effect on the yeast.
I find the amount of water to be spot on but as we all use different flours you mind find that your dough is a bit dry. If that's the case gradually add a bit more water (only teaspoon at a time) until you incorporate all the dry bits at the bottom of the bowl.
If you find your dough a bit too sticky, conversely use a bit more flour.
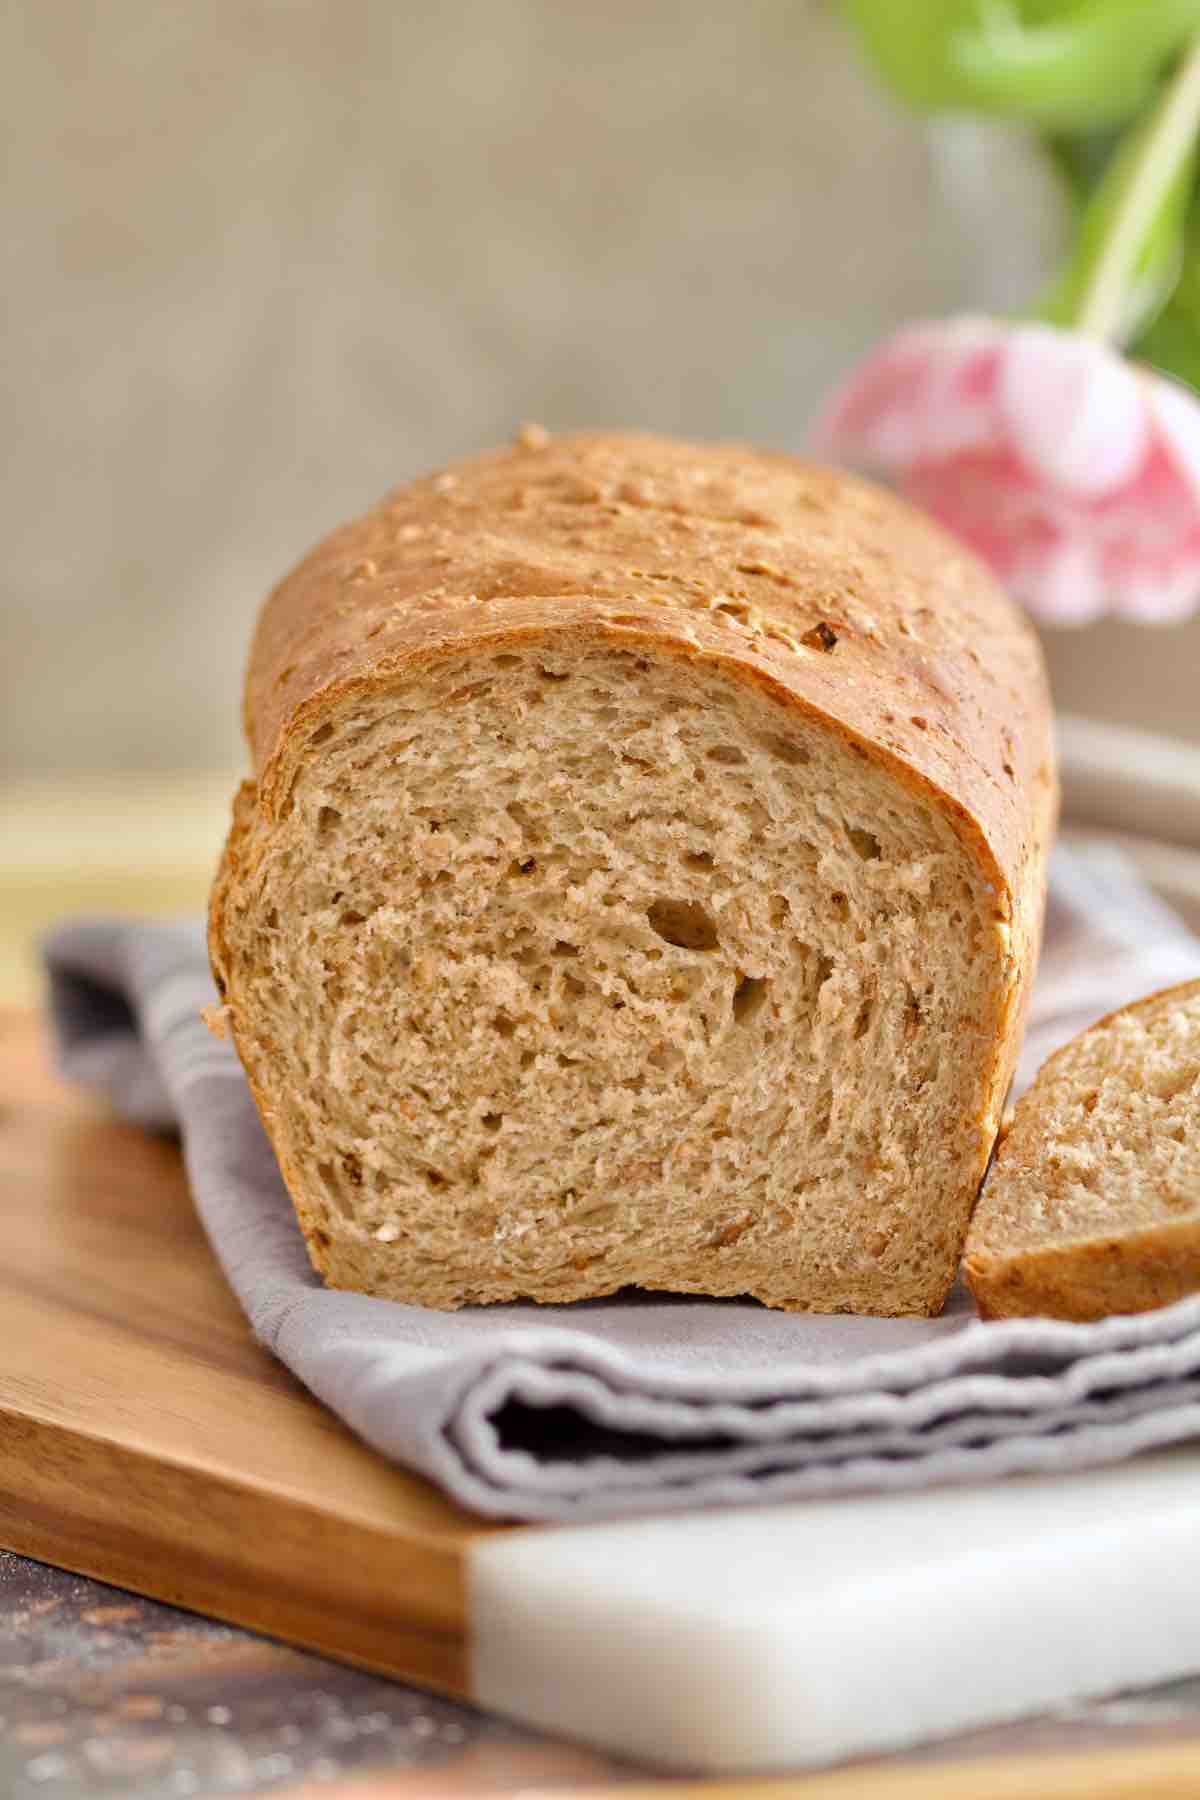
This granary bread is beautifully soft on the inside with a little bit of a crusty crust. If you like softer crust you can either wrap your loaf in a clean kitchen towel or alternatively, rub the top with a little bit of butter. Either way do it when your bread is freshly out of the oven.
This is the hardest bit but do try to resist your freshly baked granary bread for at least half an hour (ideally longer) after it's finished baking. Like any bread it really needs its rest or it will be rubbery and you risk it falling apart. Forget neat slices for sure.
🍽 Equipment
To make a loaf of homemade granary bread you really don't knead any fancy equipment. There are, however, few must pieces you simply cannot do without and couple that are not necessary but will make your life a lot easier.
Kitchen Scales - An absolute must for any home baker.
Large mixing bowl - I would recommend stainless steel bowl at least 22cm/8.5in in diameter. That will ensure plenty of room for expansion when proving your bread dough.
Bowl cover for proving - Yes you can absolutely use damp, clean kitchen towel here but I swear by my plastic elasticated shower cap which I've been using for years. Recently, after it finally fell apart I've replaced it with these purpose made plastic bowl covers. Very similar to shower cap but more robust.
Cooling wire rack - Another must for any keen home baker.
Non-stick 2lb (900g) loaf tin - It's a standard size loaf tin which is perfect for all types of bakes. I also have this silicone version which you don't even need to oil.
Rolling Pin - Super basic piece of equipment and again a must for home baker.
One extra pieces of equipment I swear by is my stand mixer. Definitely not a necessity and not for everyone's budget but if you can afford it I would highly recommend it. I've got this kMix Stand Mixer (not sponsored) bought in 2010 and have been using on weekly basis ever since. Having dough hook as one of the attachments makes kneading bread dough a breeze and I love it.
🍴 Serving suggestions
I doubt you need me to tell you how to eat your homemade granary bread especially as we all know that it makes fab sandwiches. You've got to try this Tofu "Egg" Salad or Mushroom and Walnut Pate.
However, it also works extremely well if you need something to mop up saucy stews, casseroles and heart pasta dishes. Do make sure to make your slices nice and thick for that.
Soups are another perfect companion for this humble loaf. And, even though not as robust as sourdough, granary loaf makes great croutons.
Try it with one of these:
Sweet Potato And Black Bean Stew
Vegan Sausage Casserole With Lentils And Cavolo Nero
One Pot Bean And Sausage Pasta
Or these lovely soups:
Creamy Cauliflower Leek and Potato Soup
Butternut Squash and Red Lentil Soup
Classic Carrot and Coriander Soup
📖 Variations
I like making my granary bread using 100% granary/malthouse type flour.
However, you could always experiment by swapping some of the flour for strong white bread flour for slightly lighter loaf.
You might have to be careful as you add your water and do it gradually. The reason being that with white flour your dough might not be as "thirsty". Incorporate it slowly as you're mixing your dough and adjust the amount accordingly.
Difference in the amount of water is unlikely to be big if any at all but I find it's always best to err on the side of caution.
❓ FAQ
No you don't. Feel free to shape it as a free-form loaf and bake on the baking sheet.
It will keep for a few days but is at its best for the first 2. After that it's best toasted.
Yes you can, it freezes really well. Check out 🥡 Storing for details.
Have you tried my Easy Granary Bread?
Please consider giving it ⭐️⭐️⭐️⭐️⭐️ rating in recipe card below and share your views or tips in the comments.
🍞 More bread recipes you might enjoy
Easy White Sandwich Bread (Soft-Crust)
Easy Wholemeal Bread Recipe (No-Knead)
Vegan Soda Bread (No Buttermilk)
📋 Recipe
Easy Granary Bread
Equipment
Ingredients
- 500 g granary bread flour malthouse type flour, See Notes
- 2 teaspoon quick/instant yeast (7g sachet)
- 1.5 teaspoon fine salt see notes
- 2 teaspoon sugar optional, see notes
- 30 g softened butter you can substitute with 2 tablespoon of light olive oil
- 275 ml lukewarm water
Instructions
- Put flour, sugar (if using), salt and yeast in a large mixing bowl or a bowl of your stand mixer. Ensure that when you add both salt and yeast into the bowl you initially keep them on separate sides.Give all your dry ingredients a gentle mix without butter and water first using your hand or dough hook attachment.500 g granary bread flour, 2 teaspoon quick/instant yeast (7g sachet), 1.5 teaspoon fine salt, 2 teaspoon sugar
- Next, add softened butter (or olive oil) and slowly start adding water as you mix and then knead the dough either by hand or with the dough hook attachment in your mixer.30 g softened butter, 275 ml lukewarm water
- Knead the dough until it's smooth and elastic (about 10 minutes by hand and 5 minutes on a medium speed in a mixer). It should be really nice to work with and not at all sticky. If yours is sticky, add a little bit more flour, if it feels dry a tiny bit more water, only teaspoon at a time.
- To check whether dough has been kneaded enough and is ready for proving press it gently with your finger. If it springs back slightly leaving only small indentation in your dough it's ready. If it doesn't knead for a bit longer.
- Once your dough is ready, put it back in lightly oiled bowl, cover (I use a shower cap) and place in a warm and draught free place until roughly doubled in size (about 1-2 hrs).***Quick Tip*** If you leave your dough in your kitchen at a normal room temperature of about 20°C/68°F it will prove just as well. It might take a bit longer but it will happen.
- Once double in size, knock back the dough with your fist to deflate it and turn it out onto kitchen surface.
- Prepare 2 lb loaf tin by greasing it very lightly with some oil or butter, set aside.Next, roll the dough out into a rectangle (roughly 20x28cm/ 8x11in). The short side should be roughly the length of your loaf tin.Start rolling up the dough from the short side ensuring it is pretty tight. Once the dough is rolled, gently fold the ends underneath (where the seam is) and put into prepared loaf tin.
- Once in the tin, cover the loaf with a shower cap and put somewhere warm (or leave it on the counter) for its second prove and to double in size (30min-1hr).Towards the end of second prove, preheat your oven to 200°C/400°F/Gas Mark 6.***Quick Tip*** My kitchen is usually pretty warm and the second proof takes roughly the amount of time it takes for my oven to heat up to 200°C/400°F/Gas Mark 6. Once you've baked this loaf few times you will establish your own timing routine. It all comes with practice.
- When your loaf doubled in size, score it gently across (lengthwise) with a blade or a sharp knife making sure you don't press too hard.
- Bake your loaf in a preheated oven for about 25-35 minutes. To check it for doneness, take it out of the tin and tap at the bottom. If it sounds hollow, it means it's done. If it's more like a dull thud sound that means it will need few more minutes.***Quick Tip*** Having baked this loaf more times than I can count now, I usually take it out of the oven and its tin exactly after 25 minutes. It never sounds hollow and you can tell that there is still a bit of moisture at the bottom. I put it back in the oven without the tin, directly onto a rack and bake for further 8-10 minutes. Works every time.
- Once ready, take it out of the oven and onto cooling rack. I like to wrap mine (still hot) in a clean tea towel which softens the crust. Let it cool for as long as you can (ideally almost completely) before you slice into it.Enjoy!
Notes
- Nutritional information is approximate, per slice and should be treated as a guideline only.
- For guide on how to identify granary/malthouse type flour see 🍞 Few words about granary flour.
- Feel free to adjust the amount of salt. I find 1.5tsp is enough but you might want to use less (1 tsp) or more (2 tsp). I wouldn't recommend more than 2 teaspoon for this amount of flour.
- Feel free to leave sugar out completely. It gives yeast the initial boost and helps to create thicker crust but overall I didn't find it makes enough difference one way or another.
- Freezer friendly.
- For more information on ingredients, baking tips, and storing please refer to the main article.


Paddy Allen says
Perfect first time. What more can you ask?
joskitchenlarder says
So pleased Paddy, thank you! 😊
Peter says
Hi Jo
In this recipe you say to use light olive oil not extra virgin olive oil. What's the reason behind this? Many thanks!
joskitchenlarder says
Hello Peter, Light olive oil is flavourless unlike extra virgin with its very pronounced flavour. In granary bread light olive oil or cold-pressed rapeseed oil are much better for that very reason not mentioning the expense of extra virgin olive oil which is better left for things where it can truly shine like salad dressings. There is one bread I would use extra virgin olive oil for and it's focaccia. I hope it helps. 😊
Robert says
Love this bread
joskitchenlarder says
So pleased to hear, thanks so much Robert!😊