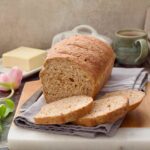
Easy Granary Bread
This quick, easy and very forgiving recipe for quintessentially British granary breadwill become your family staple. Easily made by hand or with the help of a mixer and with only 5 simple ingredients, it's home bakers' favourite.
Servings 16 slices
Calories 126kcal
Equipment
Ingredients
- 500 g granary bread flour malthouse type flour, See Notes
- 2 teaspoon quick/instant yeast (7g sachet)
- 1.5 teaspoon fine salt see notes
- 2 teaspoon sugar optional, see notes
- 30 g softened butter you can substitute with 2 tablespoon of light olive oil
- 275 ml lukewarm water
Instructions
- Put flour, sugar (if using), salt and yeast in a large mixing bowl or a bowl of your stand mixer. Ensure that when you add both salt and yeast into the bowl you initially keep them on separate sides.Give all your dry ingredients a gentle mix without butter and water first using your hand or dough hook attachment.500 g granary bread flour, 2 teaspoon quick/instant yeast (7g sachet), 1.5 teaspoon fine salt, 2 teaspoon sugar
- Next, add softened butter (or olive oil) and slowly start adding water as you mix and then knead the dough either by hand or with the dough hook attachment in your mixer.30 g softened butter, 275 ml lukewarm water
- Knead the dough until it's smooth and elastic (about 10 minutes by hand and 5 minutes on a medium speed in a mixer). It should be really nice to work with and not at all sticky. If yours is sticky, add a little bit more flour, if it feels dry a tiny bit more water, only teaspoon at a time.
- To check whether dough has been kneaded enough and is ready for proving press it gently with your finger. If it springs back slightly leaving only small indentation in your dough it's ready. If it doesn't knead for a bit longer.
- Once your dough is ready, put it back in lightly oiled bowl, cover (I use a shower cap) and place in a warm and draught free place until roughly doubled in size (about 1-2 hrs).***Quick Tip*** If you leave your dough in your kitchen at a normal room temperature of about 20°C/68°F it will prove just as well. It might take a bit longer but it will happen.
- Once double in size, knock back the dough with your fist to deflate it and turn it out onto kitchen surface.
- Prepare 2 lb loaf tin by greasing it very lightly with some oil or butter, set aside.Next, roll the dough out into a rectangle (roughly 20x28cm/ 8x11in). The short side should be roughly the length of your loaf tin.Start rolling up the dough from the short side ensuring it is pretty tight. Once the dough is rolled, gently fold the ends underneath (where the seam is) and put into prepared loaf tin.
- Once in the tin, cover the loaf with a shower cap and put somewhere warm (or leave it on the counter) for its second prove and to double in size (30min-1hr).Towards the end of second prove, preheat your oven to 200°C/400°F/Gas Mark 6.***Quick Tip*** My kitchen is usually pretty warm and the second proof takes roughly the amount of time it takes for my oven to heat up to 200°C/400°F/Gas Mark 6. Once you've baked this loaf few times you will establish your own timing routine. It all comes with practice.
- When your loaf doubled in size, score it gently across (lengthwise) with a blade or a sharp knife making sure you don't press too hard.
- Bake your loaf in a preheated oven for about 25-35 minutes. To check it for doneness, take it out of the tin and tap at the bottom. If it sounds hollow, it means it's done. If it's more like a dull thud sound that means it will need few more minutes.***Quick Tip*** Having baked this loaf more times than I can count now, I usually take it out of the oven and its tin exactly after 25 minutes. It never sounds hollow and you can tell that there is still a bit of moisture at the bottom. I put it back in the oven without the tin, directly onto a rack and bake for further 8-10 minutes. Works every time.
- Once ready, take it out of the oven and onto cooling rack. I like to wrap mine (still hot) in a clean tea towel which softens the crust. Let it cool for as long as you can (ideally almost completely) before you slice into it.Enjoy!
Notes
- Nutritional information is approximate, per slice and should be treated as a guideline only.
- For guide on how to identify granary/malthouse type flour see 🍞 Few words about granary flour.
- Feel free to adjust the amount of salt. I find 1.5tsp is enough but you might want to use less (1 tsp) or more (2 tsp). I wouldn't recommend more than 2 teaspoon for this amount of flour.
- Feel free to leave sugar out completely. It gives yeast the initial boost and helps to create thicker crust but overall I didn't find it makes enough difference one way or another.
- Freezer friendly.
- For more information on ingredients, baking tips, and storing please refer to the main article.
Nutrition
Calories: 126kcal | Carbohydrates: 21g | Protein: 4g | Fat: 2g | Saturated Fat: 1g | Polyunsaturated Fat: 0.2g | Monounsaturated Fat: 0.5g | Trans Fat: 0.1g | Cholesterol: 4mg | Sodium: 232mg | Potassium: 48mg | Fiber: 3g | Sugar: 1g | Vitamin A: 47IU | Vitamin C: 0.004mg | Calcium: 6mg | Iron: 1mg