You will love Polish Faworki. These traditional, deep fried pastry treats dusted with icing sugar are light, crispy and oh so moreish.
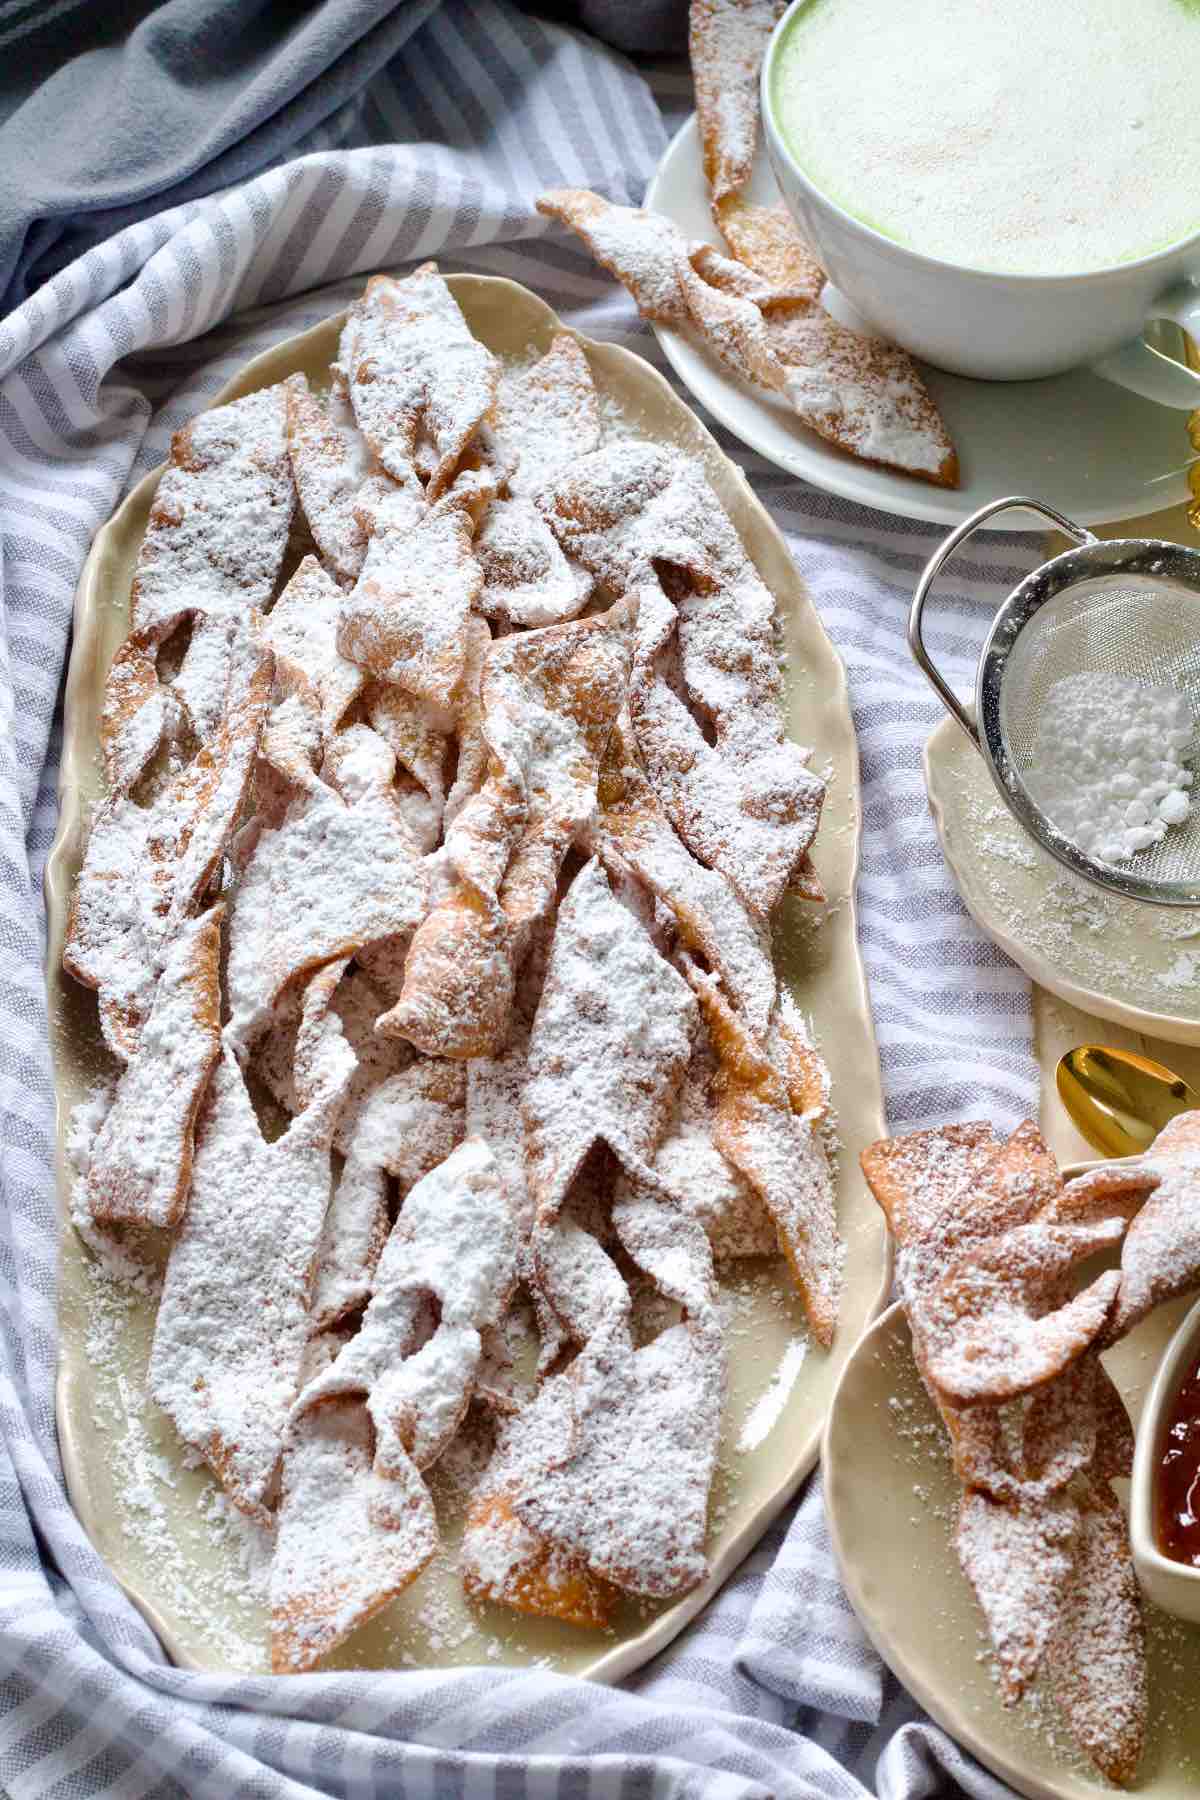
You are in for a real treat with Faworki aka Chrusty, Chruściki or Angel Wings (all the names are plural).
Although they require a little bit of work (and some physical stamina too), they're pretty simple to make and will give you a little insight into Polish food culture should you wish to give them a go.
And I hope you do.
If you'd like to try more Polish recipes, take a look at my traditional Polish Apple Cake (Szarlotka) or Polish Apple Pancakes (Racuchy z Jabłkami) recipes.
Jump to:
🇵🇱 What are faworki?
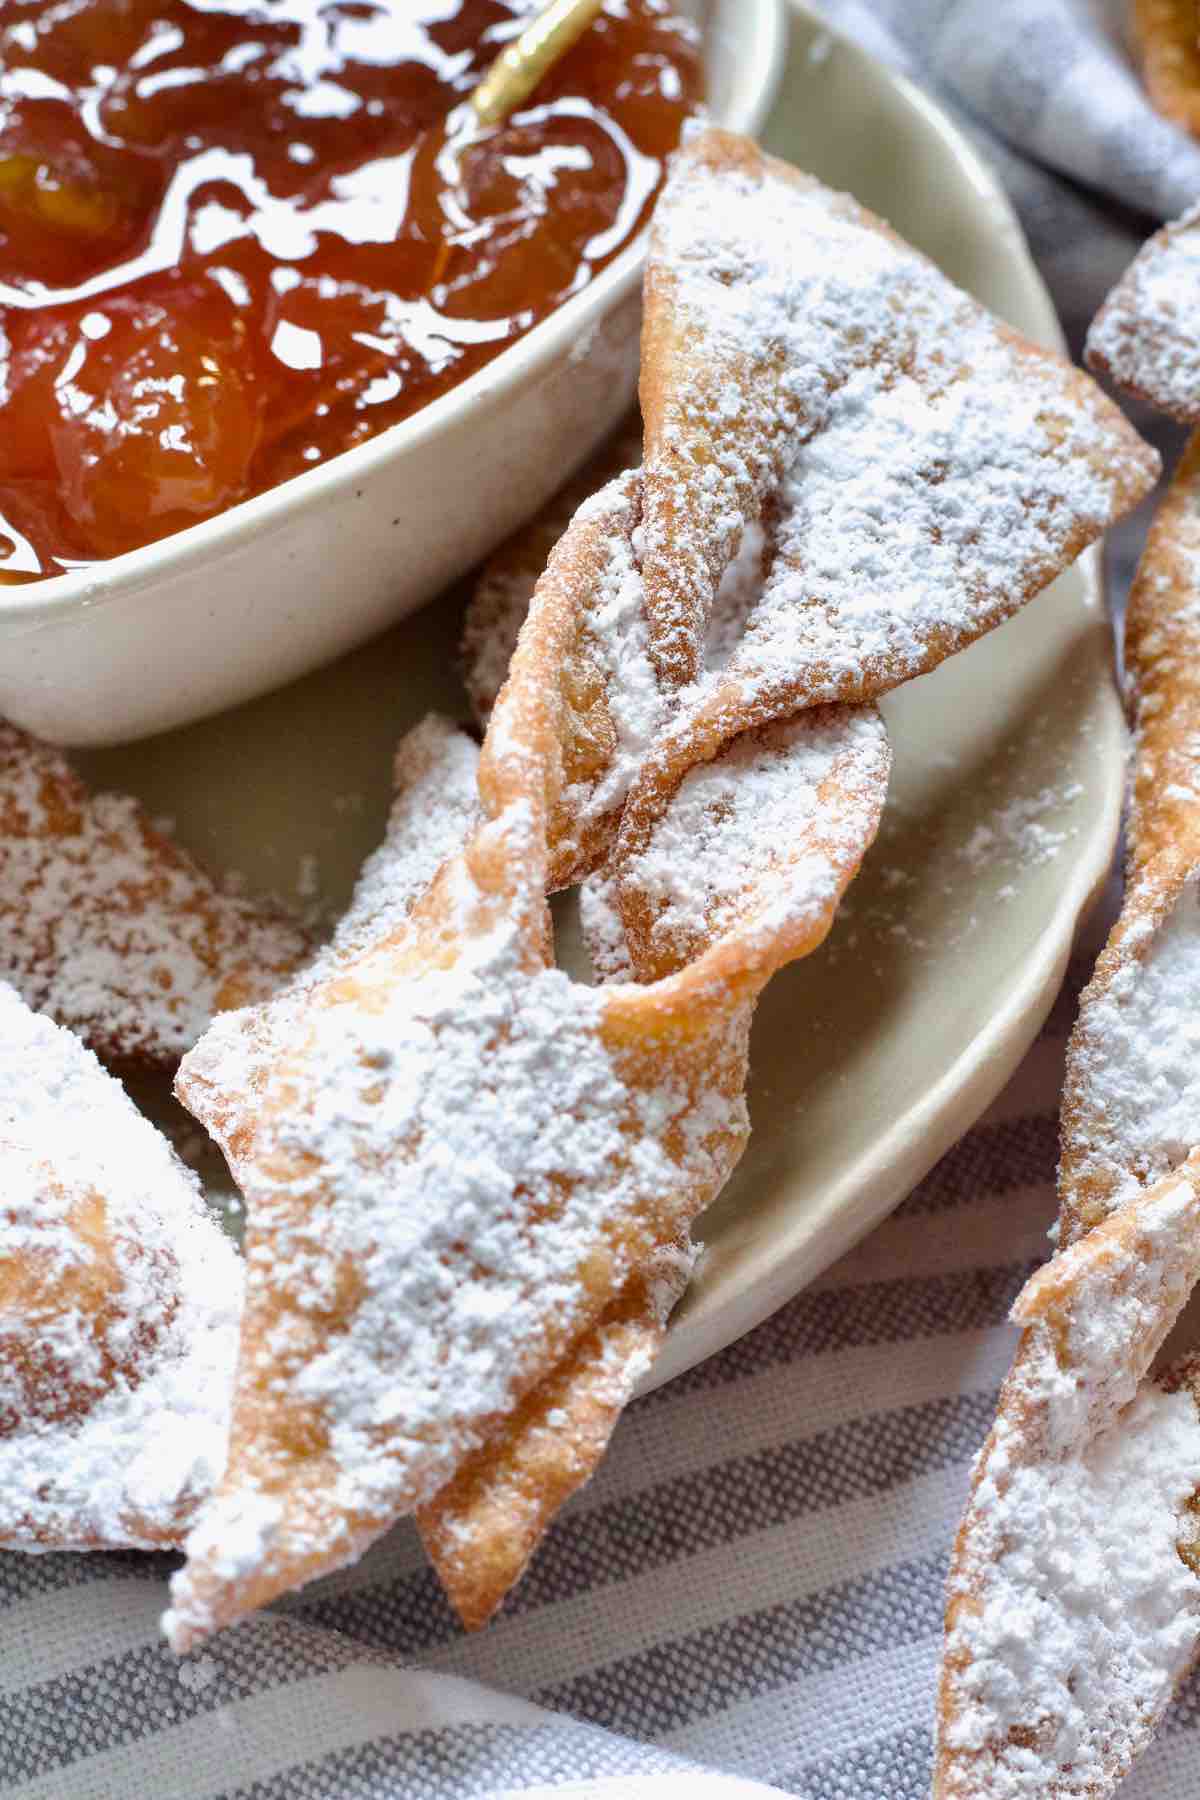
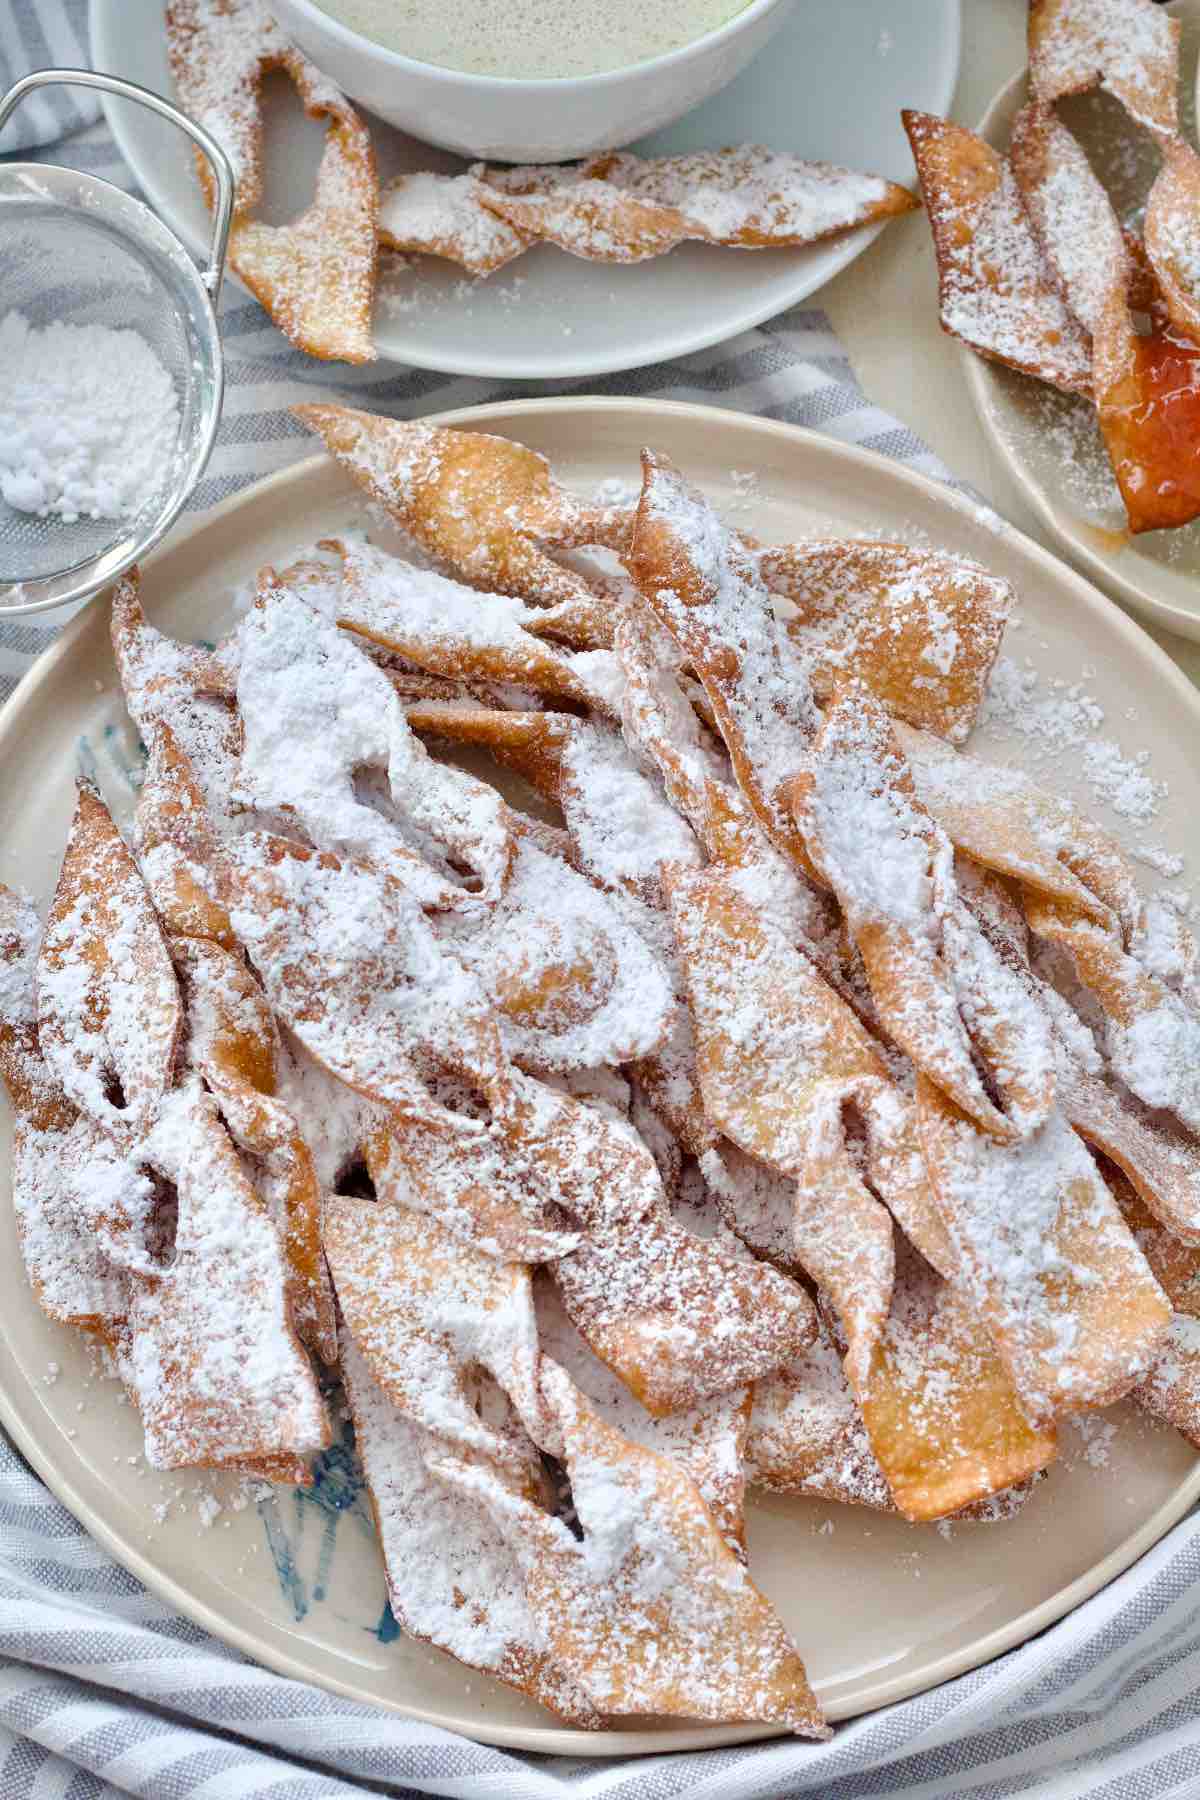
Faworki are deep fried pieces of pastry dough, shaped into sort of twisted ribbons and served sprinkled very generously with icing sugar.
They're very crispy and despite being deep fried very light too.
Properly made faworki, which dough have been well aerated, will have lots of little air bubbles on their surface once fried, indicating their super crispness.
Pastry dough itself contains none to very little sugar (depending on recipe) and dusting them with icing/powdered sugar when serving provides just the right amount of sweetness. Remember to be generous though!
Chruściki are usually enjoyed during the period known in Poland as Carnival which runs from 6 January (known as The Three Kings Day or Epiphany) up until the day before the start of Lent (Ash Wednesday).
Lots of people make them on Fat Thursday (last Thursday before Ash Wednesday and sort of an equivalent of Shrove Tuesday here in the UK), when they compete for attention with Polish doughnuts called pączki.
Some people choose one over the other some people indulge in both! It's Fat Thursday after all!
According to Wikipedia the Polish word faworki was the name reserved for colourful ribbons attached to either female or male clothing, especially ribbons given to medieval knights by their ladies.
The word faworki itself came to Poland from the French word faveur, meaning 'grace' or 'favour'.
✔️ Why you'll love this recipe
- Perfect treat to indulge in every now and then.
- Great introduction to Polish culinary traditions.
- Simple to make even though requiring some physical strength and patience.
- Use very simple, everyday ingredients.
- Perfect for making in advance.
- Great for feeding crowds.
- Dough itself is freezer friendly.
- Great alternative to pancakes on Shrove Tuesday.
📝 Ingredients and substitutes
Here's what you will need to make Faworki:
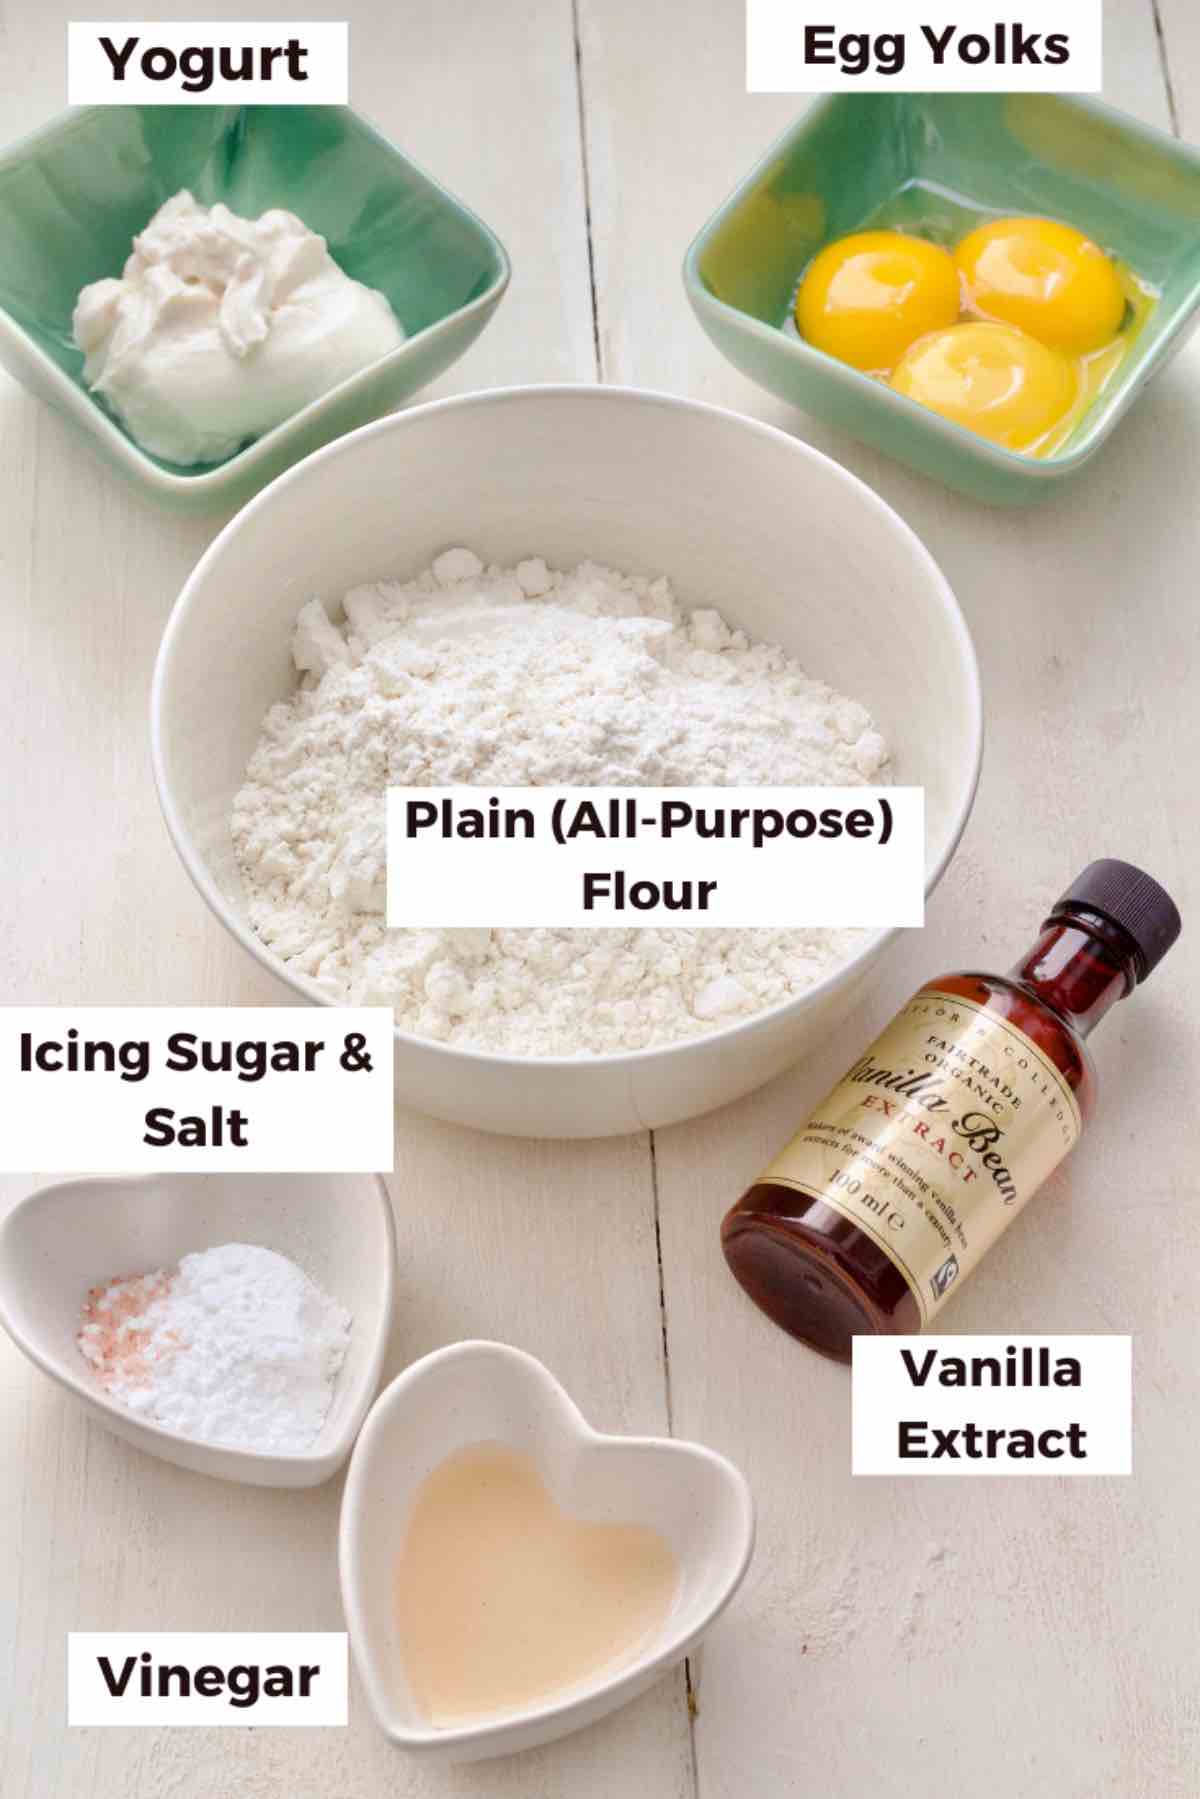
Plain (All-Purpose) Flour
Egg Yolks - They provide fat and richness to the dough and contribute to faworki being crisp and delicate.
Yogurt - I used full fat, Greek style soya yogurt (as we don't eat dairy) but traditionally you would use sour cream. Yo could also use regular full fat yogurt or creme fraiche here.
Icing (Powdered, Confectioners') Sugar - Although you will need majority of icing sugar to dust over ready made faworki, most traditional recipes add some sugar into the dough as well. My recipe uses 1 tbsp.
Pinch of salt - Flavour.
Vanilla Extract - Optional but I love vanilla and like adding it in.
Vodka or Vinegar - The reason for adding it is to prevent faworki from soaking up too much fat when fried. As we don't have vodka in the house I always use apple cider vinegar and it works really well.
You can use other types of vinegar here as well.
Oil for frying - Traditionally, faworki are fried mainly in lard (no thank you) but oil works just as well.
I tend to use cold-pressed rapeseed oil when frying but any neutral oil that has high smoking point (can be heated to high temperature) will be fine here.
🔪 Instructions
Ingredient quantities & detailed instructions to be found in recipe card at the bottom of the post.
Making dough
Add flour, icing sugar, salt, egg yolks, yogurt, vinegar and vanilla extract into a large bowl or bowl of standing mixer.
If using standing mixer, use dough hook attachment and knead until dough starts coming together. First it will have this "shaggy" appearance for a while (it's initially very dry) but it will eventually come together.
If making dough by hand, you can start by mixing it with a wooden spoon and then moving onto bringing dough together with your hand until it forms a ball. Again, it will feel very dry at first but do refrain from adding any extra moisture.
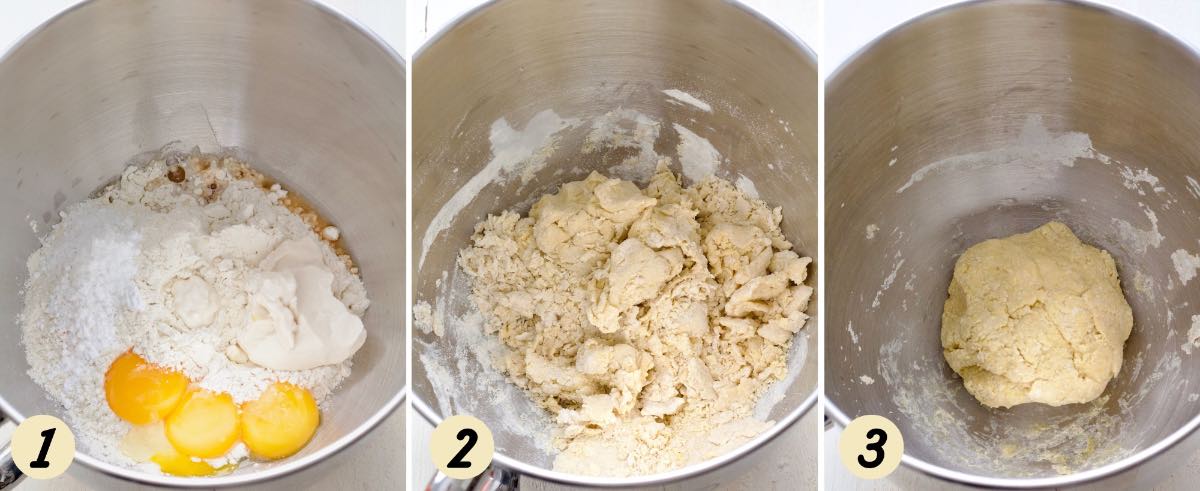
Move the dough to the worktop dusted with flour and start rolling it out.
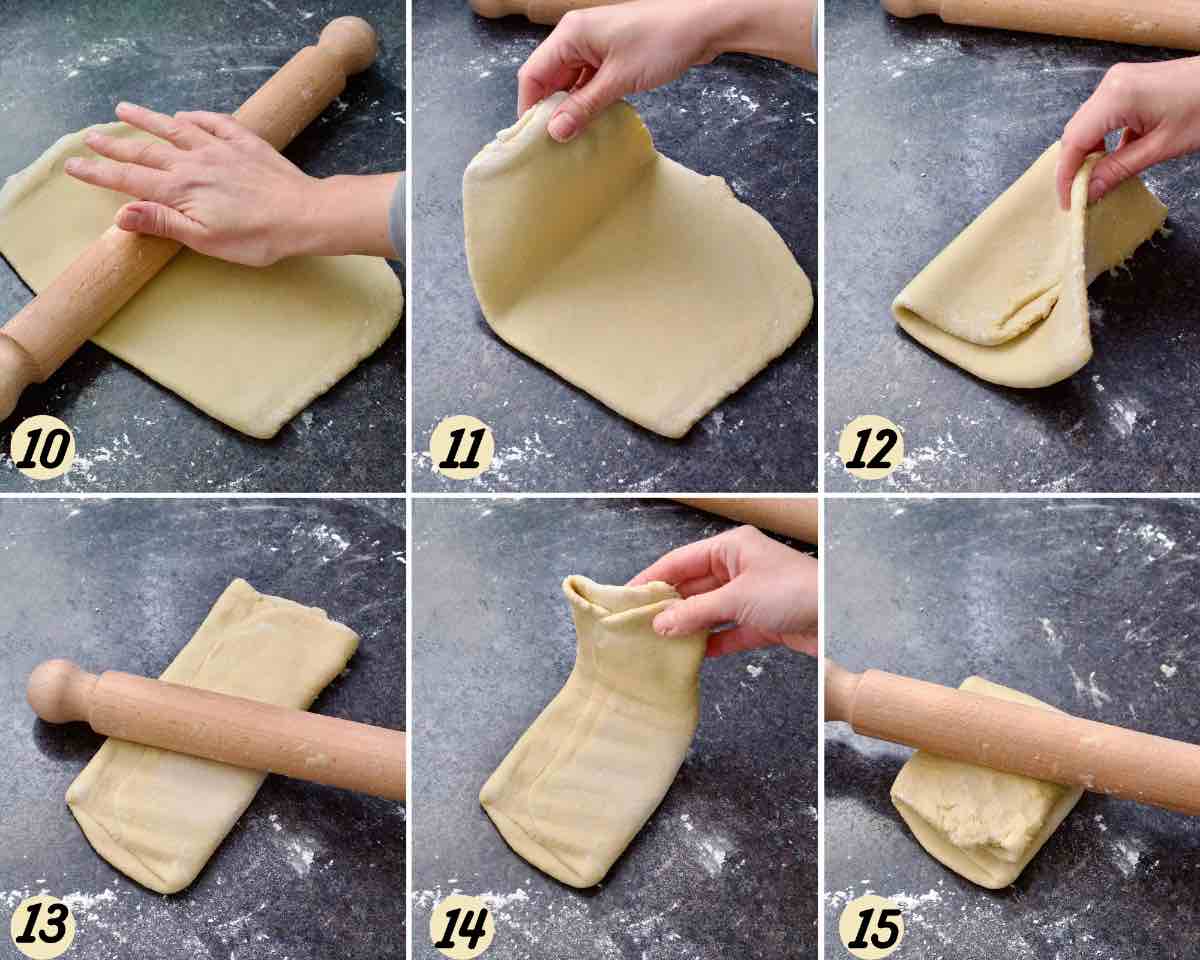
Once rolled out, fold third of the dough from the top in and third of the dough from the bottom in (you can keep folding it even smaller if you want to) and give it a good "beating" with a rolling pin before rolling it out again.
You will have to repeat the process quite a few times in order to aerate the dough properly which is the key to the success with faworki. I usually allow myself at least 10 minutes of rolling, folding, "beating" and rolling the dough out again.
The "beating" bit is not strictly necessary but it does help in achieving super crispy and light faworki.
***Quick Tip*** If you happen to have pasta machine or meat grinder, you can achieve the same effect by running your dough through one of them. If using meat grinder use the attachment with the largest holes and run the dough through 2 or 3 times.
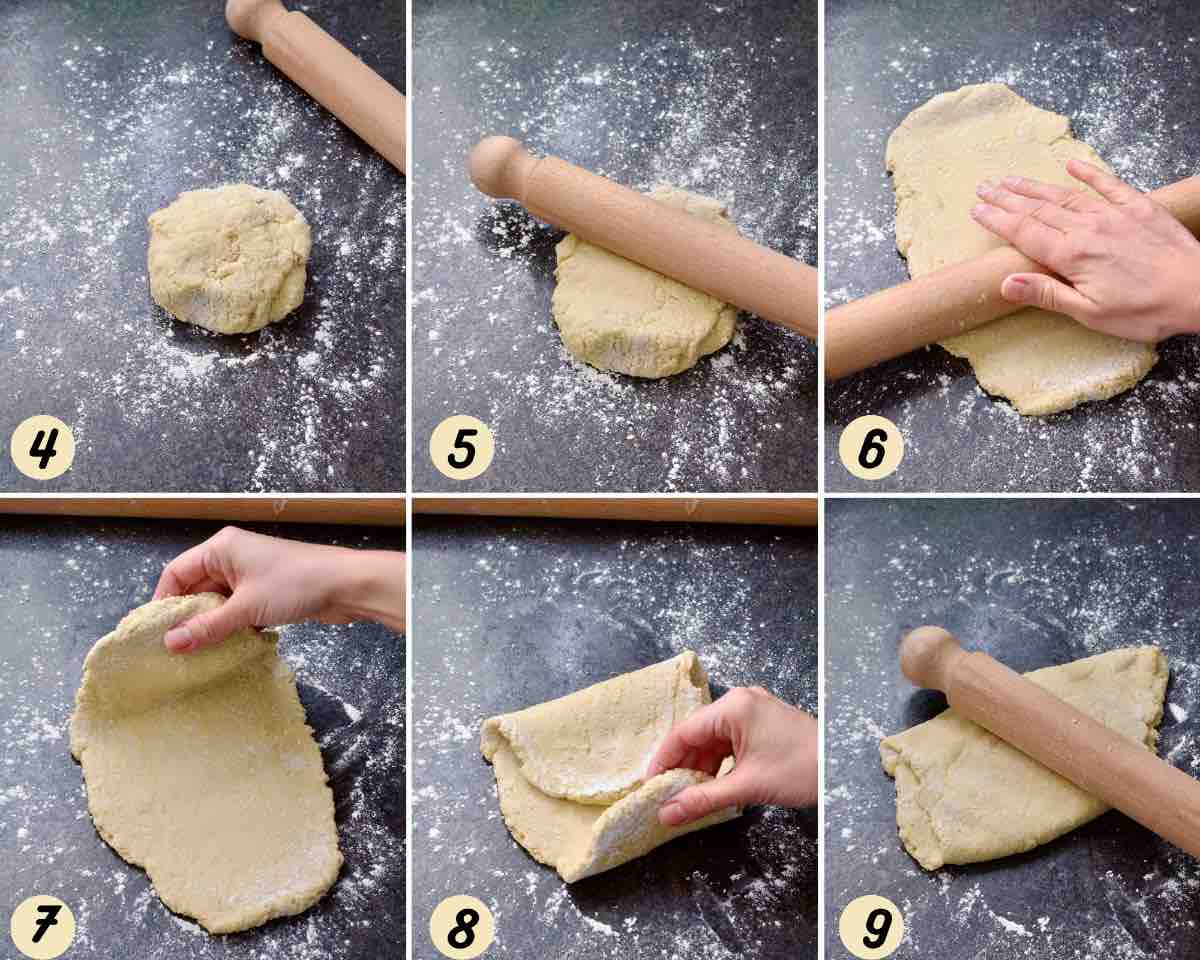
As you keep going you will notice that dough is getting smoother and smoother and really nice to work with.
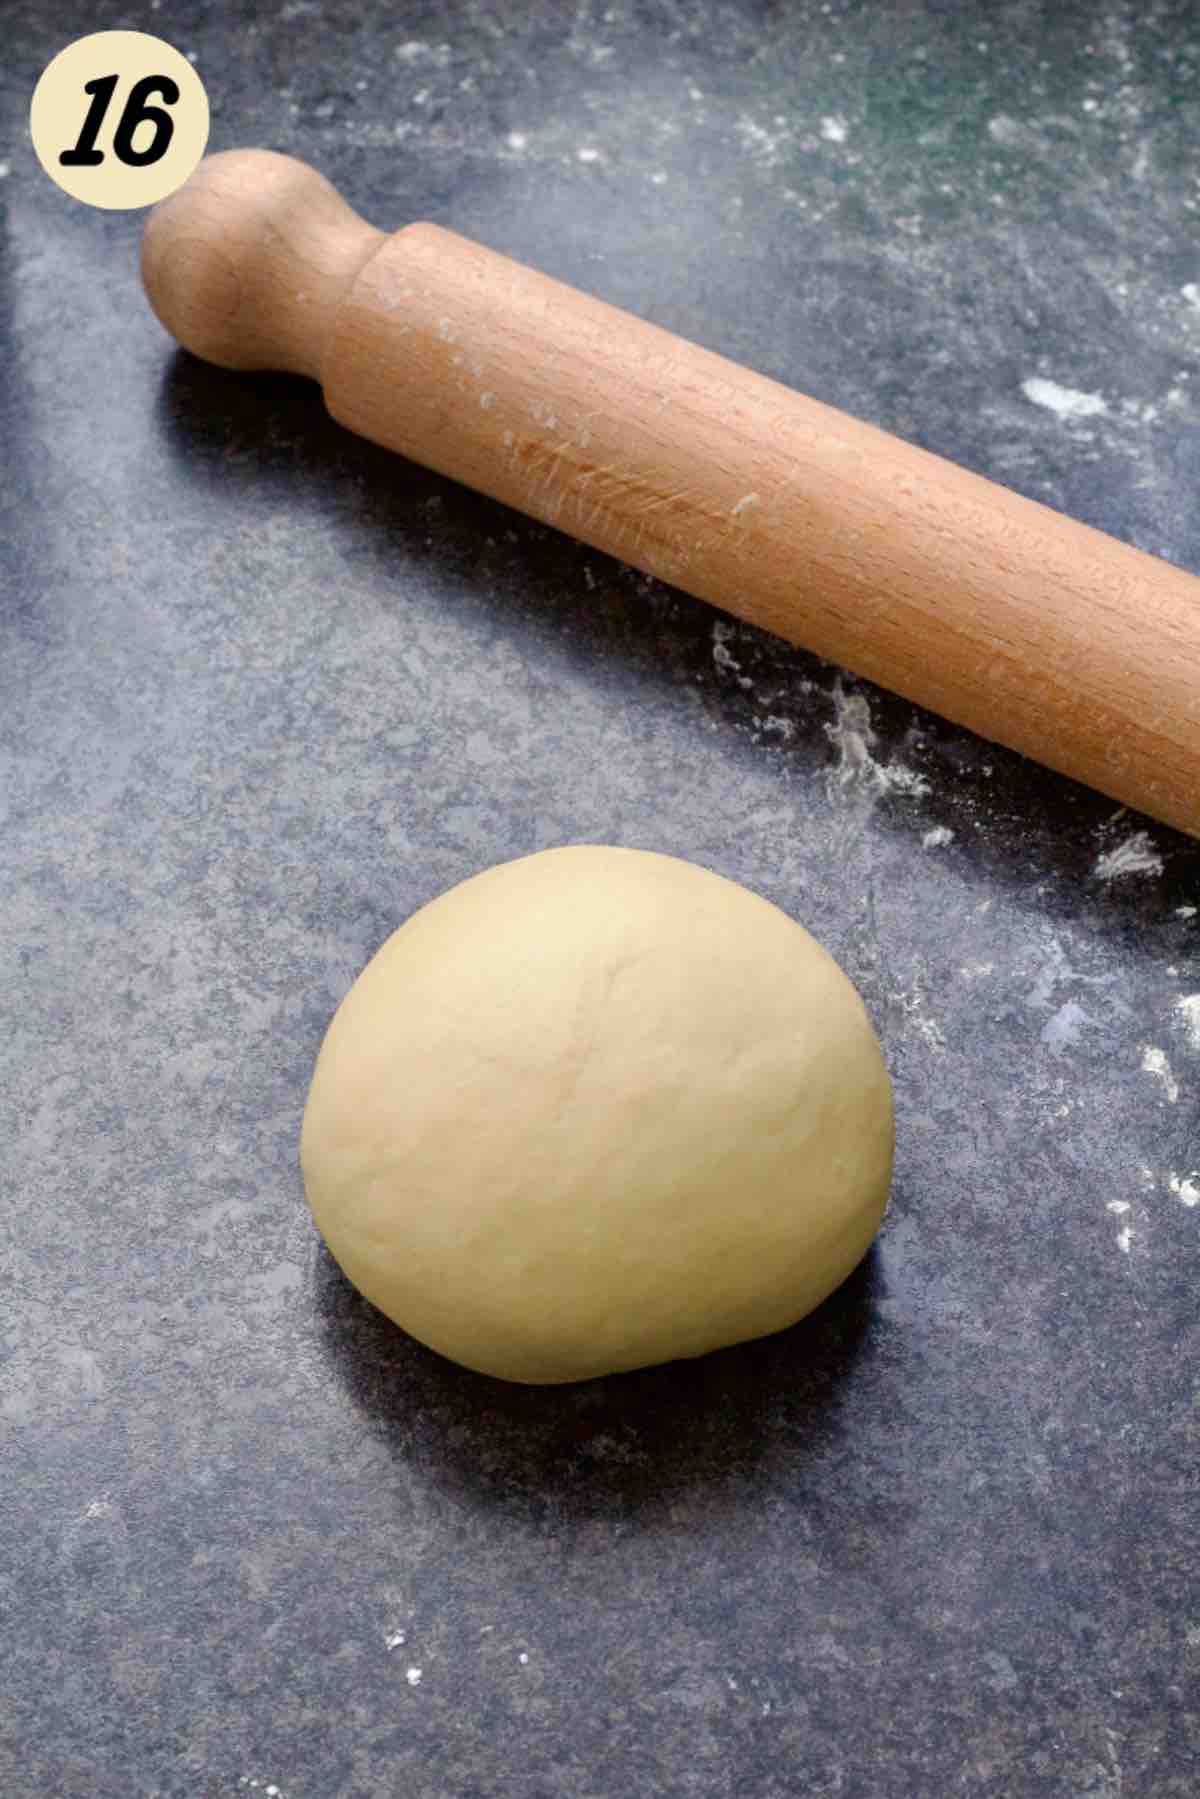
After about 10-15 minutes of hard work you will have nice and smooth ball of dough.
At this point you can cover the dough to prevent it from drying out and let it rest for about half an hour. It is supposed to make rolling it out easier. Personally, I haven't noticed much difference to when I use it straight away so I tend to go straight to rolling out the dough and cutting and shaping faworki.
***Quick Tip*** If you are making faworki ahead of time you would put the dough into plastic bag (reusable ziplock style bag work great) and put it in the fridge for up to 2 days. If you'd like to keep it for longer, I would recommend freezing.
Cutting and shaping faworki
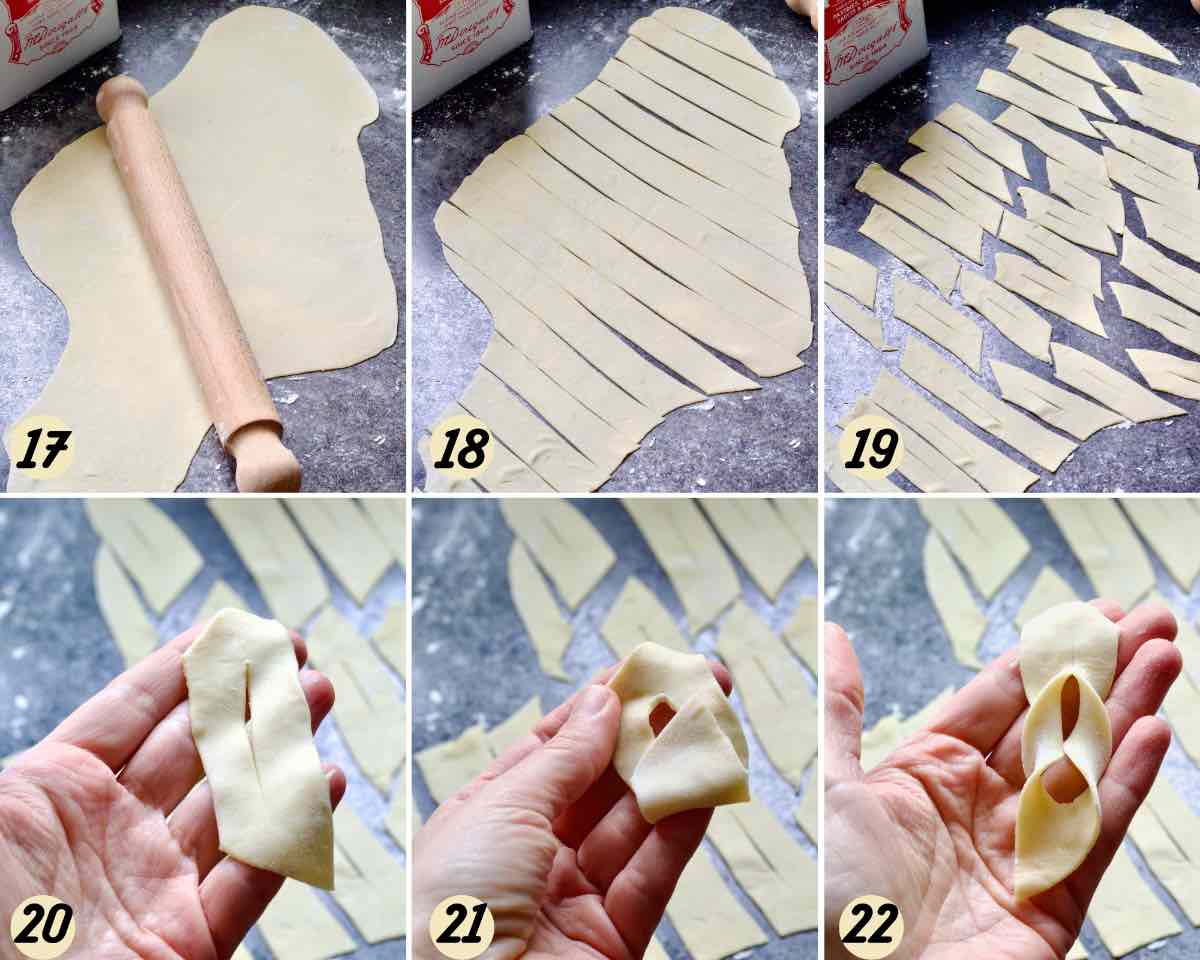
Cut the dough in half or even into 3 pieces (it will be easier to work with less dough at a time) and cover remaining piece(s) with clean kitchen towel.
Dust your worktop and rolling pin well with flour and roll out the dough as thinly as you can. You want to be able to see through it (2mm max).
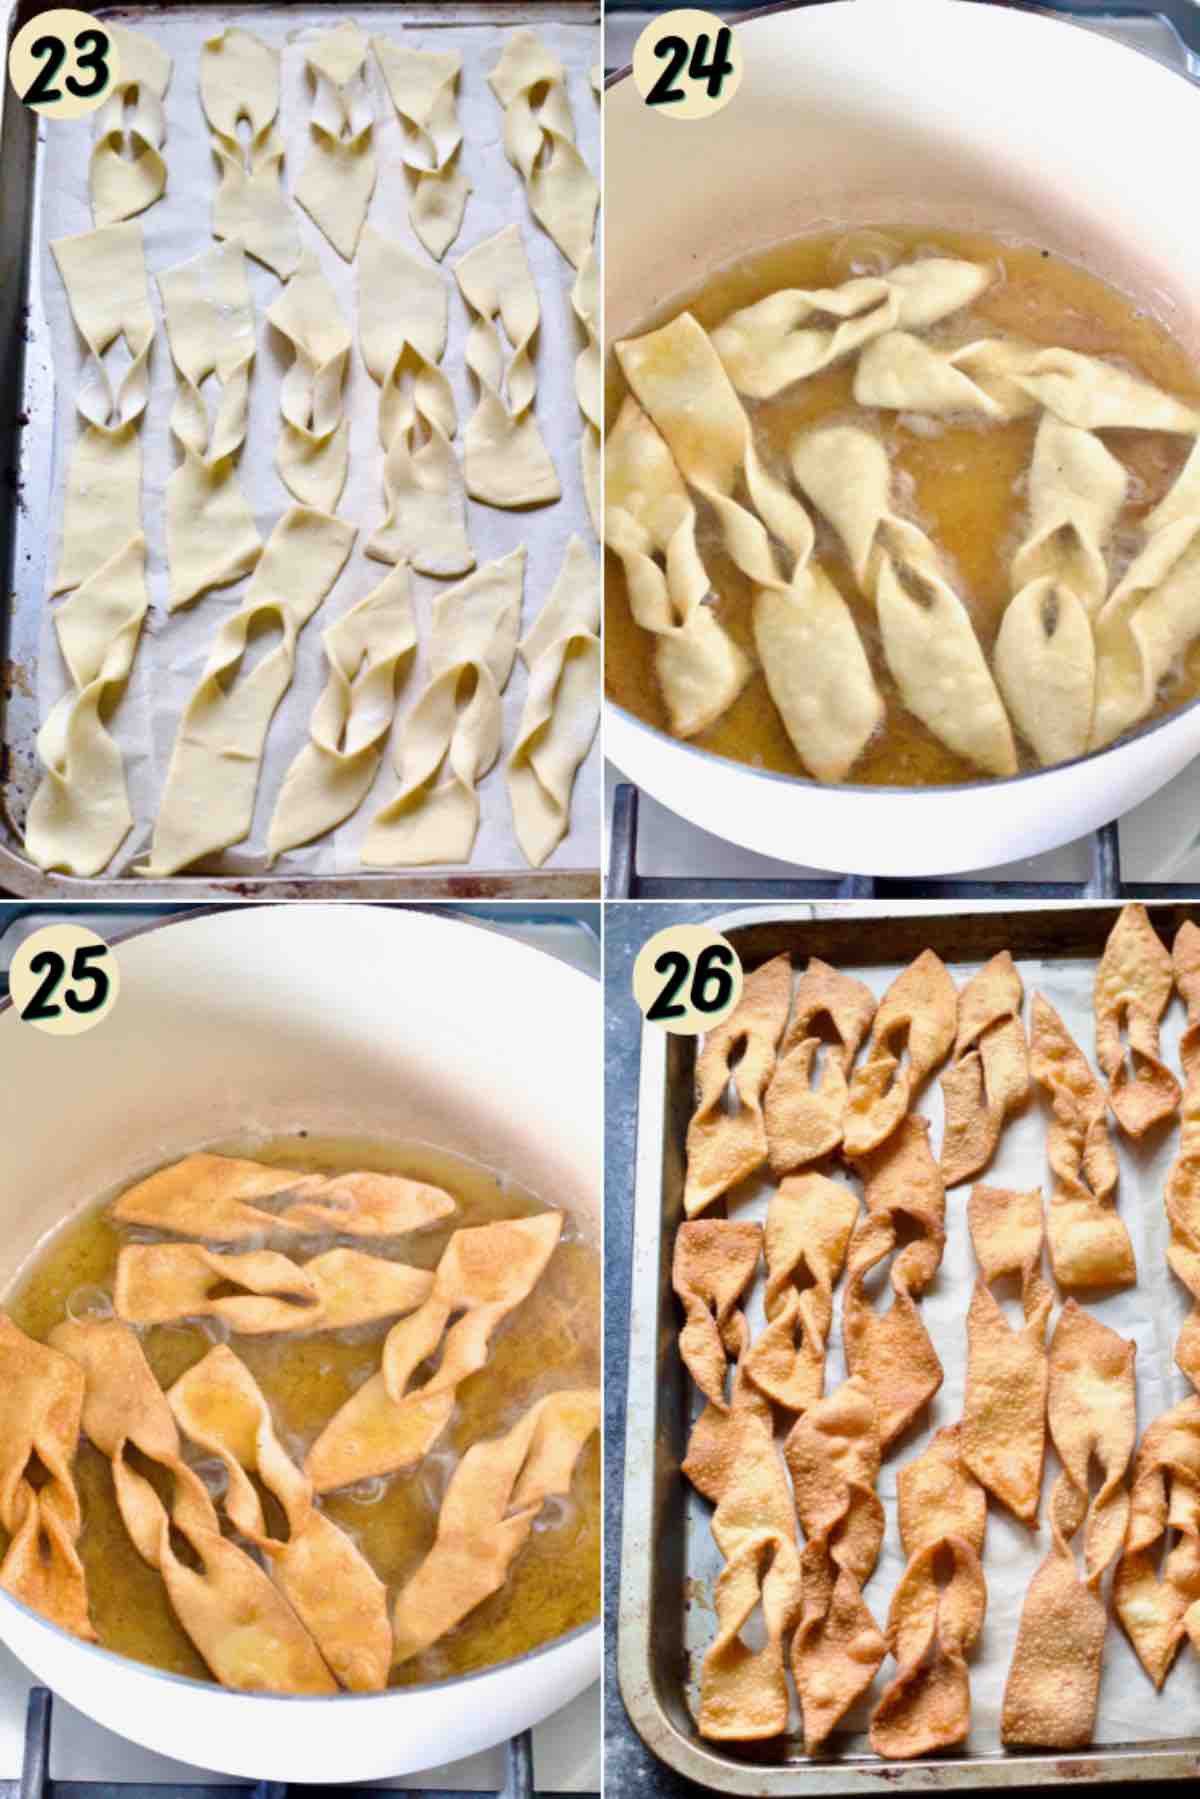
Using a knife or a pastry cutter, cut the dough into strips (3-4cm or 1-1.5in wide) and then each long piece into shorter ones at a slight angle (about 10cm/4in in length each but can be longer or shorter).
Cut approx. 2cm incision in each piece of dough and shape faworki by pulling one end of dough through, straightening it gently and placing on prepared tray covered with baking paper to prevent them from sticking.
Repeat with all the remaining pieces.
In a large pan or deep frying pan, heat up 300-500ml of oil until it reaches 170-180°C (338-356°F).
***QUICK TIP***Use digital kitchen thermometer if you've got one or if you don't, submerge the end of a wooden spoon into the oil and if you see bubbles appearing around it, it means the oil is ready. Alternatively, drop small piece of dough into the oil and if it sizzles and floats to the top, you are ready to go.
Fry faworki, few at a time, in hot oil until light golden in colour (30-45 seconds per side). Watch them at all times as they cook very fast.
***QUICK TIP*** Use two forks to flip faworki onto other side. Don't overcrowd the pan as that will make oil temperature drop and will make faworki soak up more fat. You want to keep oil temperature at a steady 170-180°C (338-356°F).
Remove them onto a plate or baking tray lined with kitchen towels to soak up some of the fat. Repeat with remaining faworki.
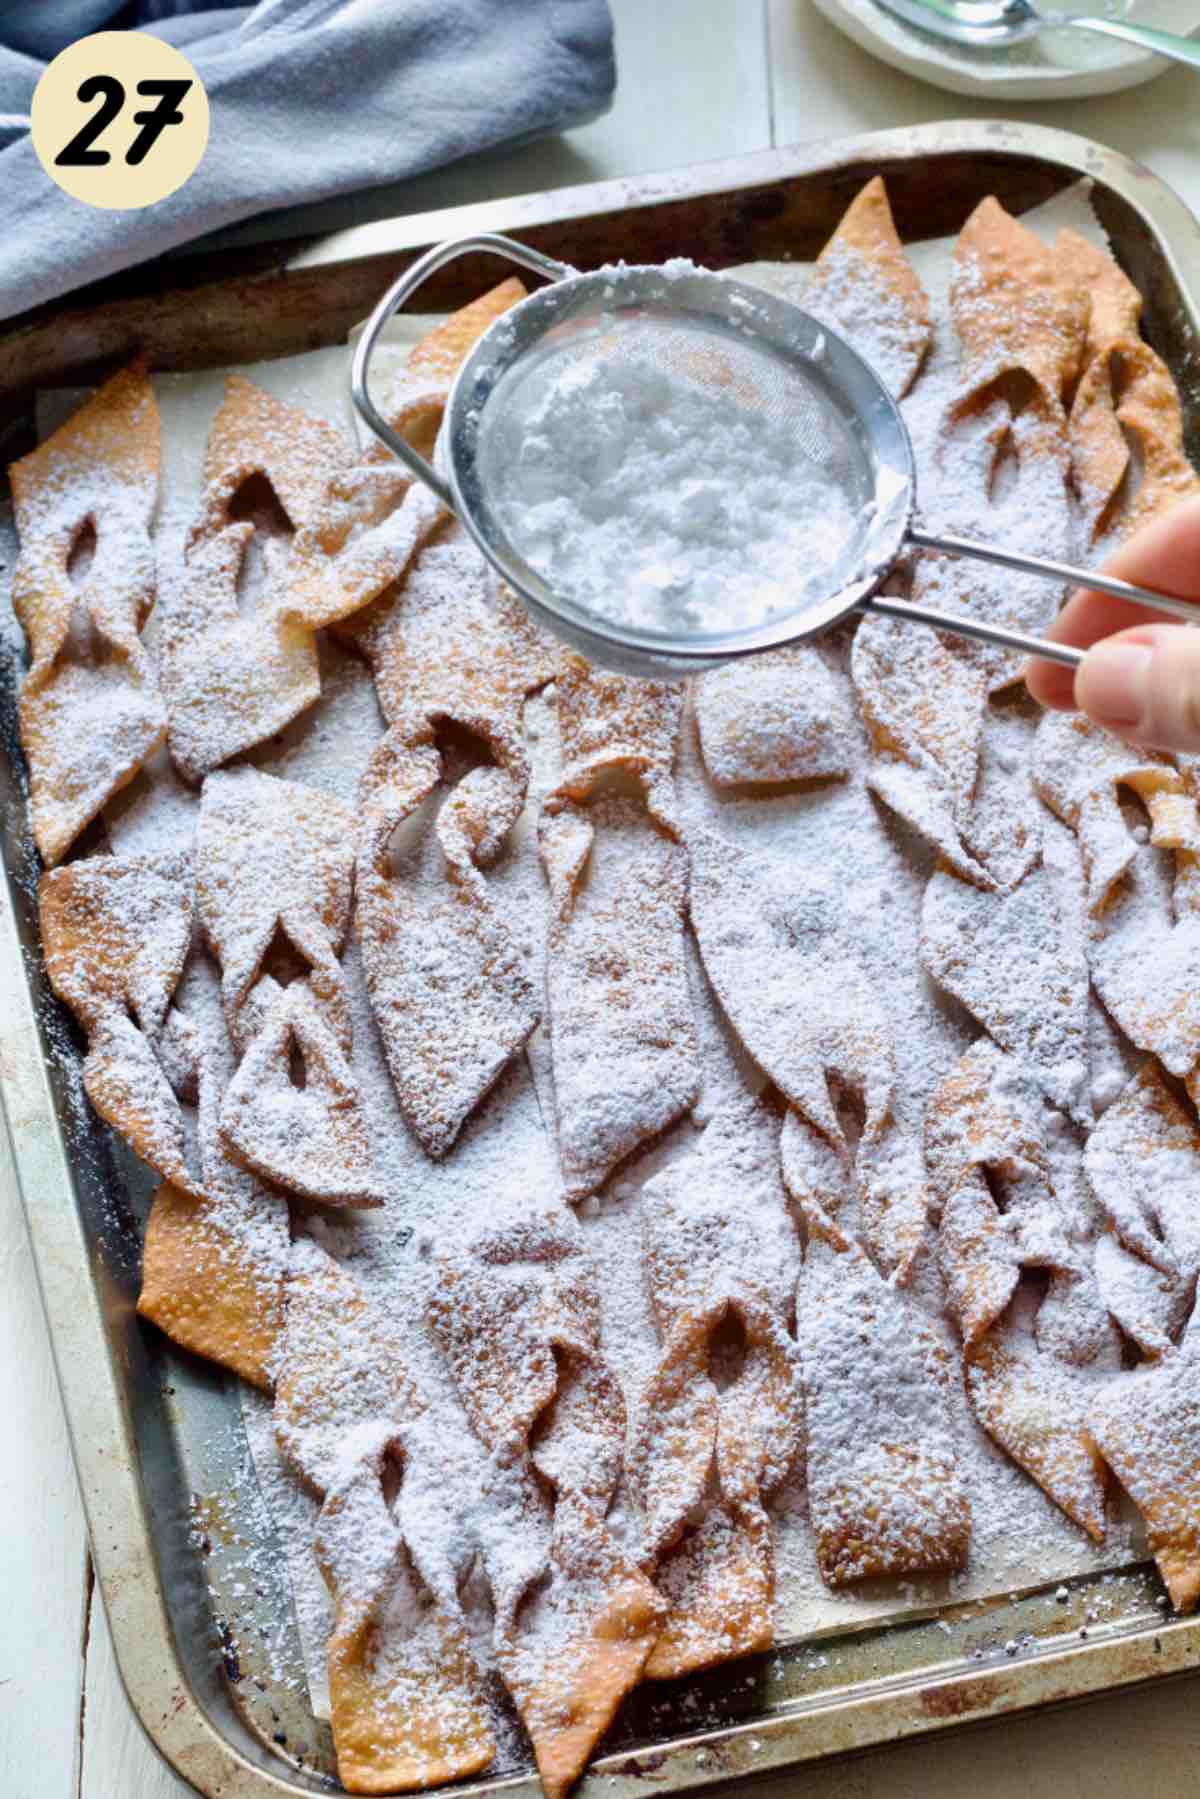
Dust faworki generously with icing sugar and you're ready to serve!
***QUICK TIP*** If you dust faworki with icing sugar while they're still warm it will stick better.
🥡 Storing
Store: Even though chruściki are definitely the best on the day you make them, they actually keep really well.
They shouldn't be kept in the fridge but instead on the counter in the airtight container where they can be stored even for up to 5 days. The trick to storing them is to keep them dry and away from any source of moisture.
Unused dough can be stored in the fridge for up to 2 days. Make sure to take it out of the fridge 30 minutes before you'd like to make faworki.
Freeze: Although faworki are not suitable for freezing, the dough freezes really well. I like to freeze it in a reusable ziplock style bag. Don't freeze for longer than 3 months. Defrost in the fridge overnight.
💭 Pro Tips
Weigh out your pastry ingredients using simple kitchen scales. In certain recipes accuracy is everything.
Use fluted pastry cutter to cut faworki. It will give them lovely finish.
Really take your time with the dough. The more kneading, rolling out, folding, bashing with the rolling pin you do the better the faworki.
When faworki dough is ready, cut it into 2 or even 3 pieces. It will make rolling it out much easier (unless you have a large countertop). Keep remaining pieces covered with tea towel to prevent them from drying out.
When frying faworki keep an eye on them at all times. They cook super quickly and burn easily.
Keep the oil at steady temperature. If you see that faworki get a bit too brown too quickly, lower the heat. Conversely, if they take much longer than 30-45 sec per side, the fat is too cold so turn the heat up a bit.
To make icing sugar stick to faworki better, dust them when still warm. Having said that, if you don't have many mouths to feed and would like faworki to stay crispy for longer only dust the amount you'll be serving and store the rest "naked". Dust with icing sugar before serving.
❓ FAQ
Definitely don't throw them away. You can mix them with another couple of eggs to make omelette, freeze for later (making a note of how many there are) or make a dessert like Pavlova.
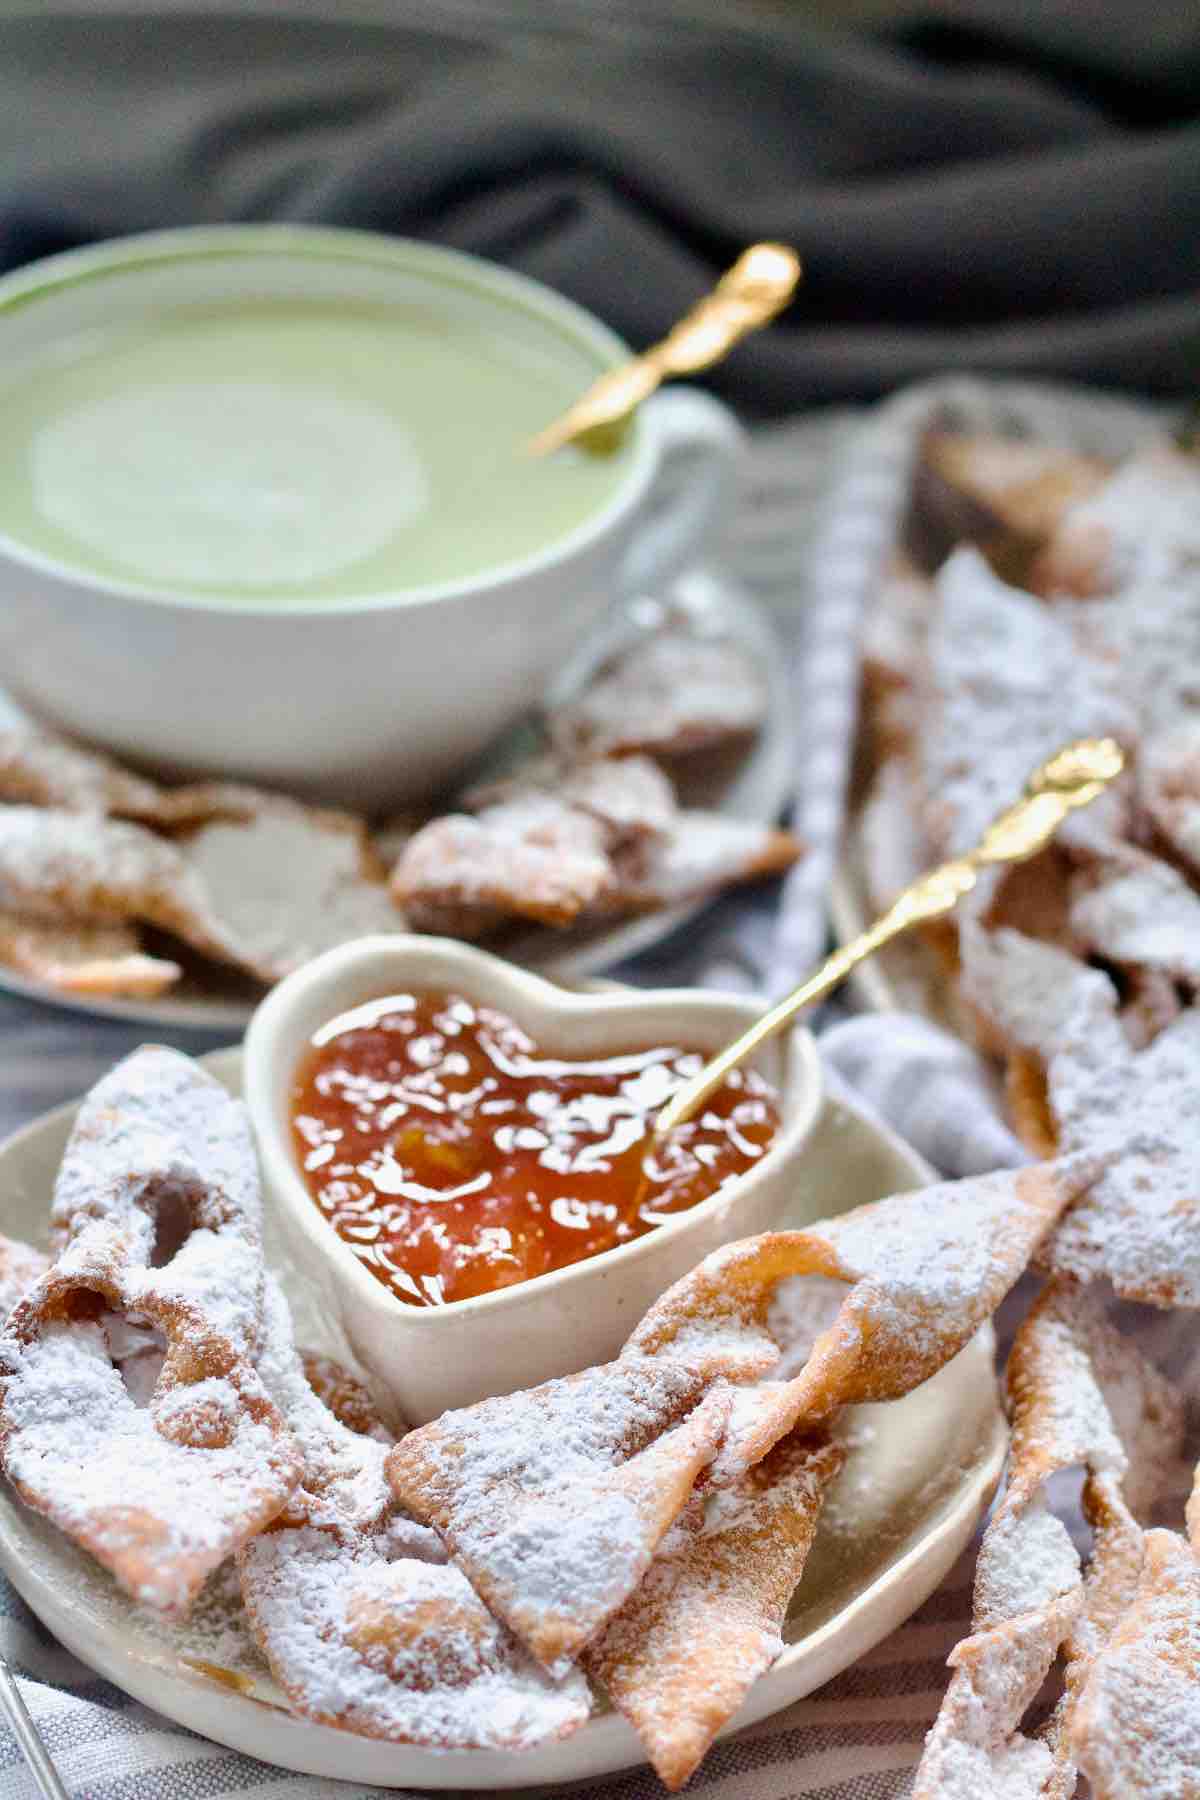
In Poland they are eaten very simply as they are, perhaps accompanied by a cup of tea or coffee. Having said that, my kids love them with a little bit of homemade plum jam. You could try any other jam of course or even your favourite chocolate spread. 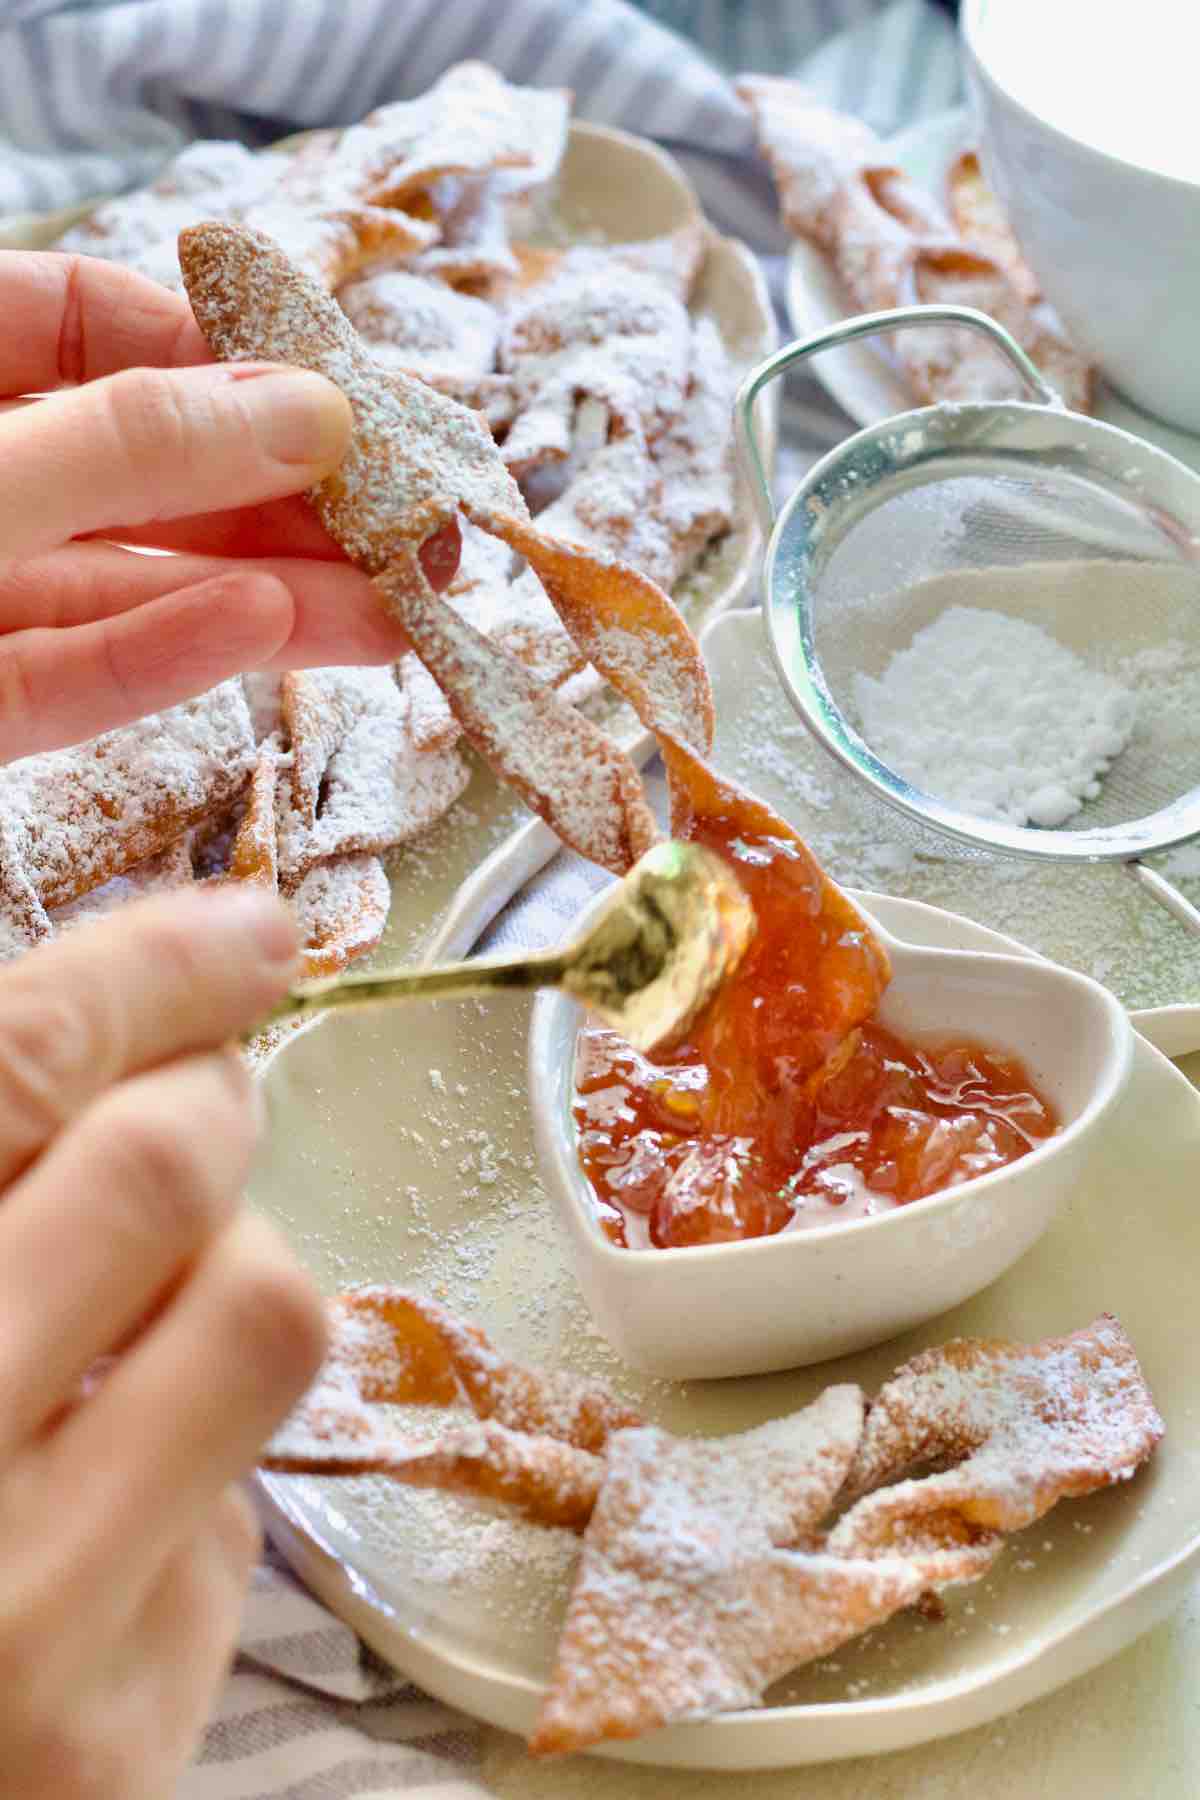
I'm afraid I haven't tried making them with gluten-free flour so am not sure how it would work with this type of dough.
Have you tried my Faworki recipe?
Please consider giving it ⭐️⭐️⭐️⭐️⭐️ rating in recipe card below and share your views or tips in the comments.
😋 More Polish recipes for you to try
Mizeria (Polish Cucumber Salad)
Botwinka (Polish Beet Greens Soup)
Jagodzianki (Polish Blueberry Buns)
Polish Apple Cake (Szarlotka)
📋 Recipe
Polish Faworki (Chrust, Chruściki)
Equipment
- Large Cast Iron Round Casserole Pan, 26 cm* This is what I use but any large pan or deep frying pan will be good.
Ingredients
Dough
- 200 g plain (all-purpose) flour
- 3 large egg yolks (55g/1.9oz in weight)
- 70 g soya yogurt or regular yogurt or sour cream
- 1 tablespoon icing sugar
- 1 teaspoon vanilla extract
- 2 tsps vodka or apple cider vinegar other vinegars can be used as well
- pinch of salt
Frying
- 500 ml cold-pressed rapeseed oil or any other neutral oil with high smoke point
Serving
- lots of icing sugar
Instructions
Making dough
- Add flour, icing sugar, salt, egg yolks, yogurt, vinegar and vanilla extract into a large bowl or bowl of standing mixer. If using standing mixer, use dough hook attachment and knead until dough starts coming together. First it will have this "shaggy" appearance for a while (it's initially very dry) but it will eventually come together.If making dough by hand, you can start by mixing it with a wooden spoon and then moving onto bringing dough together with your hand until it forms a ball. Again, it will feel very dry at first but do refrain from adding any extra moisture.200 g plain (all-purpose) flour, 3 large egg yolks (55g/1.9oz in weight), 70 g soya yogurt or regular yogurt or sour cream, 1 tablespoon icing sugar, 1 teaspoon vanilla extract, 2 tsps vodka or apple cider vinegar, pinch of salt
- Move the dough to the worktop dusted with flour and start rolling it out. Once rolled out, fold third of the dough from the top in and third of the dough from the bottom in (you can keep folding it even smaller if you want to) and give it a good "beating" with a rolling pin before rolling it out again.You will have to repeat the process quite a few times in order to aerate the dough properly which is the key to the success with faworki. I usually allow myself at least 10 minutes of rolling, folding, "beating" and rolling the dough out again. The "beating" bit is not strictly necessary but it does help in achieving super crispy and light faworki.***Quick Tip*** If you happen to have pasta machine or meat grinder, you can achieve the same effect by running your dough through one of them.If using meat grinder use the attachment with the largest holes and run the dough through 2 or 3 times.As you keep going you will notice that dough is getting smoother and smoother and really nice to work with.After about 10 minutes of hard work you will have nice and smooth ball of dough. At this point you can cover the dough to prevent it from drying out and let it rest for about half an hour. It is supposed to make rolling it out easier. Personally, I haven't noticed much difference to when I use it straight away so I tend to go straight to rolling out the dough and cutting and shaping faworki.***Quick Tip*** If you are making faworki ahead of time you would put the dough into plastic bag (reusable ziplock style bag work great) and put it in the fridge for up to 2 days. If you'd like to keep it for longer, I would recommend freezing.
Cutting and shaping faworki
- Cut the dough in half or even into 3 pieces (it will be easier to work with less dough at a time) and cover remaining piece(s) with clean kitchen towel.Dust your worktop and rolling pin well with flour and roll out the dough as thinly as you can. You want to be able to see through it (2mm max).Using knife or a pastry cutter, cut the dough into strips (3-4cm or 1-1.5in wide) and then each long piece into shorter ones at a slight angle (about 10cm/4in in length each but can be longer or shorter).Cut approx. 2cm/0.8in incision in each piece of dough and shape faworki by pulling one end of dough through, straightening it gently and placing on prepared tray covered with baking paper to prevent them from sticking. Repeat with all the remaining pieces.
Frying
- In a large pan or deep frying pan, heat up 300-500ml of oil until it reaches 170-180°C (338-356°F). ***Quick Tip***Use digital kitchen thermometer if you've got one or if you don't, submerge the end of a wooden spoon into the oil and if you see bubbles appearing around it, it means the oil is ready. Alternatively, drop small piece of dough into the oil and if it sizzles and floats to the top, you are ready to go.Fry faworki, few at a time, in hot oil until light golden in colour (30-60 seconds per side). Watch them at all times as they cook very fast. ***Quick Tip*** Use two forks to flip faworki onto other side. Don't overcrowd the pan as that will make oil temperature drop and will make faworki soak up more fat. You want to keep oil temperature at a steady 170-180°C (338-356°F).Remove them onto a plate or baking tray lined with kitchen towels to soak up some of the fat. Repeat with remaining faworki.500 ml cold-pressed rapeseed oil
- Dust faworki generously with icing sugar and you're ready to serve! ***QUICK TIP*** Dust faworki with icing sugar while they're still warm. It will make sugar stick better.lots of icing sugar
Notes
- Nutritional information is very approximate as number of faworki will depend on the size you choose to make them. My calculations are based on 50 faworki and don't include oil for frying or icing sugar for dusting.
- Faworki are best on the day they're made but can be stored on the countertop in the airtight container even for up to 5 days. For more information refer to Storage paragraph.
- Dough itself is freezer friendly.




Comments
No Comments