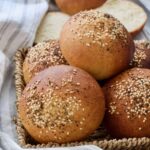
Easy Bread Rolls
These delicious and easy to make bread rolls are super versatile. Perfect for sandwiches or as burger buns, they're soft in the middle with slightly chewy crust. Yum!
Servings 8 bread rolls
Calories 310kcal
Equipment
Ingredients
- 500 g strong bread flour plain white (all-purpose) flour will also work here
- 2 teaspoon dry yeast (7g sachet)
- 250 ml oat milk or any other neutral tasting plant milk warmed up slightly
- ½ teaspoon salt
- 50 g caster sugar
- 40 g vegan block butter or margarine (softenend) or 2 tablespoon rapeseed/sunflower oil
Glaze
- ½ tablespoon oat milk
- ½ tablespoon agave syrup
- sesame and poppy seeds to top your rolls with
Instructions
- Put flour, sugar, salt and yeast in a large bowl or a bowl of your stand mixer. Make sure you keep salt and yeast separate to prevent salt from “killing” the yeast.
- Give all the dry ingredients a gentle mix first before adding softened butter/margarine and oat milk (or any other milk you choose to use).
- Start kneading the dough using dough hook on your stand mixer or by hand until you get an elastic ball of dough which is not sticky and springs back when you press it with your finger. You shouldn’t need to add any additional flour to come to this point but if you do (as flours do differ), try and use as little as possible.
- At this point use you fist to deflate the dough, turn it out onto the kitchen counter and give it a quick knead with your hands.
- Divide your dough into 8 round balls (try and keep them even in size as much as you can). Feel free to follow my roll shaping technique below or go with your own.
Shaping bread rolls
- To shape a roll I take one piece of dough and flatten it slightly with my fingers or the palm of my hand to create a flat triangle.
- Next, I start bringing pieces of dough into the middle, making my way around until I have a shape of a round roll which at this point will be a bit flat.
- Then I put the roll on the kitchen counter (smooth side up), cap it with my hand and start rolling it in place very gently using circular motion which makes it nice and round.
- Finally, I turn my roll seam side up and give it a little pinch with my fingers to hold it together and that's that. I repeat the process with the remaining rolls.
Baking bread rolls
- Line your baking sheet with baking paper and arrange your rolls on it ensuring you leave a little room in between each roll to allow for their expansion.
- Cover them gently with a clean tea towel and leave somewhere draft-free to roughly double in size (it will take around 1 hr).
- Preheat the oven to 200C/400F/Gas Mark 6.
- Once the rolls had time to puff up prepare the glaze by mixing together oat milk and agave syrup and brush it over the rolls with pastry brush.
- Sprinkle the top of the rolls with your choice of topping – I like sesame and poppy seeds.
- Bake your rolls in preheated oven for 12-15 minutes or until golden on top and sound hollow when tapped on the bottom.
- Cool on the cooling rack and enjoy!
Video
Notes
- Nutritional values are approximate, per roll and should be treated as a guideline only.
- The rolls will stay fresh for 2-3 days if stored in resealable plastic bag in your bread bin. Make sure they are completely cool before putting them away.
- Freezer friendly.
- Signs to look for when determining whether your dough had enough kneading are:
– the elasticity of the dough
– lack of stickiness
– the dough should spring back when you press it with your finger - Kneading dough by hand might take you even up to 10 minutes to get to this point whereas in the stand mixer around 5.
- You shouldn’t have to add any extra flour to your dough when kneading. However, some flours do differ so in case your dough is still sticky and you’re not getting anywhere with it after you’ve been kneading it for a while then add a little extra flour at a time. Try and keep it to minimum though.
- Ovens do differ and I do say that a lot but it’s an important bit. The time given in my recipe below is approximate. It takes 12-15 minutes to bake these rolls in my fan oven at 200C/400F. I find that sometimes I need to turn the tray with rolls around half way through baking time for even colour and so that the rolls closer to the back of the oven don’t burn (the joys of my oven I’m afraid). Once you bake these rolls for the first time you’ll have better idea of timings for your oven.
- The rolls are ready when nice and brown on top and sound hollow as you tap them on the bottom.
Nutrition
Calories: 310kcal | Carbohydrates: 57g | Protein: 9g | Fat: 5g | Saturated Fat: 1g | Sodium: 196mg | Potassium: 107mg | Fiber: 3g | Sugar: 10g | Vitamin A: 256IU | Calcium: 56mg | Iron: 1mg